User Guide
I. Platform Introduction
1.1 Welcome Message
Dear User,
Welcome to the Lead-to-Win Acceleration AI Platform, and let's embark on a new journey of global business development! Our platform provides one-stop full-process AI sales and pre-sales tools, including Opportunity Workspace, Customer Deep Insight, Sales Email Coach , Smart Poster Generator, Pain Point Discovery , Solution Generation , Demo & Training , etc. We are committed to helping B2B clients offering enterprise services and Non-standard Products break through geographical limitations and achieve efficient and precise business development and business growth in the global market.
1.2 Platform Positioning and Target Users
The Lead-to-Win Acceleration AI Platform is primarily oriented towards B2B clients providing enterprise services and Non-standard Products, helping enterprises solve core challenges in global business development. The platform's target users are sales and pre-sales personnel of such enterprises.
1.3 Overview of Core Functions
The Lead-to-Win Acceleration AI Platform consists of these modules as below:
Opportunity Workspace
Customer Deep Insight
Sales Email Coach
lmage Generator
Smart Poster Generator
Pain Points Discovery
Operation Sim & Analysis
Solution Generation
Demo & Training
1.4 Technical Advantages of the Platform
Xpirory's core strength lies in using AI technology as the underlying driver to build an intelligent tool matrix covering the entire global business development process. Meanwhile, through the triple advantages of "data accuracy + cultural adaptability + efficiency-cost optimization", it has formed global business development solutions for enterprises. Its differentiated value lies not only in the functional innovation of tools but also in helping enterprises engaged in enterprise services and Non-standard Products achieve intelligent upgrades across the entire chain from "market development" to "customer conversion" through the deep integration of "technology + scenarios + industry know-how".
II. Quick Start Guide
2.1 Registration and Login
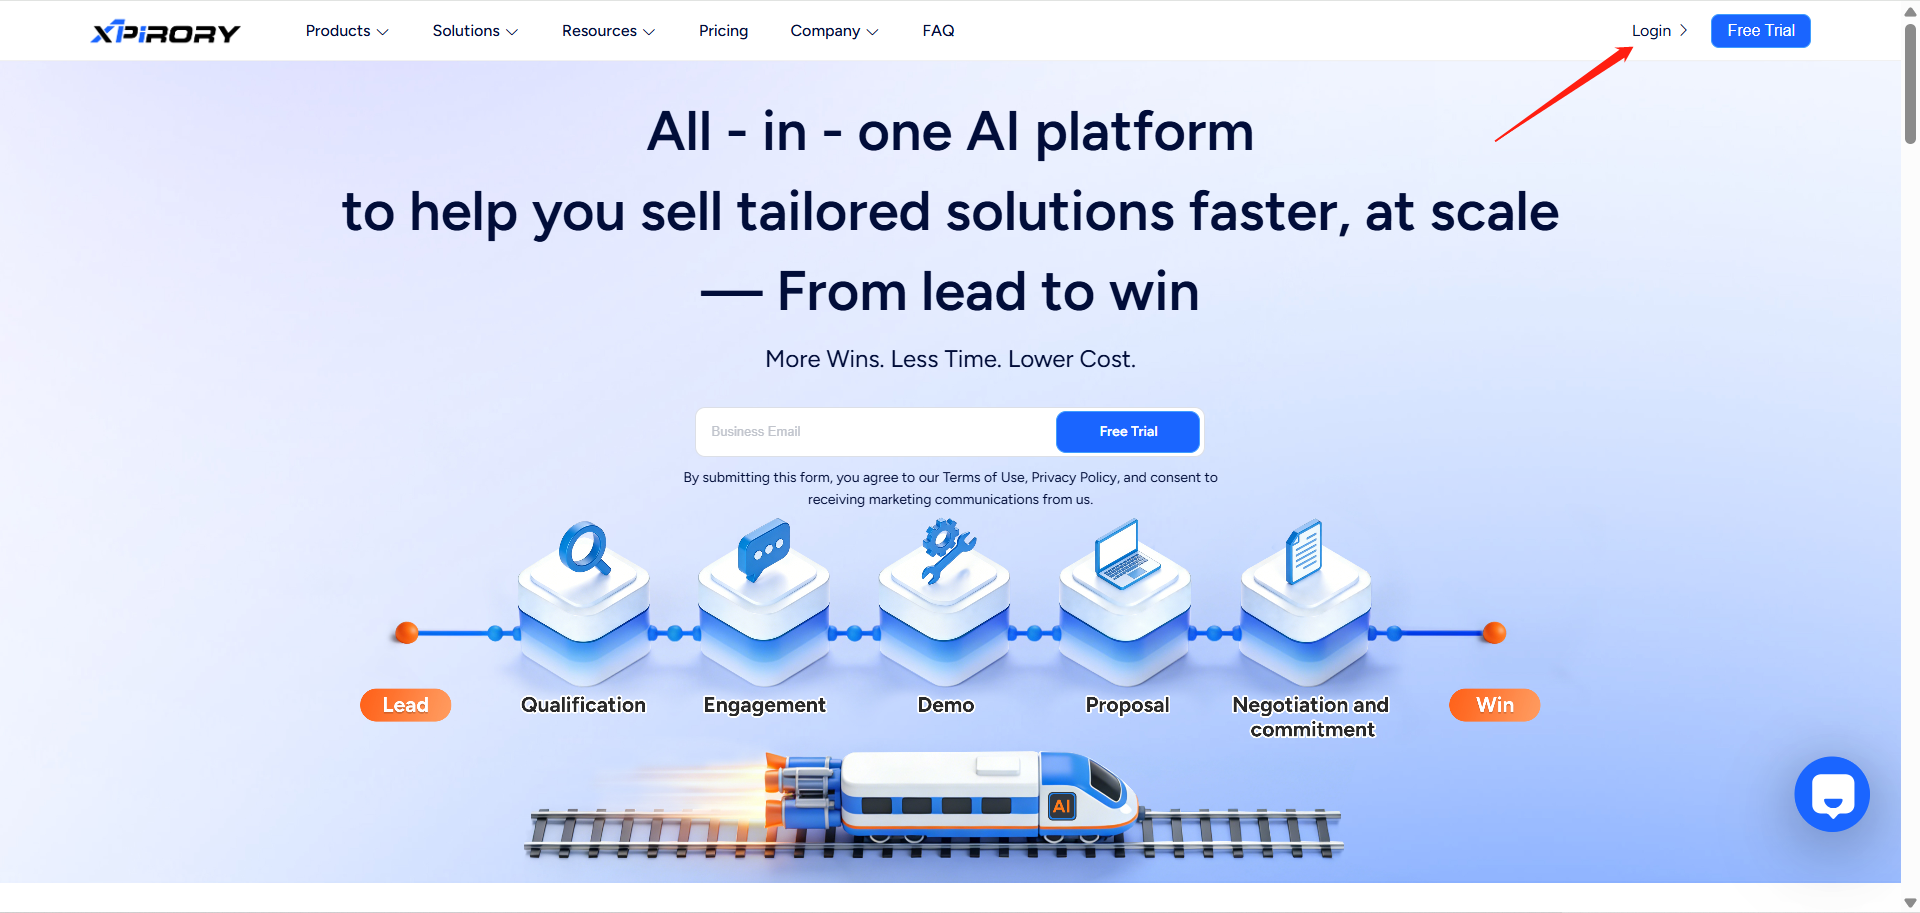
(1) You can find the login interface by clicking the Login button on the homepage of the official website.
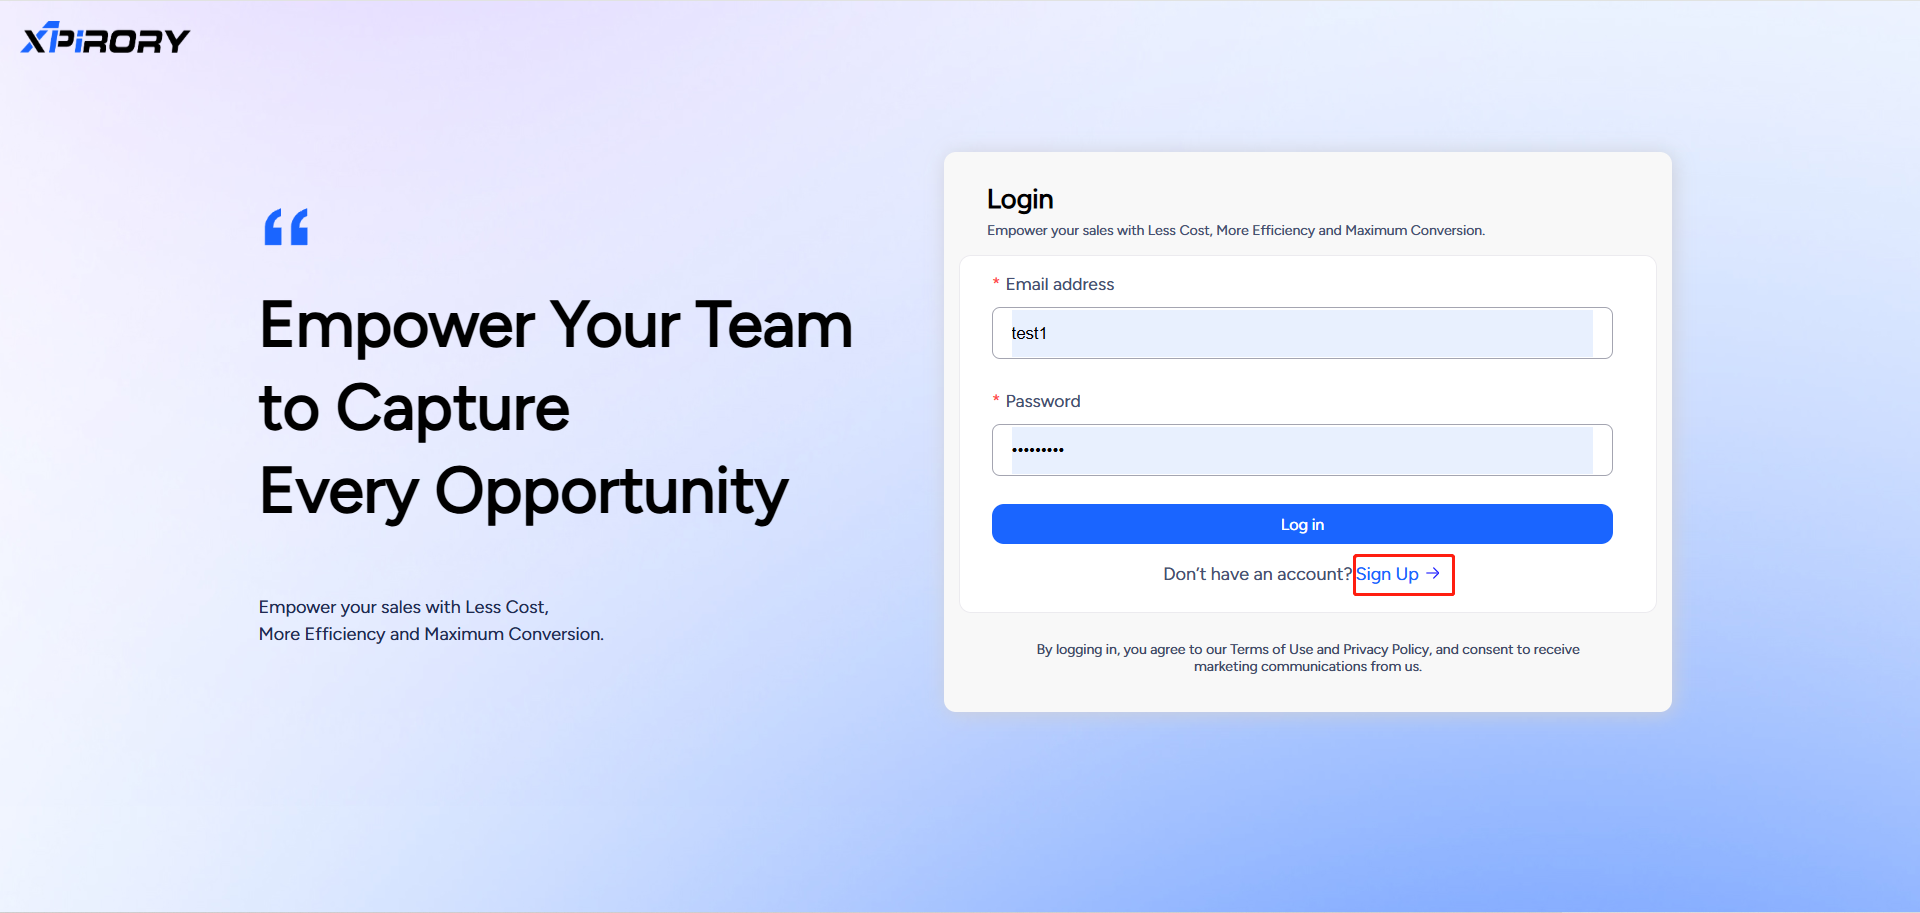
(2) On the login interface, click Sign Up to enter the account registration page.
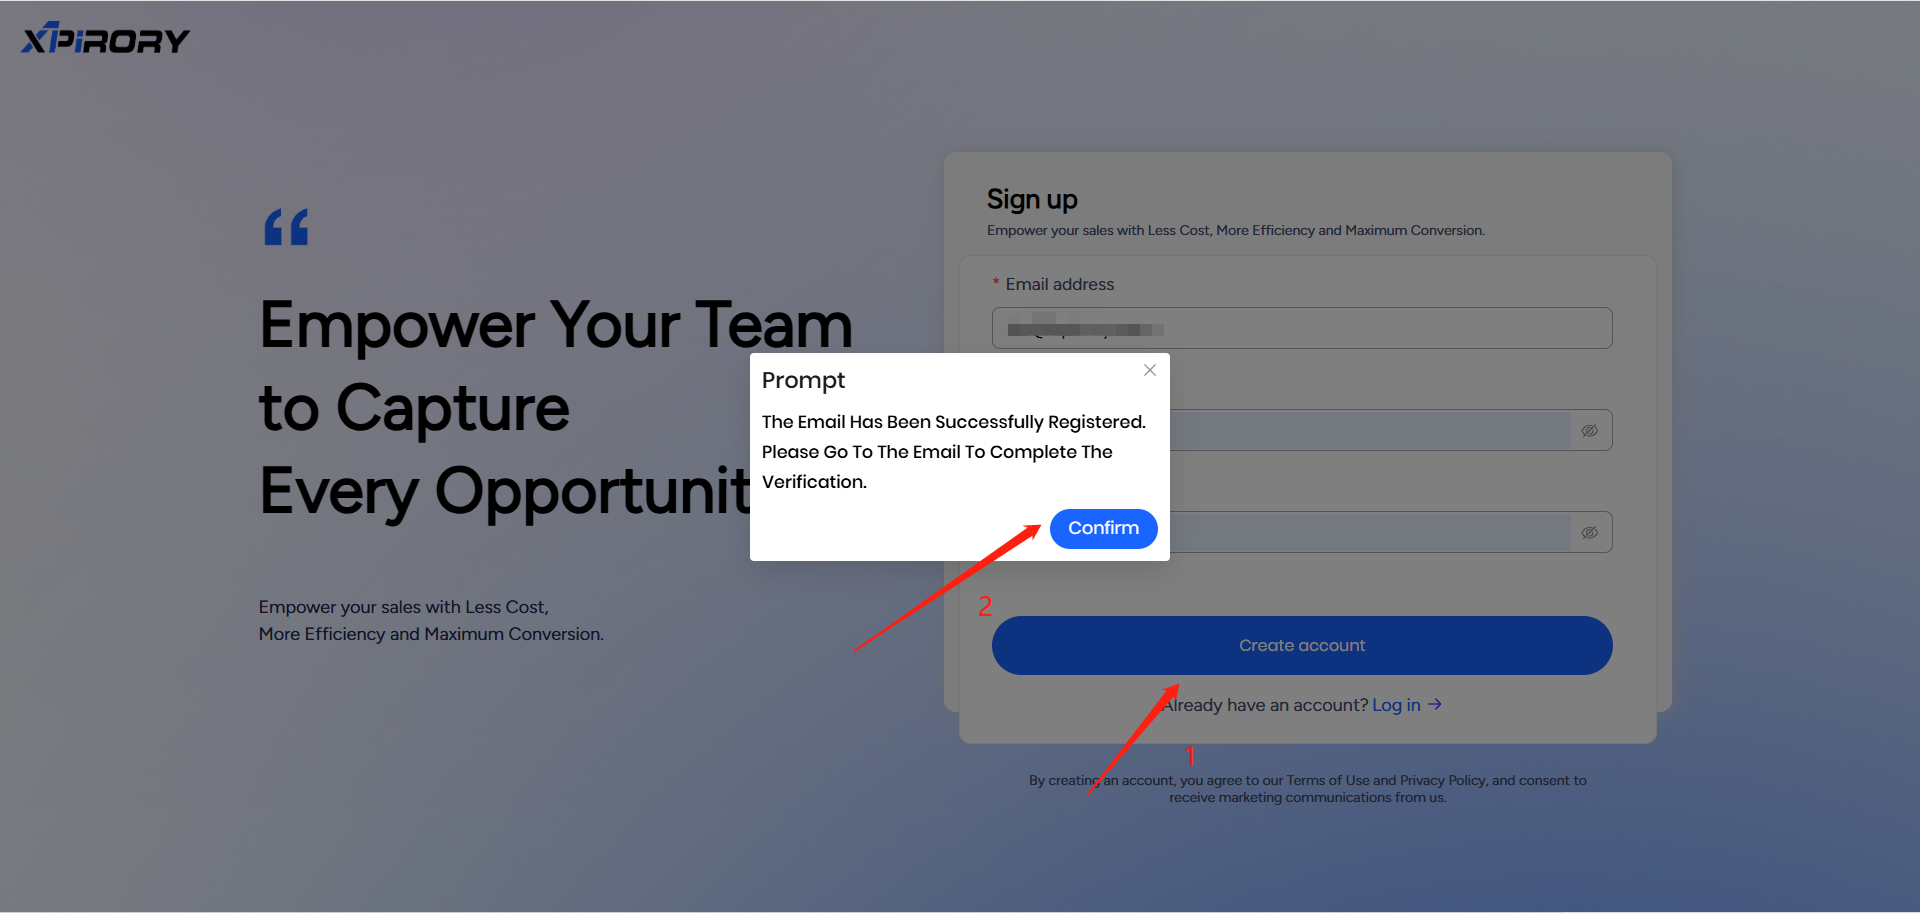
(3) Complete the registration information by entering your email address and customizing the platform login password. (Note: Please use your real email address for registration, as subsequent steps will involve email verification.)
(4) After completion, click Create account, and the system will automatically pop up a prompt for you to go to your email to complete the final verification step.
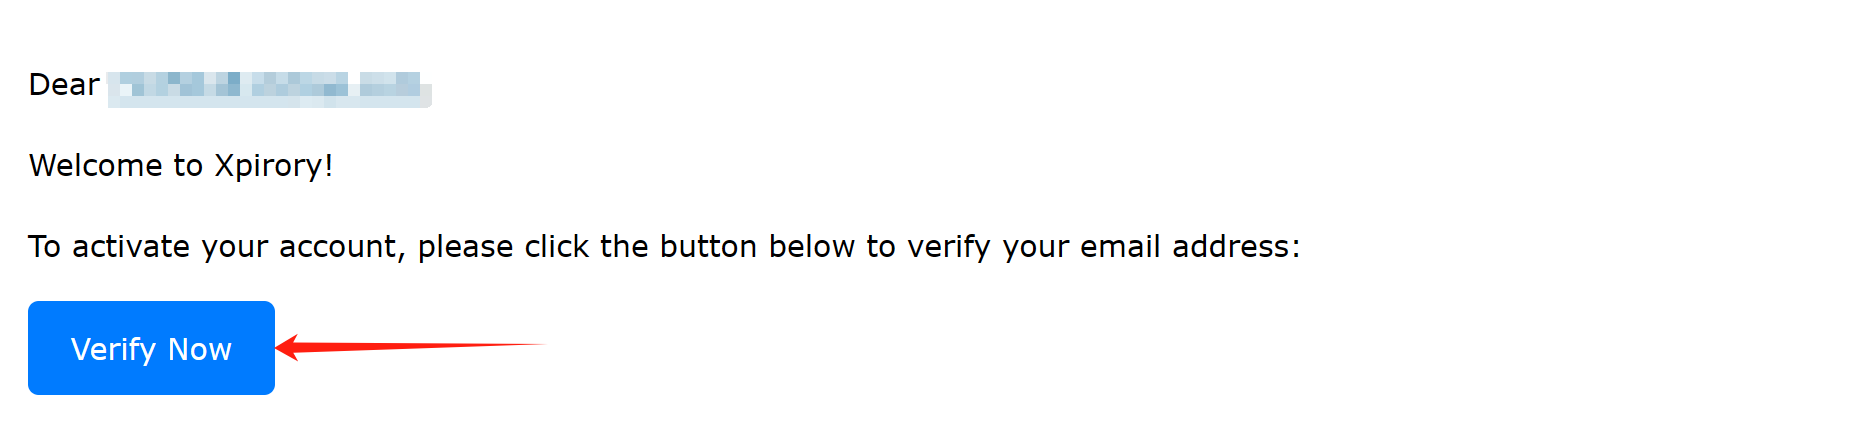
(5) At this point, you need to check your email for a message from Xpirory and click the Verify Now button to complete the verification.
(6) Upon successful verification, the webpage will automatically redirect to the login page. You can then log in to the platform by entering your login account and password again.
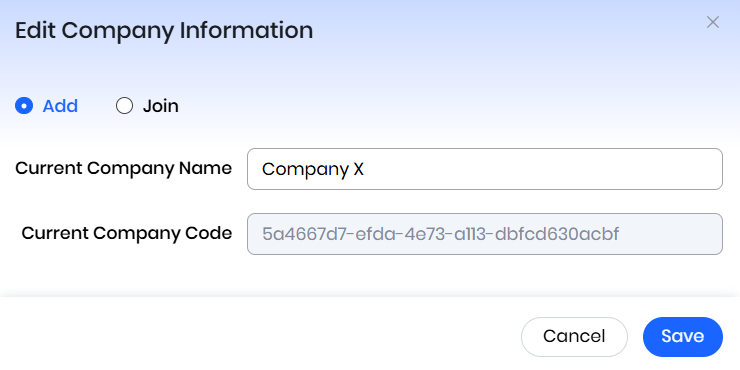
(7) After logging in, users will see a window for setting the company name.
For ordinary individual users or enterprise administrators (usually the first account of the enterprise), they can set a company name according to the actual situation to determine the association between the account and the enterprise.
For ordinary enterprise users (the second and subsequent accounts applied for and activated under the same enterprise), they can directly close this window. Then, in the Company Information section of the upper-right menu, select Join and fill in the company number provided by the enterprise administrator to join the enterprise created by the administrator, thereby enabling data sharing and unified points settlement.
2.2 Platform Interface Tour
The platform interface mainly consists of three parts: the function menu, work area, and information center.
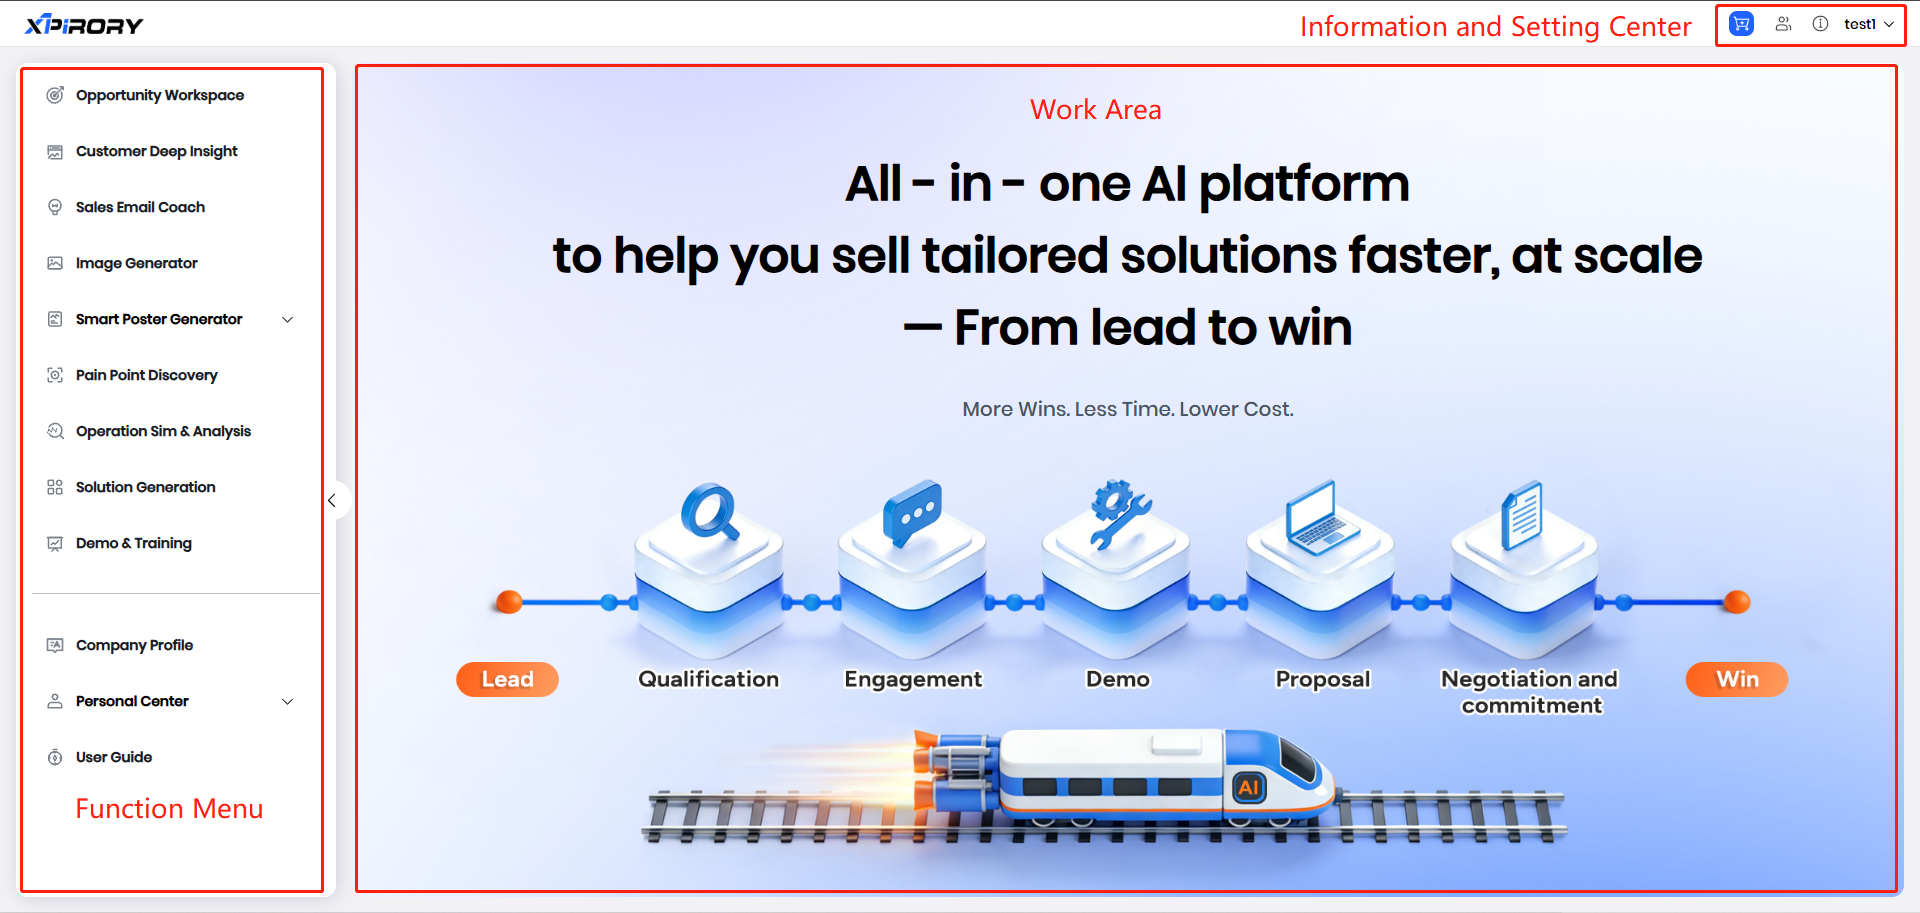
Function Menu: All major function entries of the platform are located in the function menu. You can select the corresponding function menu to access specific functions as needed.
Work Area: The main operations of each function are concentrated in the work area.
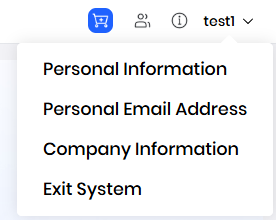
Information Center: The information center contains functions such as personal information editing, company information editing, Email binding, benefit descriptions, help center, language switching, and system logout.
2.3 Account Password Modification
Select Personal Information from the drop-down menu in the upper right corner to modify your account password in the pop-up window.
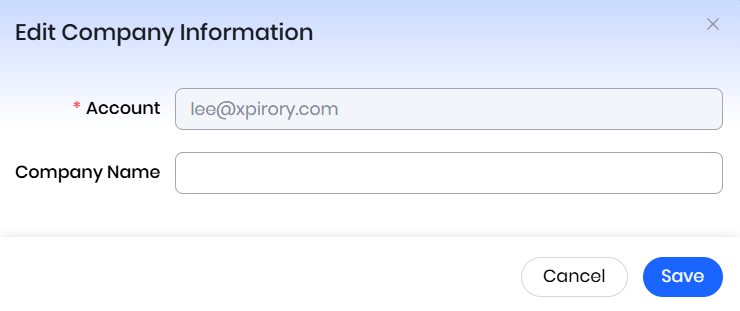
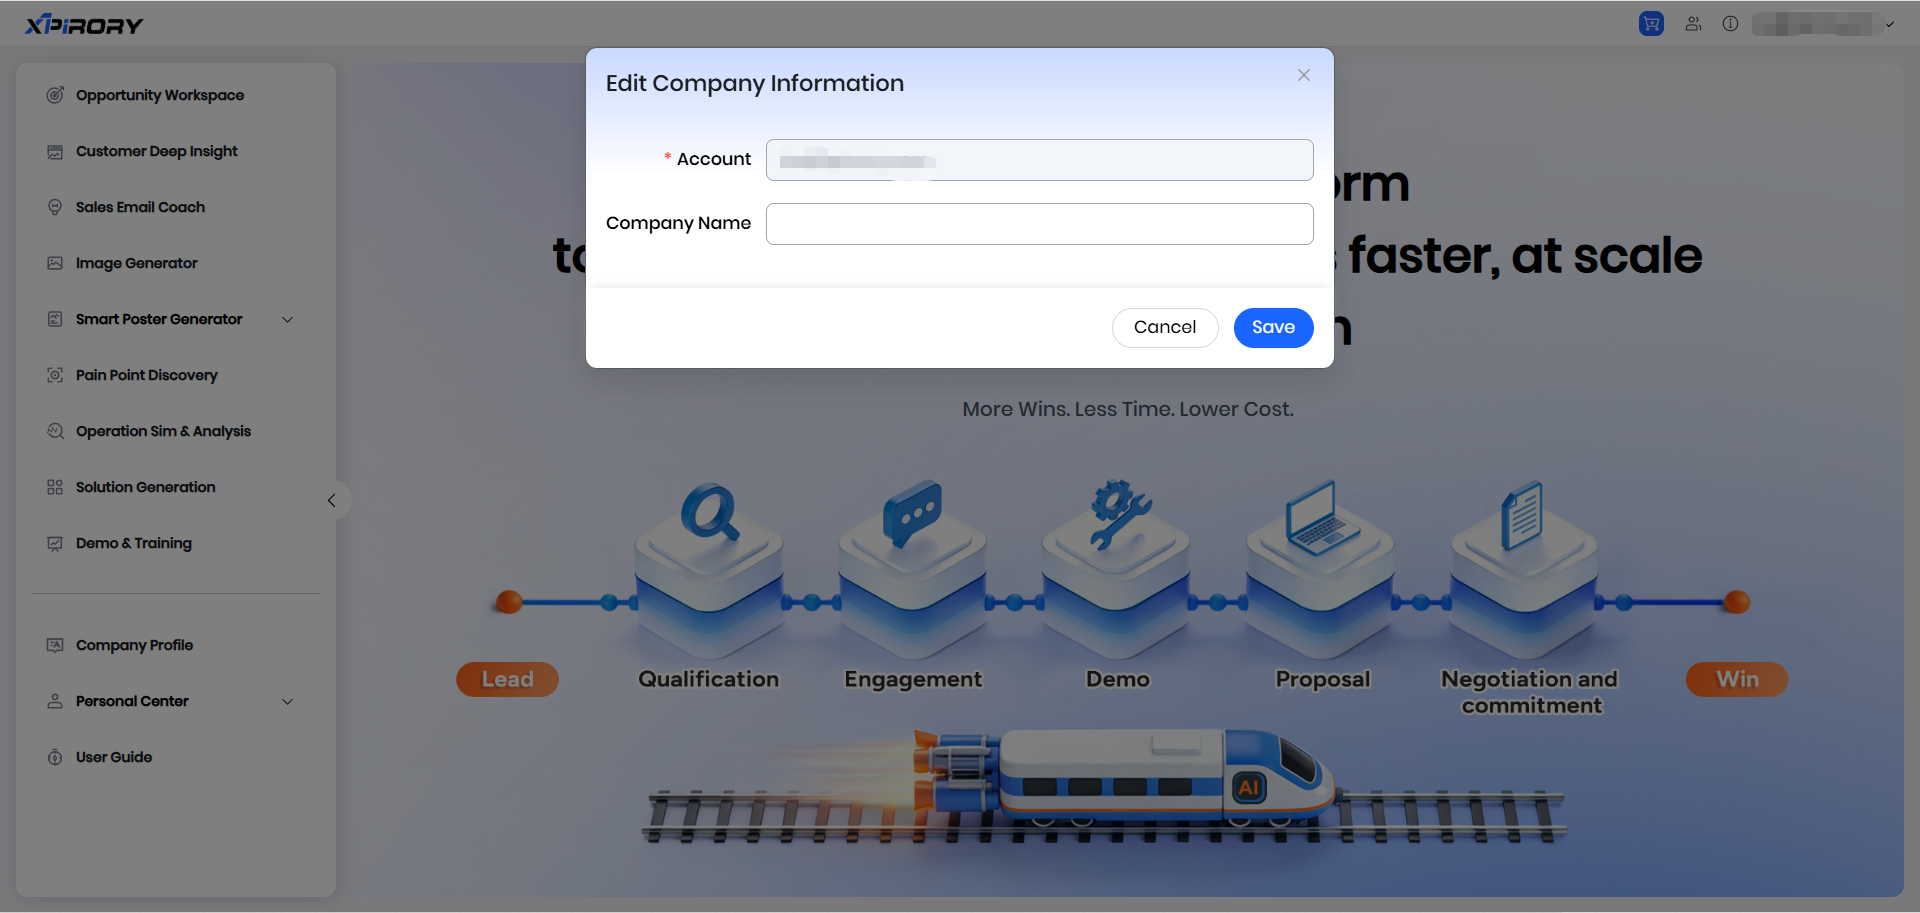
2.4 Company Name Setup
Select Company Information from the drop-down menu in the upper right corner to add your company name in the pop-up window.
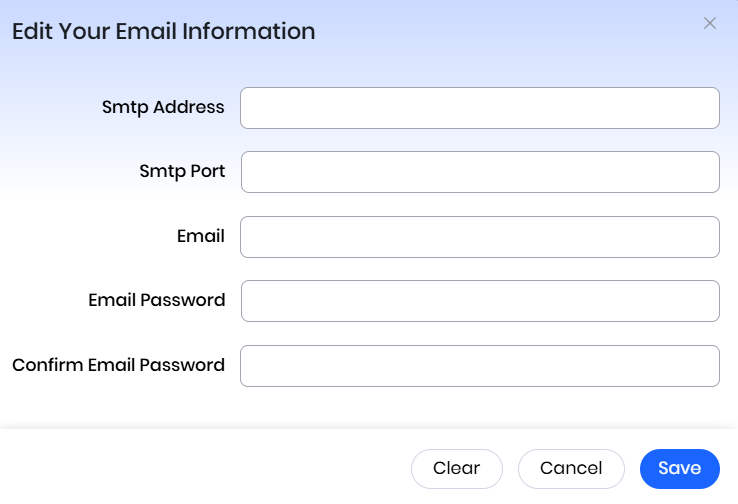
2.5 Personal Email Binding
Select Personal Email Address from the drop-down menu in the upper right corner to add and bind an email address in the pop-up window, which aids in the normal use of email sending functions on the platform.
III. Functional Operation Instructions
3.1 Opportunity Workspace
Function Overview:
Unify all Lead-to-Win data—leads, insights, proposals, and communications—into one opportunity workspace. Connect analysis, pain points, solutions, strategy, and demos, making every follow-up traceable and sales progress controllable.
Operation Steps:
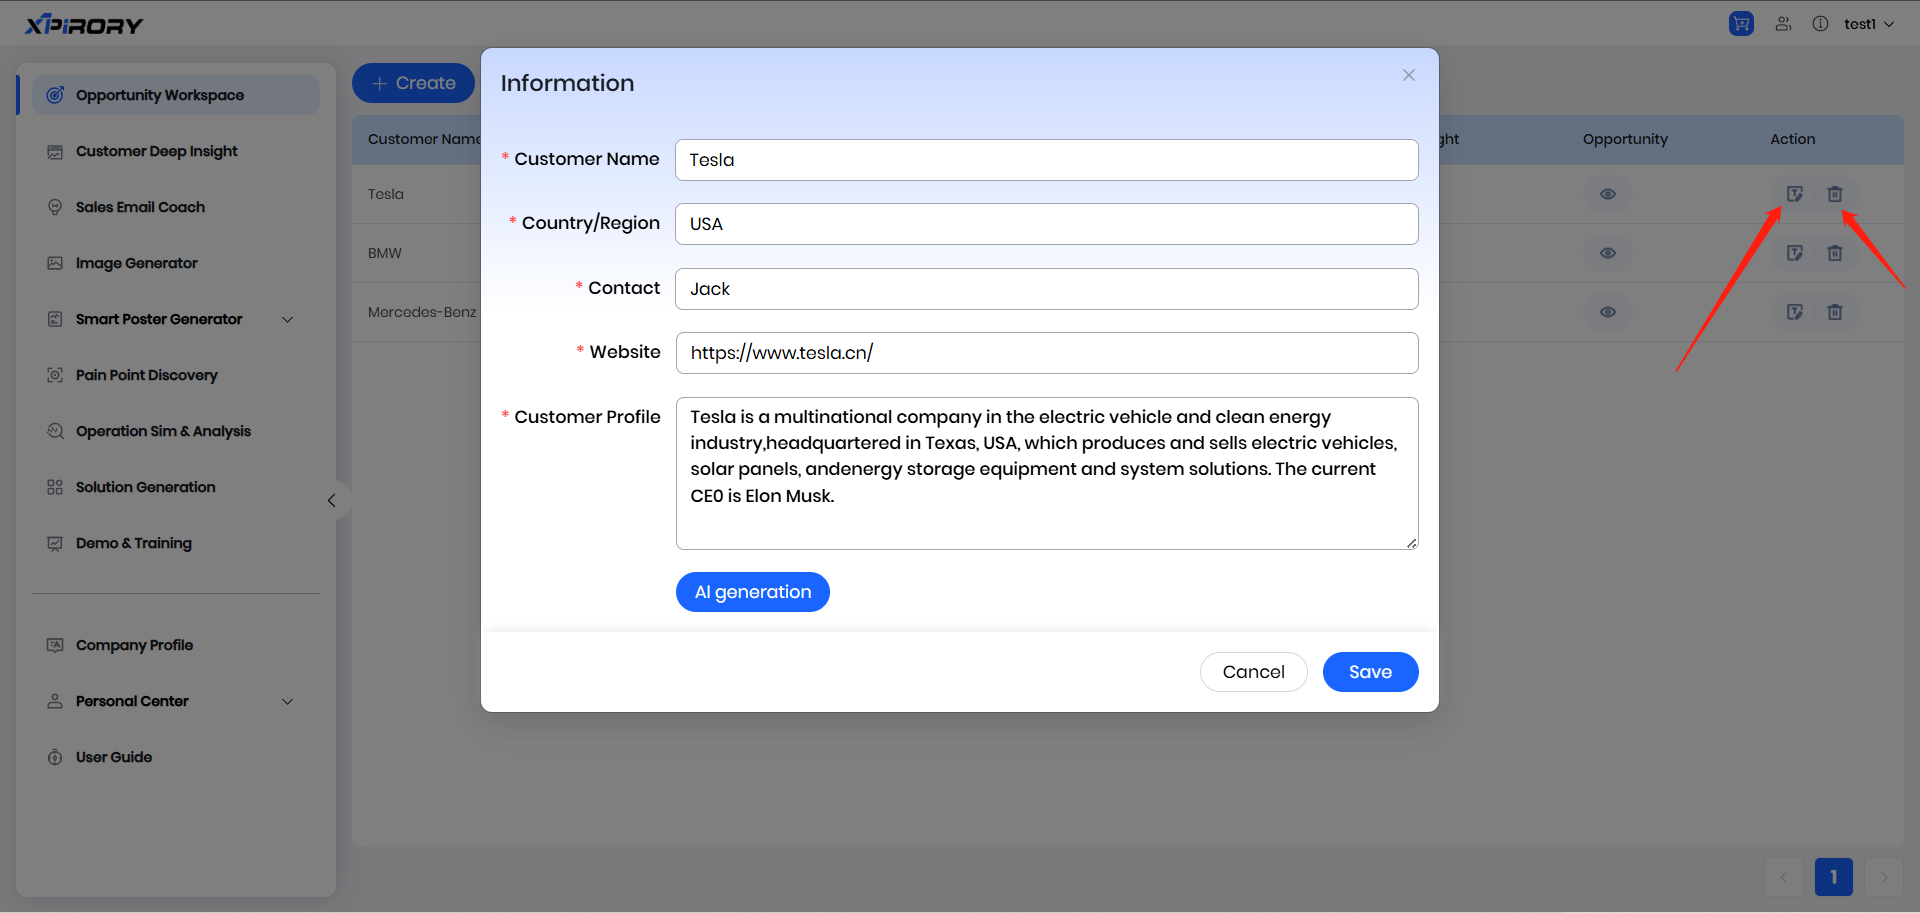
- Click the Create button, fill in the information in the pop-up window, and record the customer's basic details.
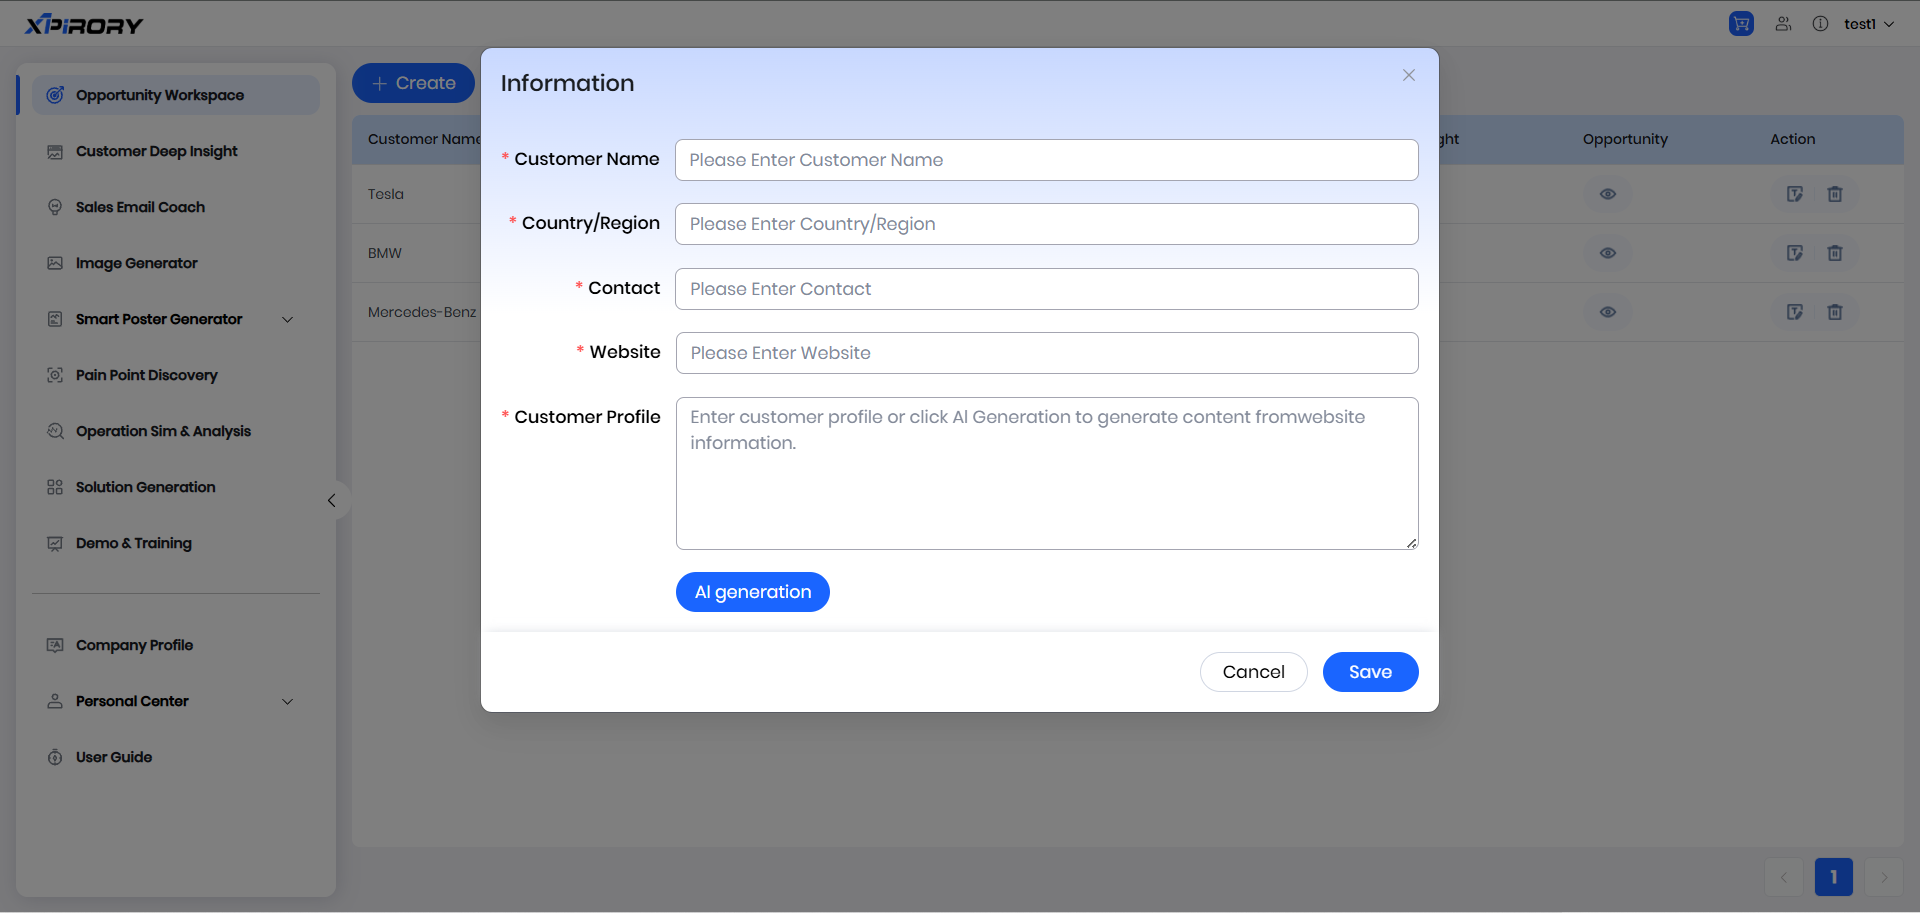
Filling Instructions
Customer Name: Enter the name of the customer's company (e.g., Tesla).
Country/Region: Enter the customer's country or region (e.g., USA).
Contact: Enter the customer's contact information, which can be a name, phone number, email address, etc.
Website: Enter the customer's official website URL.
Customer Profile: Fill in the customer's information manually, or generate it by the AI using the correctly filled official website address.
Finally, click the Save button to store the above information.
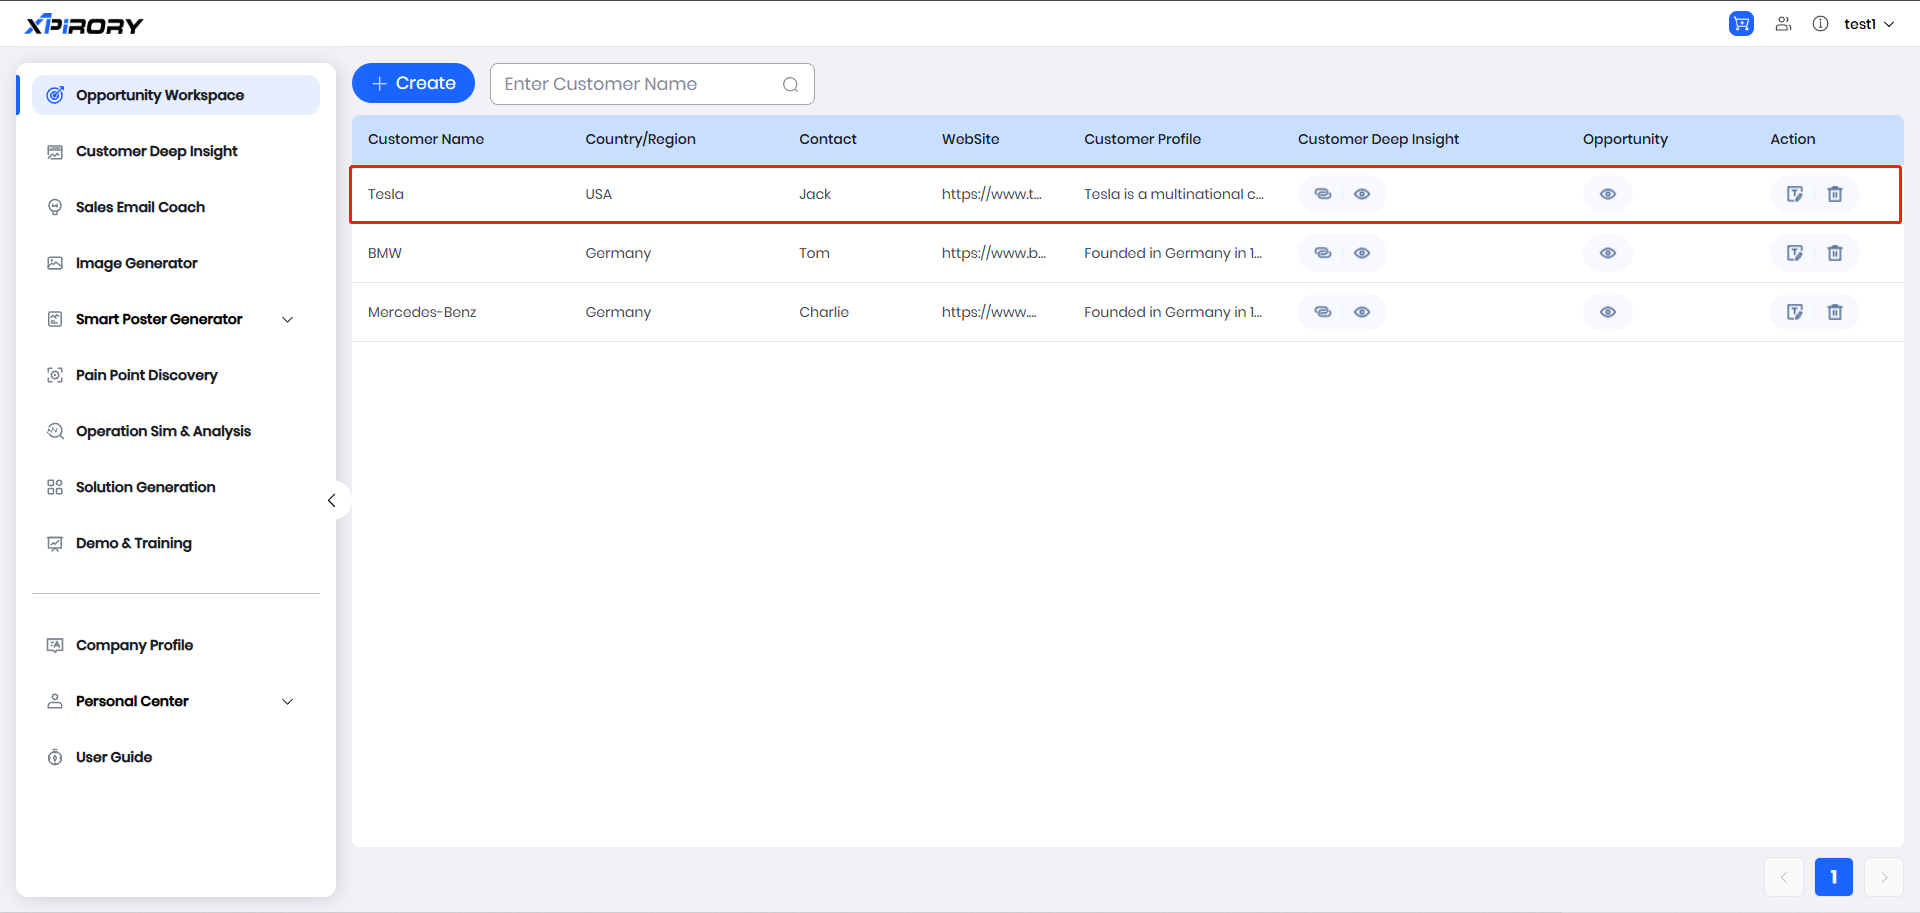
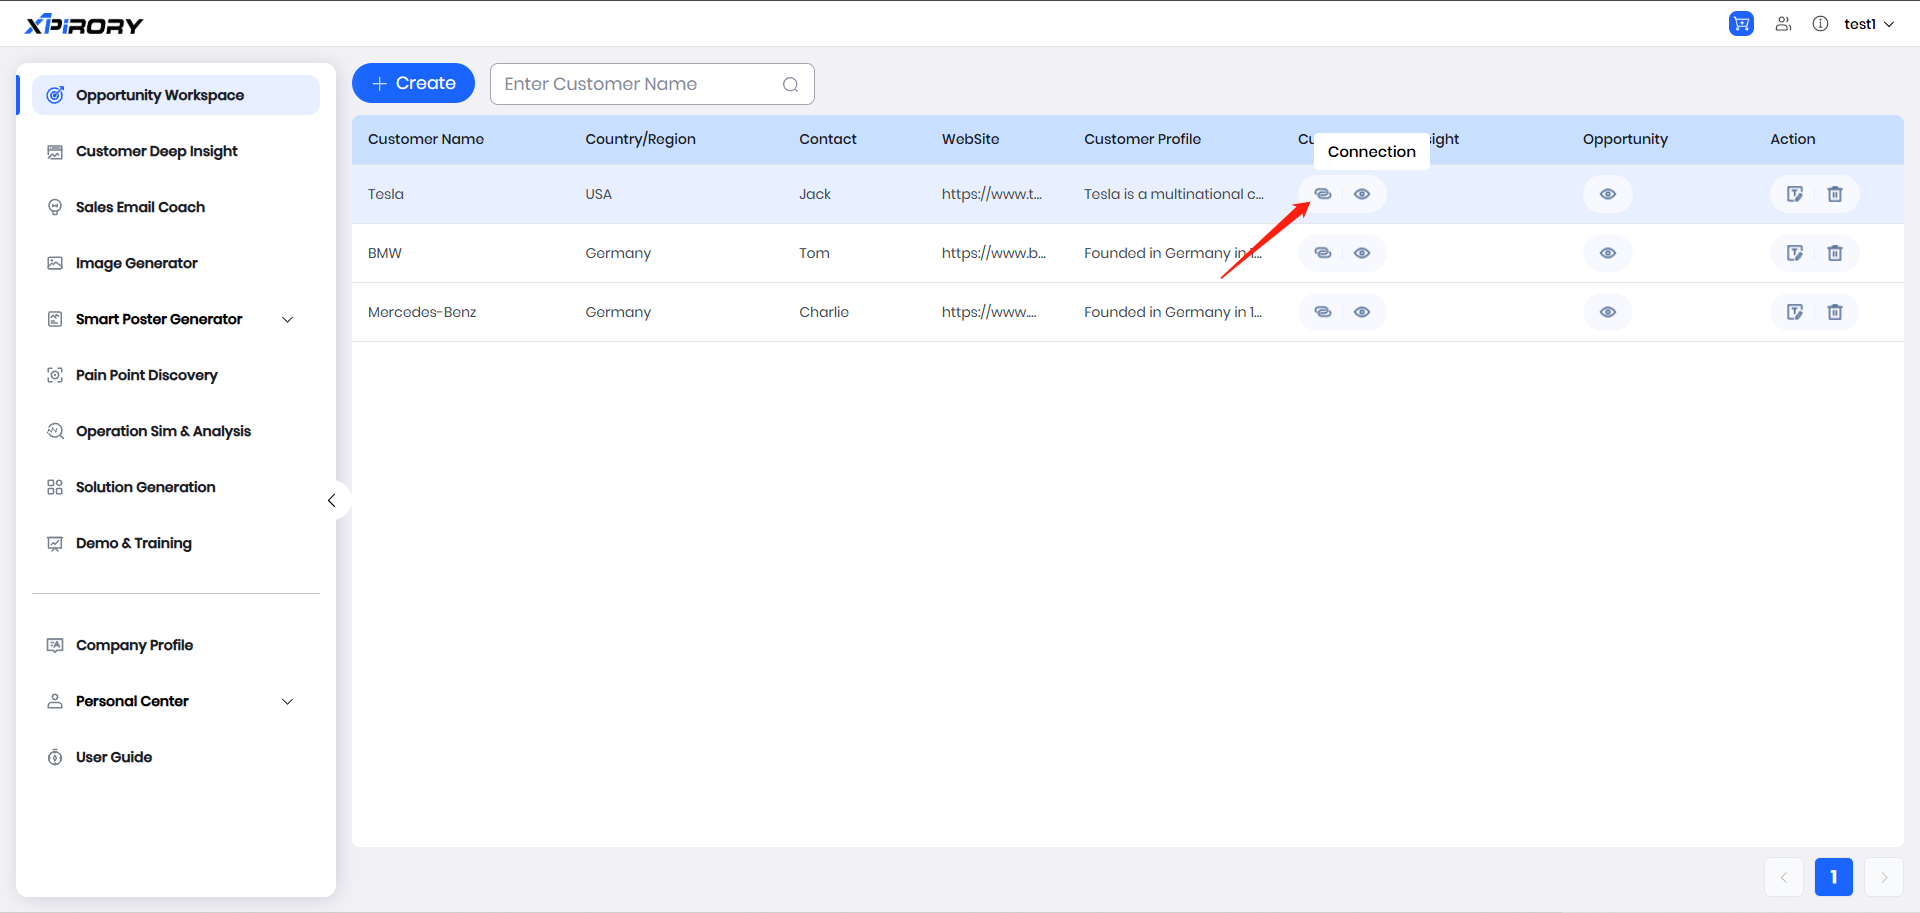
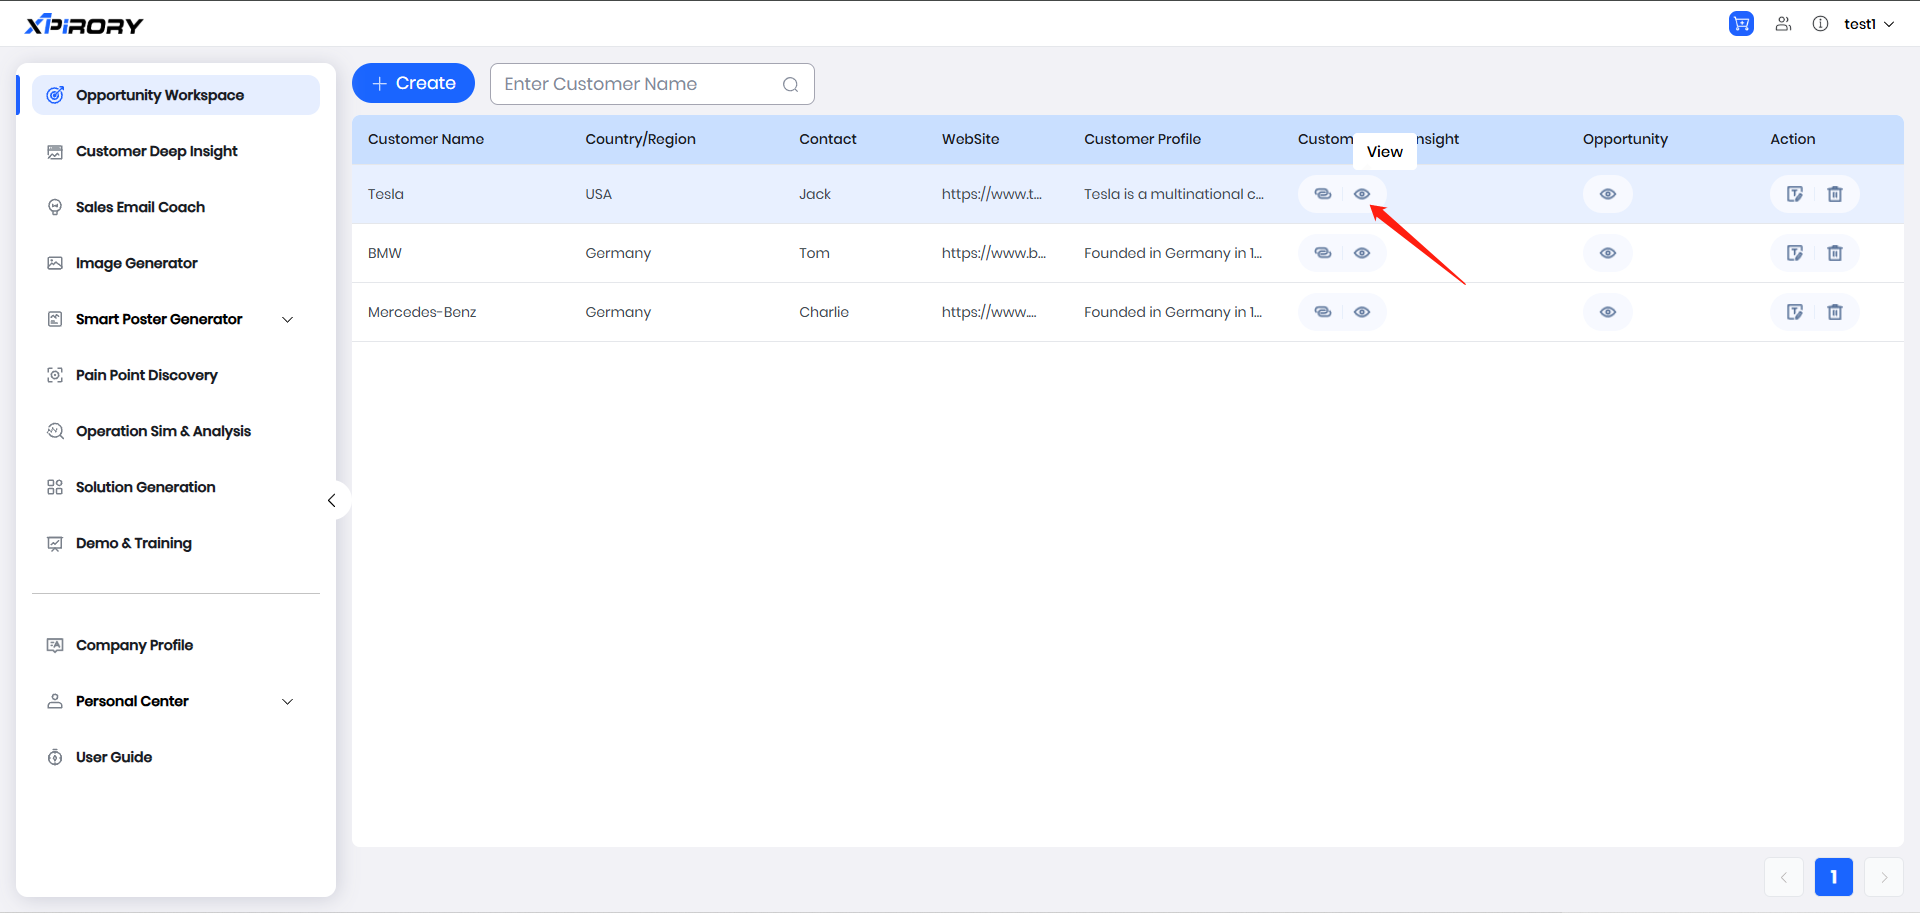
- Click the Connection icon in the Customer Deep Insight column to link the report generated for the enterprise in Customer Deep Insight. Then click the View button to check the report.
- Click the View icon in the Opportunity column to add multiple records here.
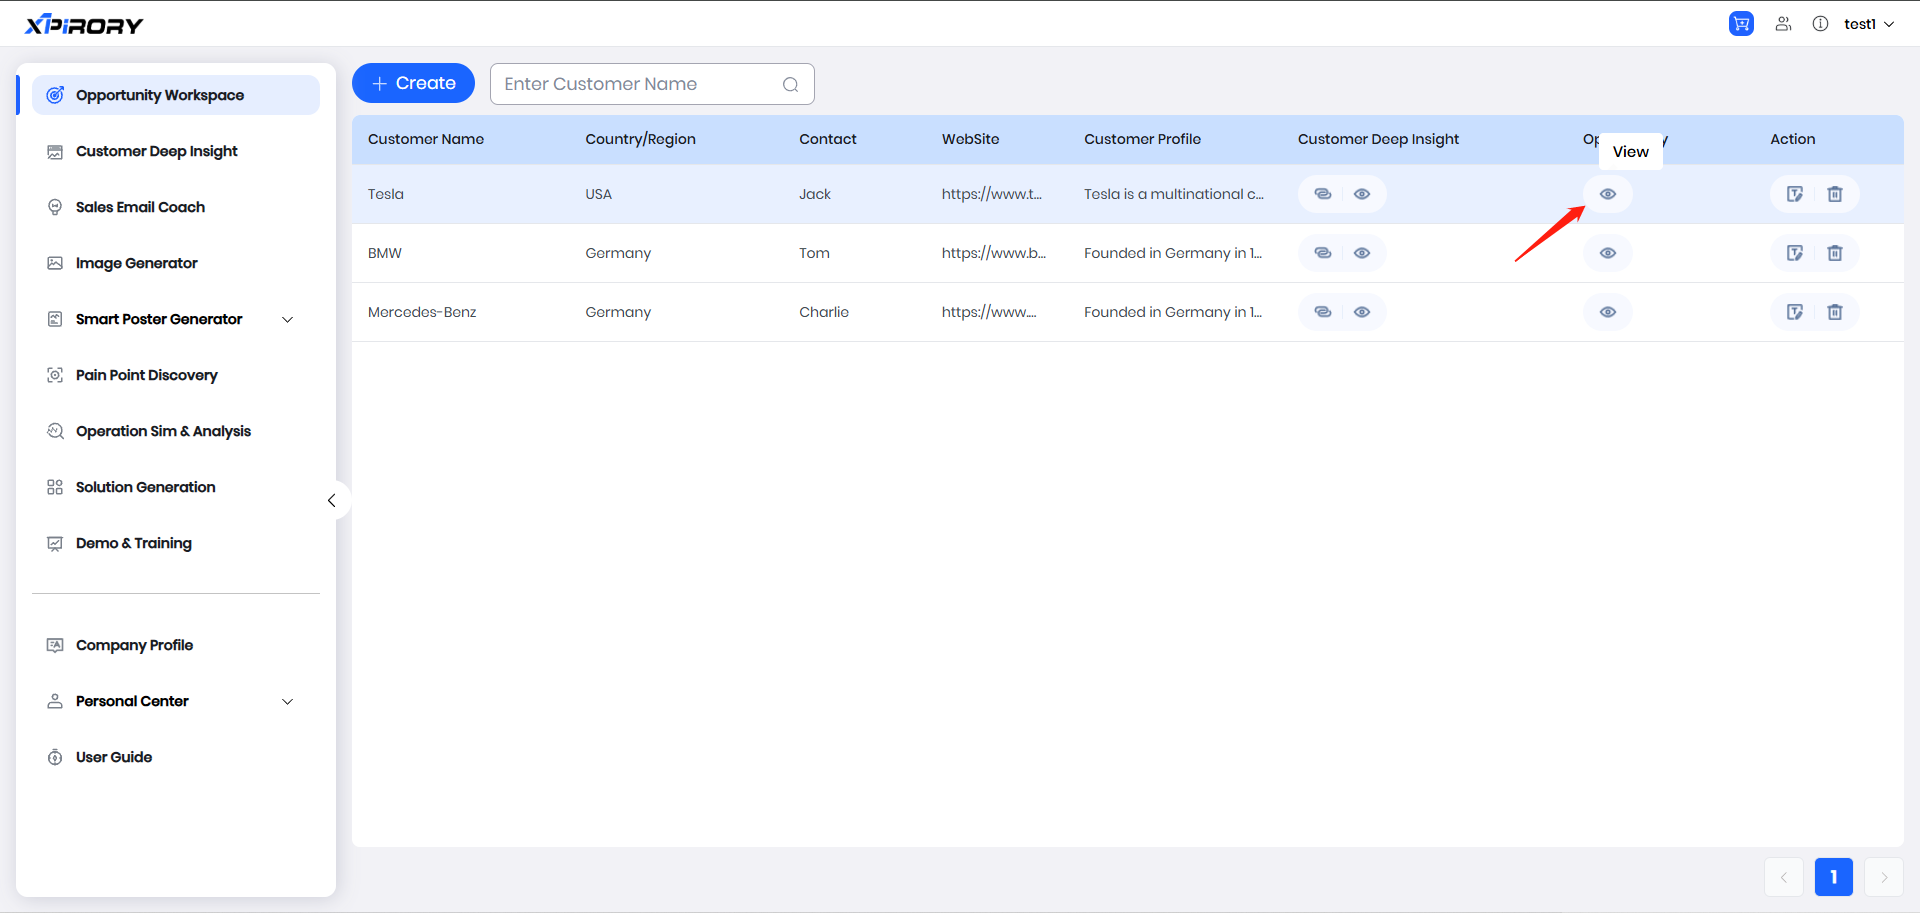
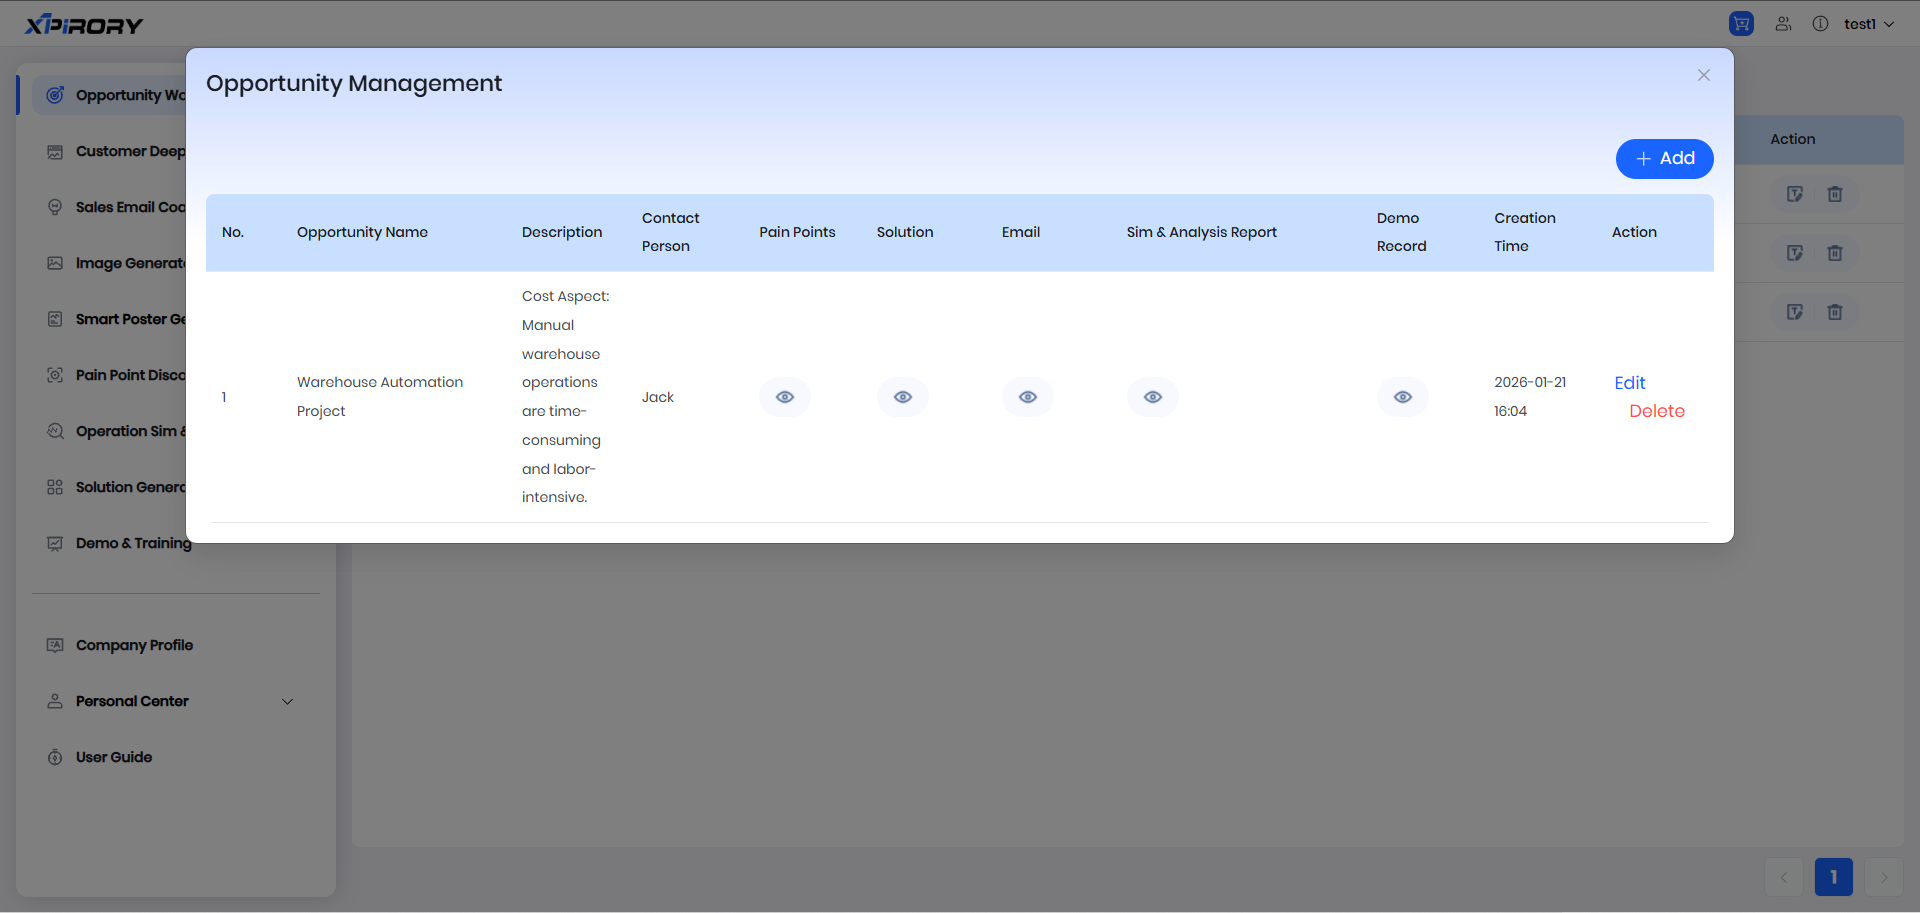
Click the Add button to fill in the specific content.
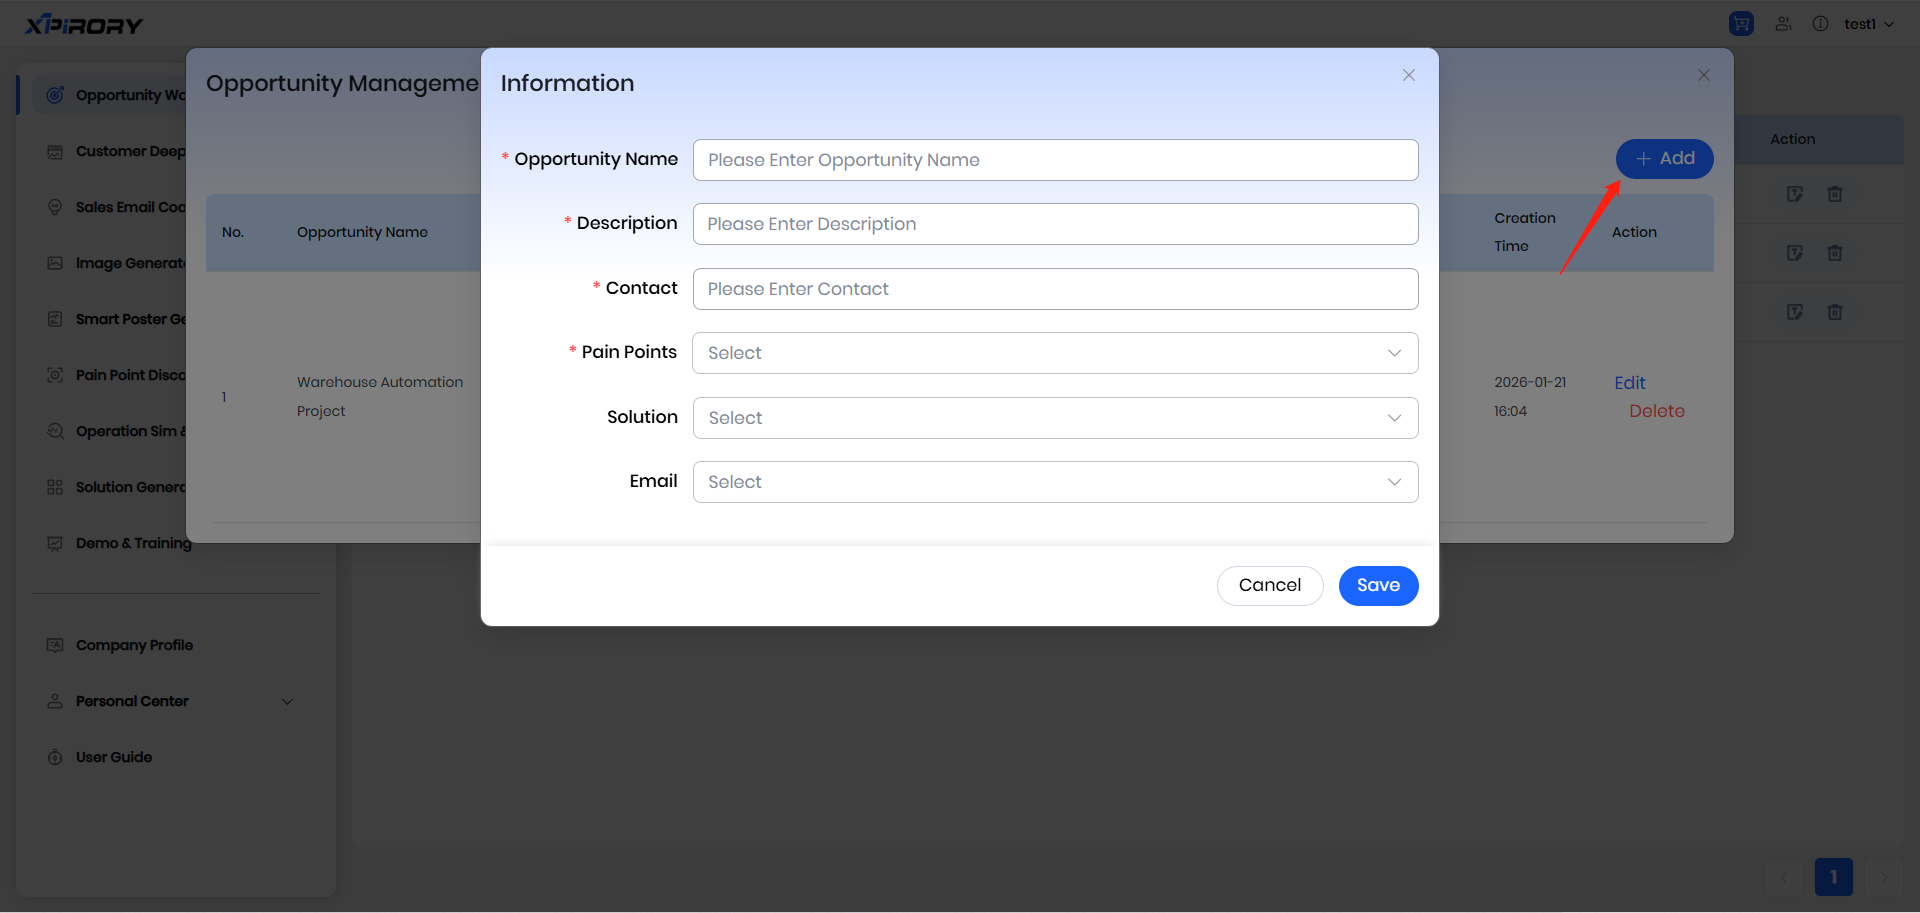
Filling Instructions
Opportunity Name: Enter a custom name for the opportunity.
Description: Provide a detailed description of the opportunity.
Contact: Enter the contact person for this opportunity.
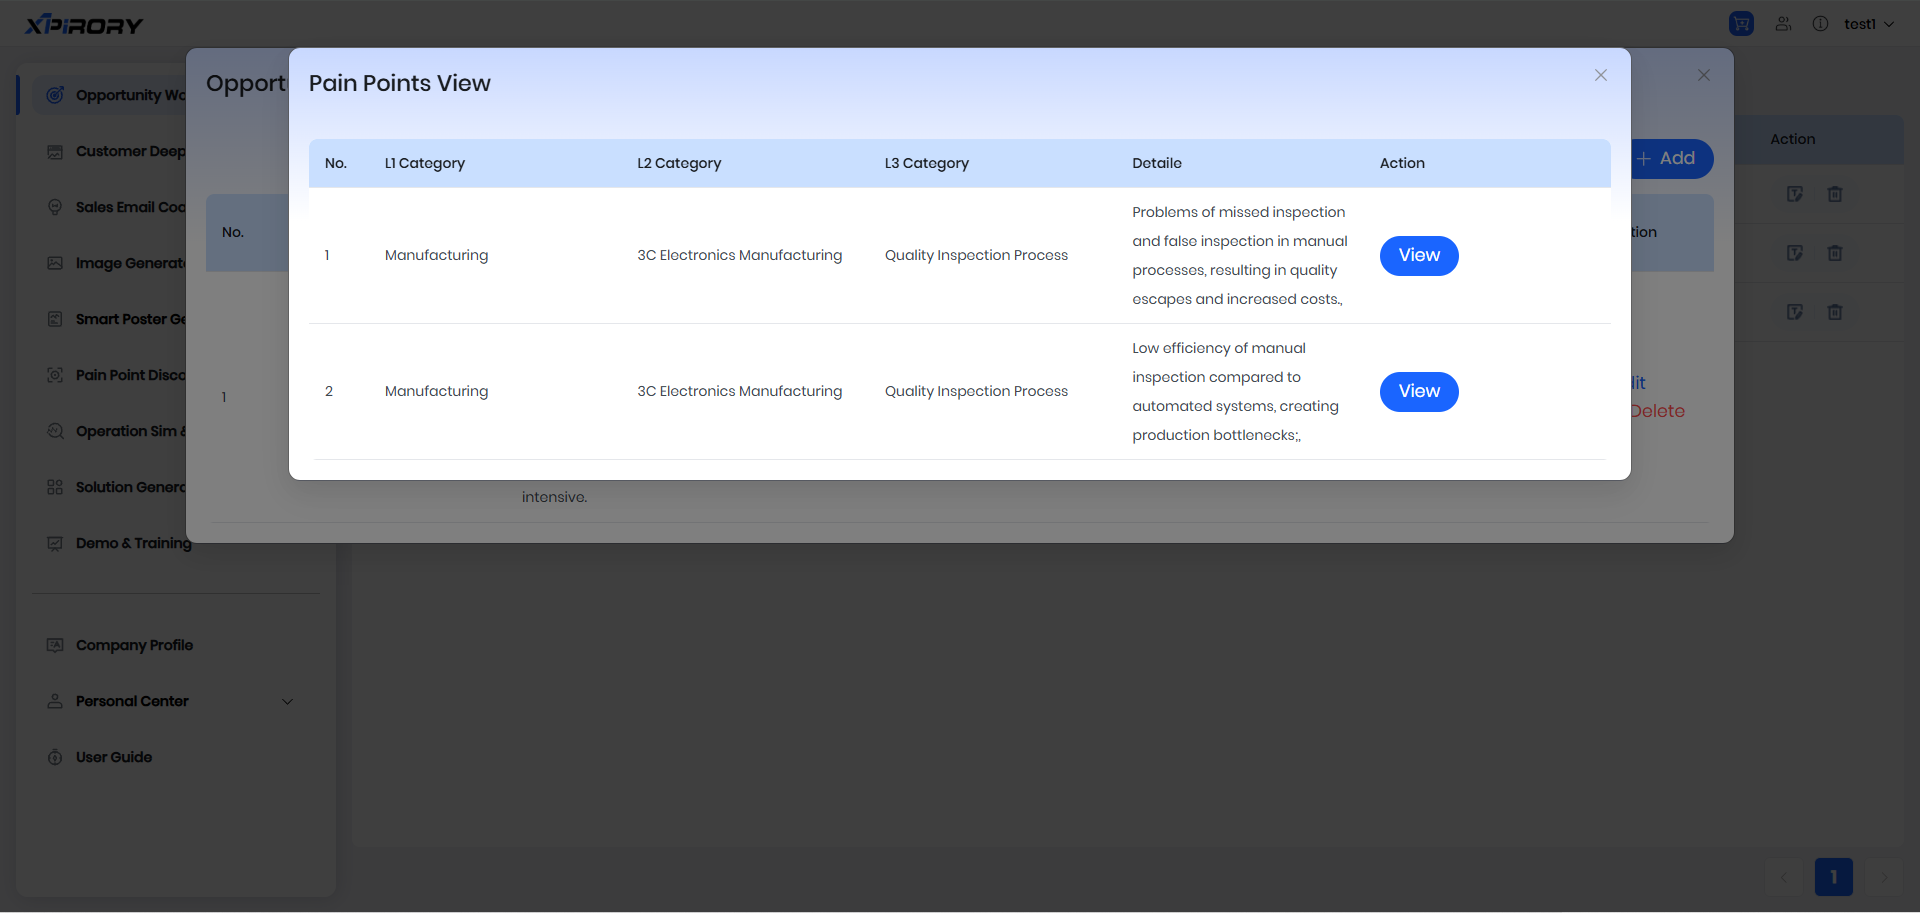
Pain Points: Directly select from the content associated in Pain Points Discovery.
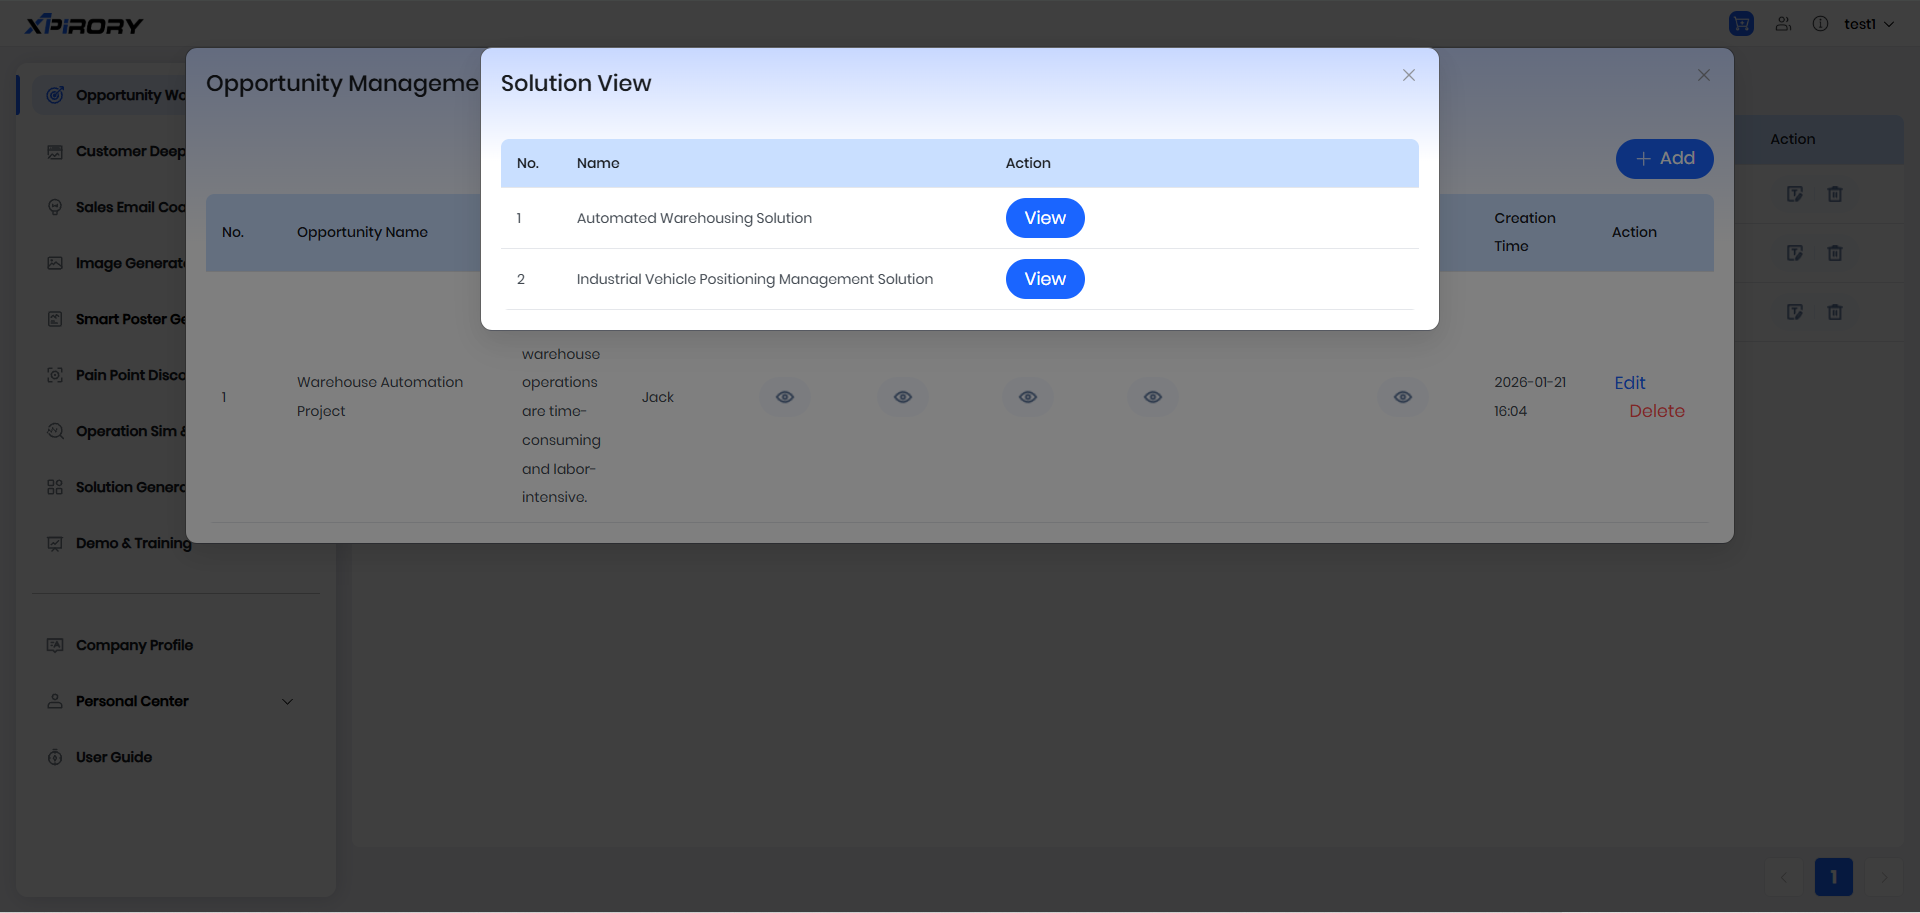
Solution: Directly select from the content associated in Solution Generation.
Email: Directly select from the content associated in Sales Email Coach.
Click the View icon under Pain Points, Solution, and Email to check the specific content.

* Updates on the Sim & Analysis Report and Demo Record sections are coming soon.
- Click the Edit icon to re-edit the enterprise information; click the Delete icon to remove this record.
3.2 Customer Deep Insight
Function Overview:
The customer deep insight function is built based on the deep research technology of AI large models, aiming to provide users with accurate and efficient customer in-depth analysis solutions. Through advanced data collection and processing algorithms, this function can real-time scrape massive data related to target customers, combine with the user's enterprise product characteristics and business objectives for intelligent analysis, and quickly output professional customer deep insight reports, significantly reducing the complexity and time cost of in-depth research on target customers.
Operation Steps:
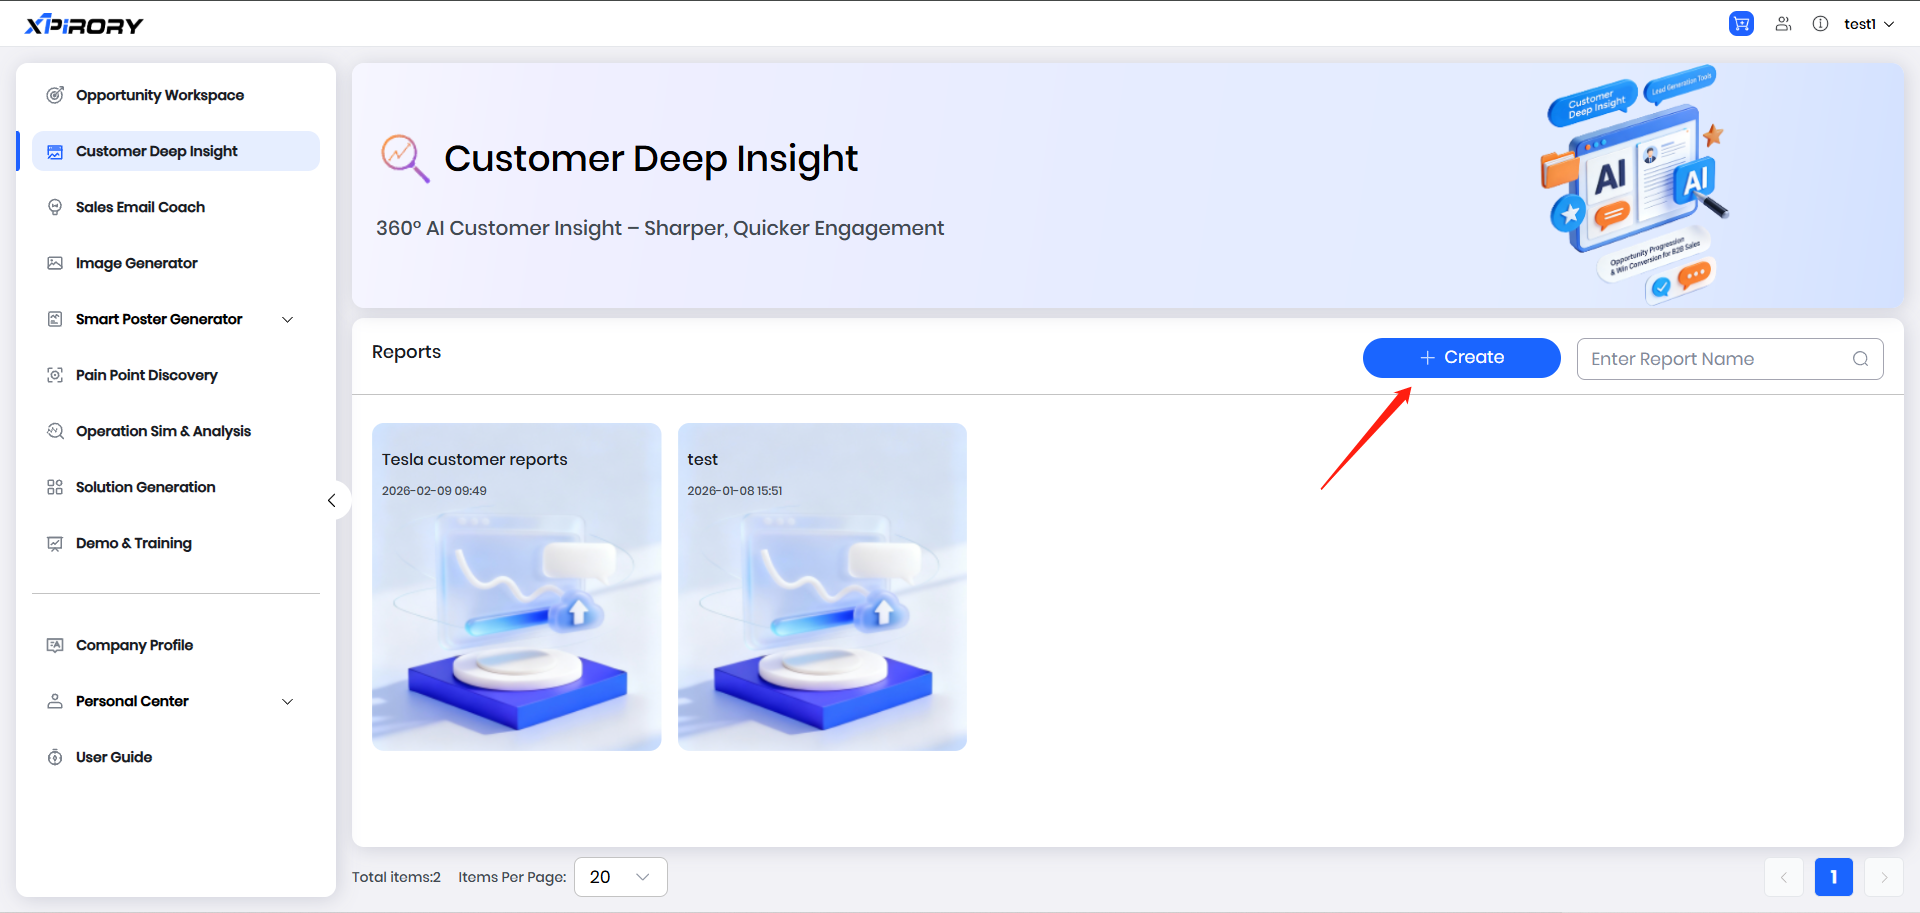
(1) Click the "+Create" button on the Customer deep insight interface to open the new customer deep insight report creation interface.
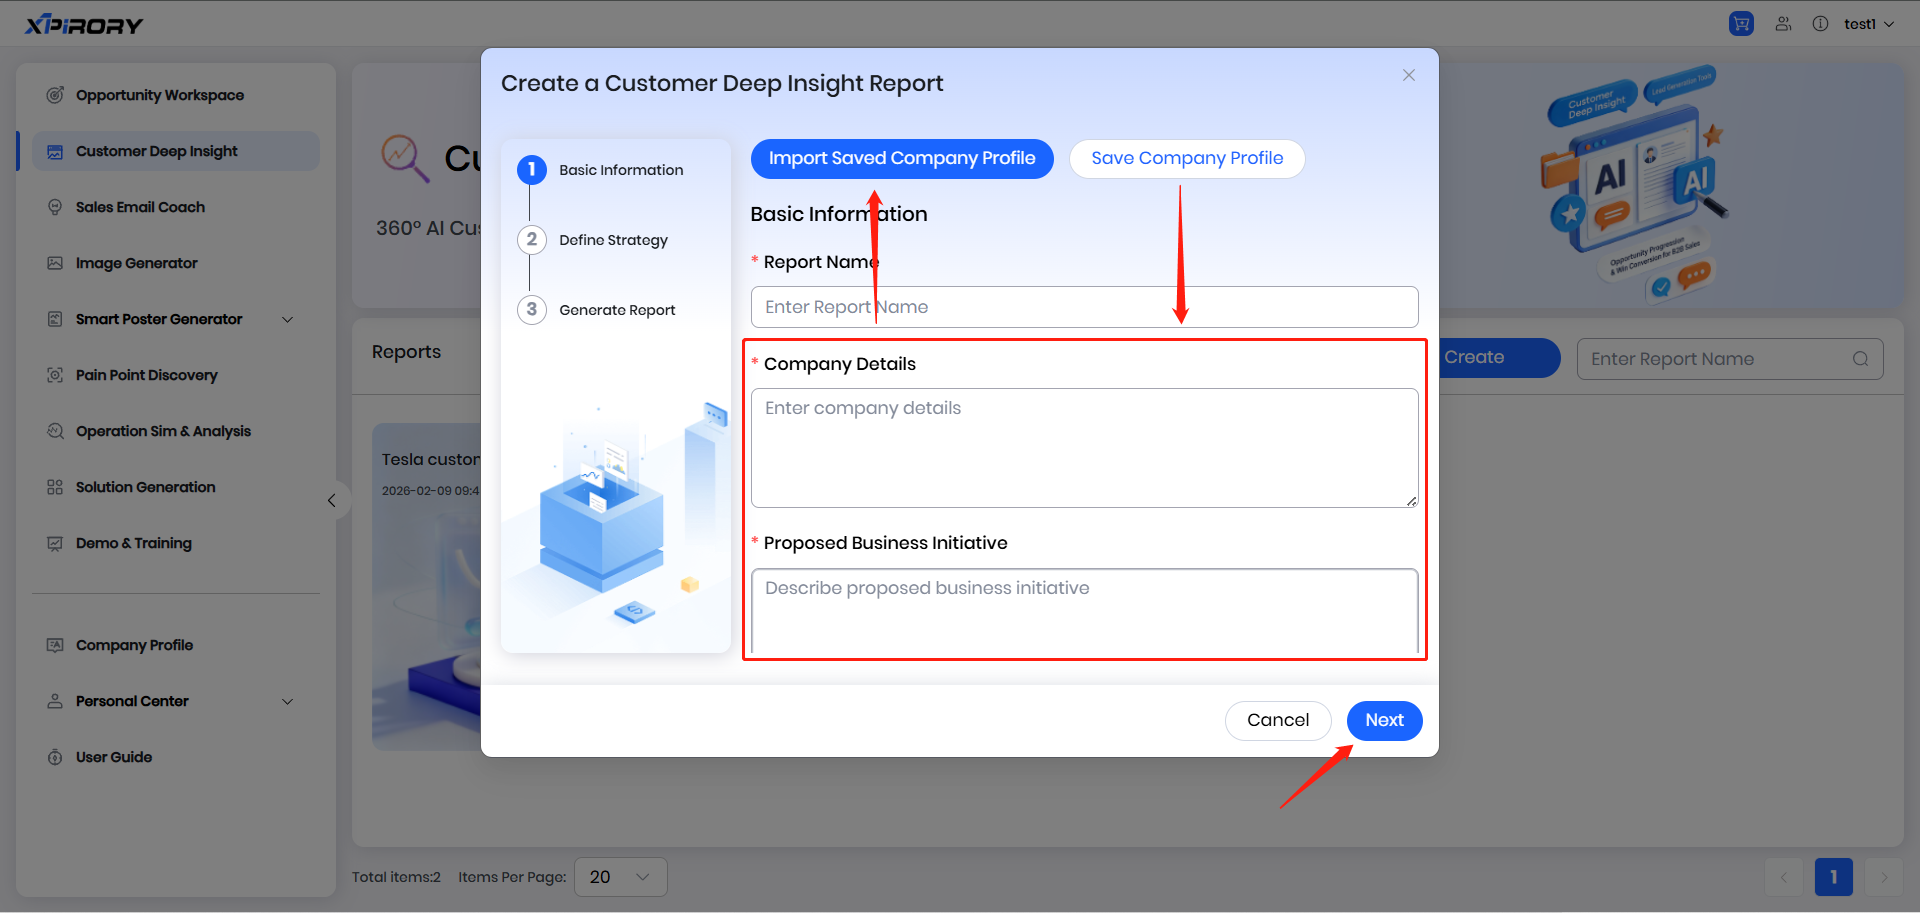
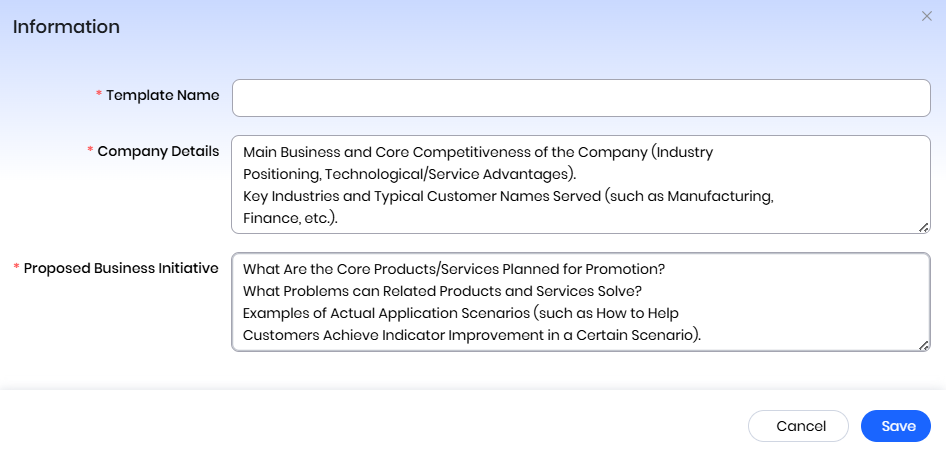
(2) After entering information including the report name, company details, proposed business initiative, and target customer-related information according to the pop-up prompts, click "Next." (If the entered enterprise information and planned promotion business content will be frequently used in the future, you can click the " Save Company Profile" button in the upper right corner to save the filled information as a template, which can be directly imported into the input field via the " Import Saved Company Profile" button next time. For enterprise information maintenance, see Section 3.10 of this chapter.)
Filling Instructions:
Report Name: The document name of the customer deep insight report to be generated.
Company Details: Details about the user's enterprise, such as positioning, main products, and target customers.
Proposed Business Initiative: Details of the business content the user plans to promote in the target market.
Target Customer Company: Enter the full name of the target customer enterprise to be analyzed.
Target Customer Website: Enter the official website URL of the target customer enterprise to be analyzed.
Target Customer Overview: Enter the profile information of the target customer enterprise to be analyzed.
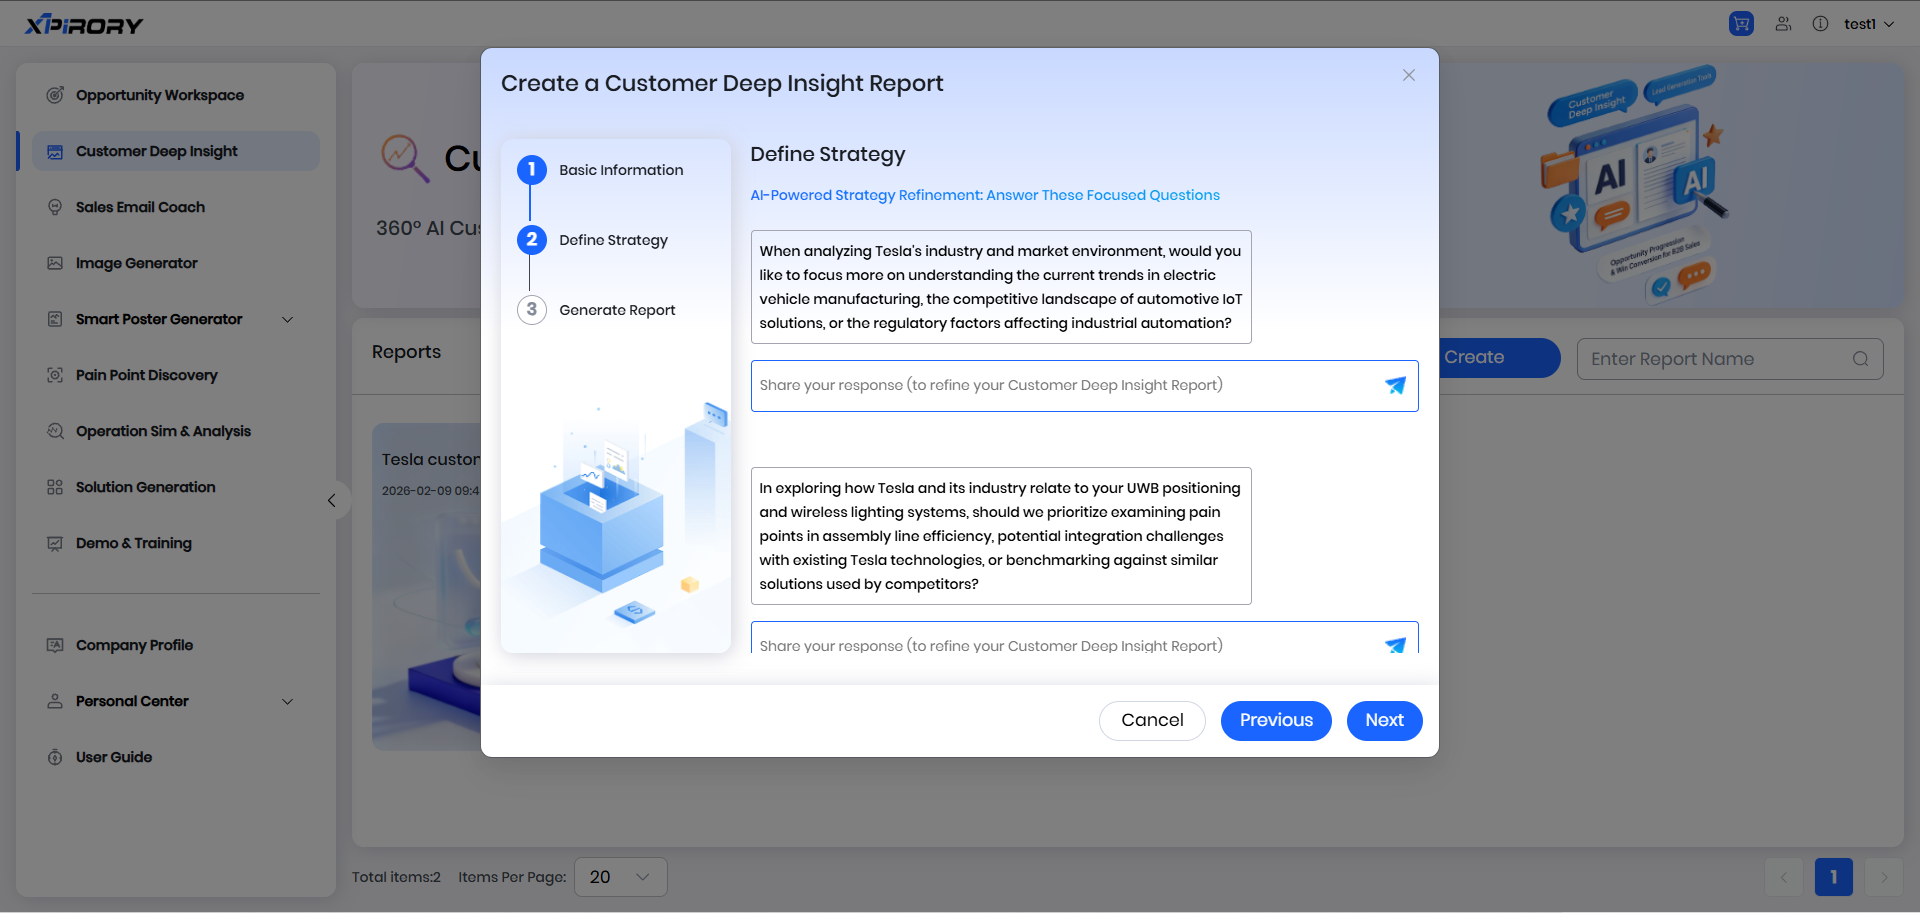
(3) The AI will initially understand the information entered by the user and return detailed questions requiring further confirmation. Users need to answer and confirm these questions.
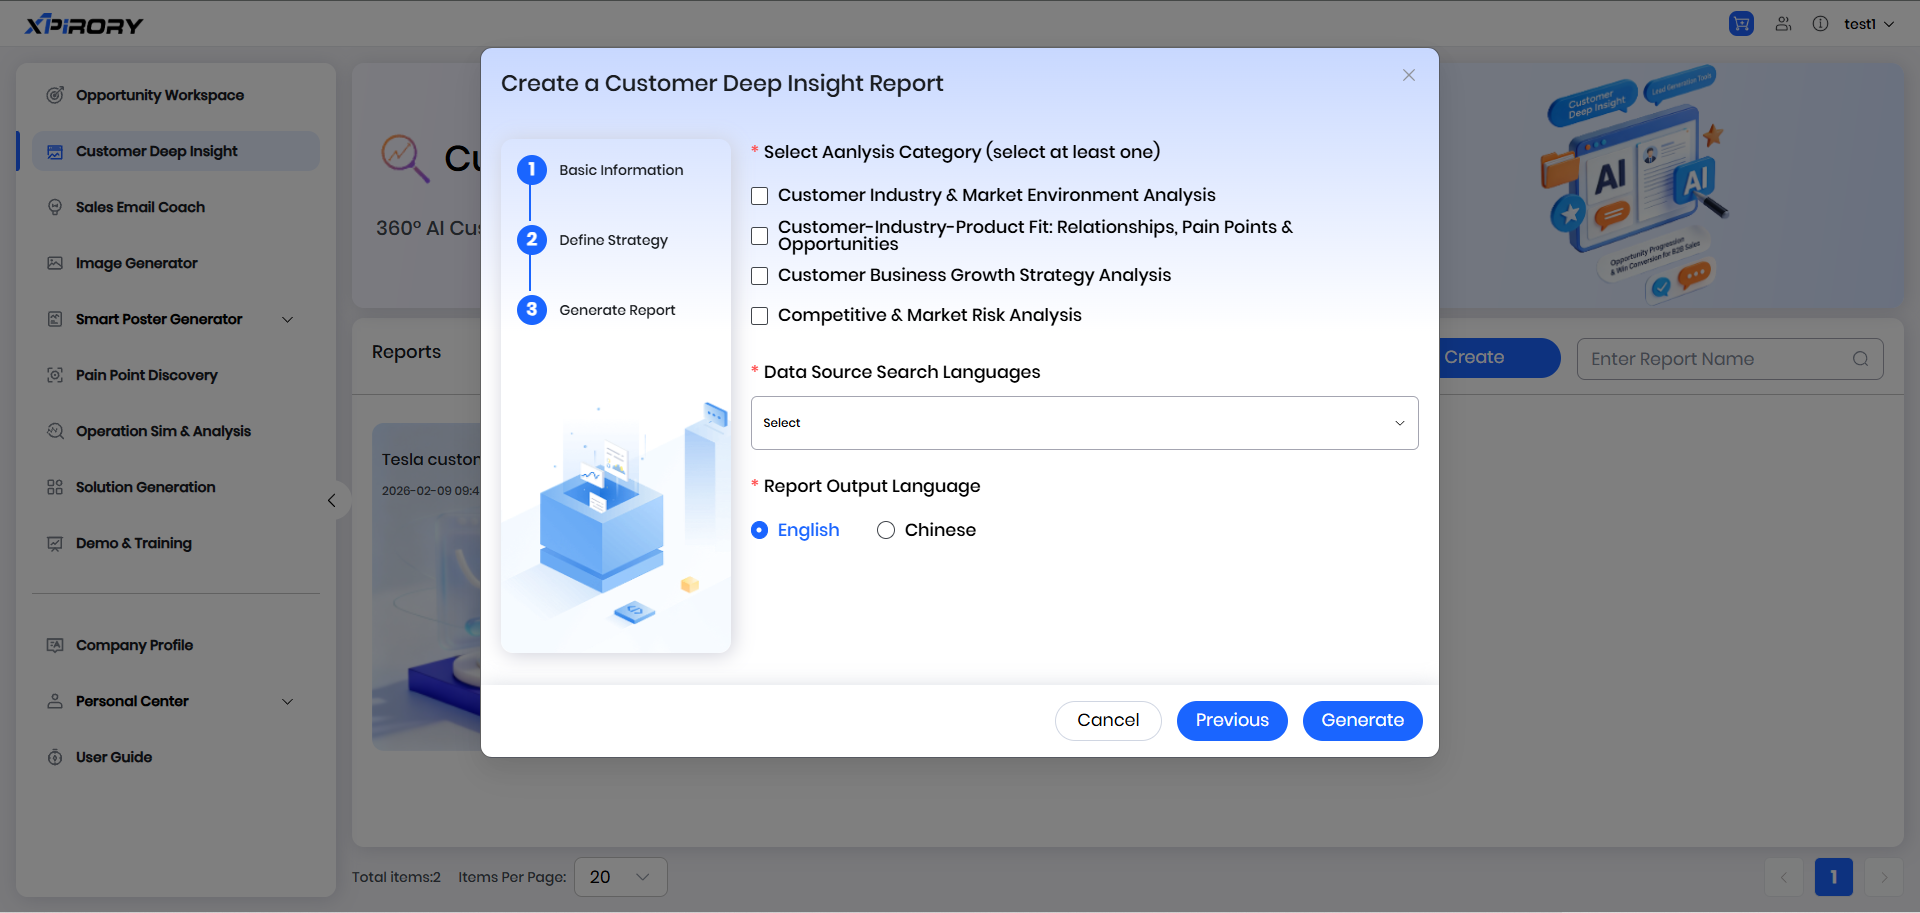
(4) After completing all detailed question responses, users can select the corresponding analysis categories, search material language, and output language requirements based on their analysis needs.
Option Explanations:
Select Analysis Category: Each category selected by the user determines the analysis items included in the customer deep insight report. Users can choose according to their needs.
Data Source Search Languages: Users can select the common language of the target customer's country or region. The AI will conduct targeted searches in the selected language to ensure access to the latest and most comprehensive data about the target customer.
Report Output Language: Users can choose the report generation language based on their reading habits.
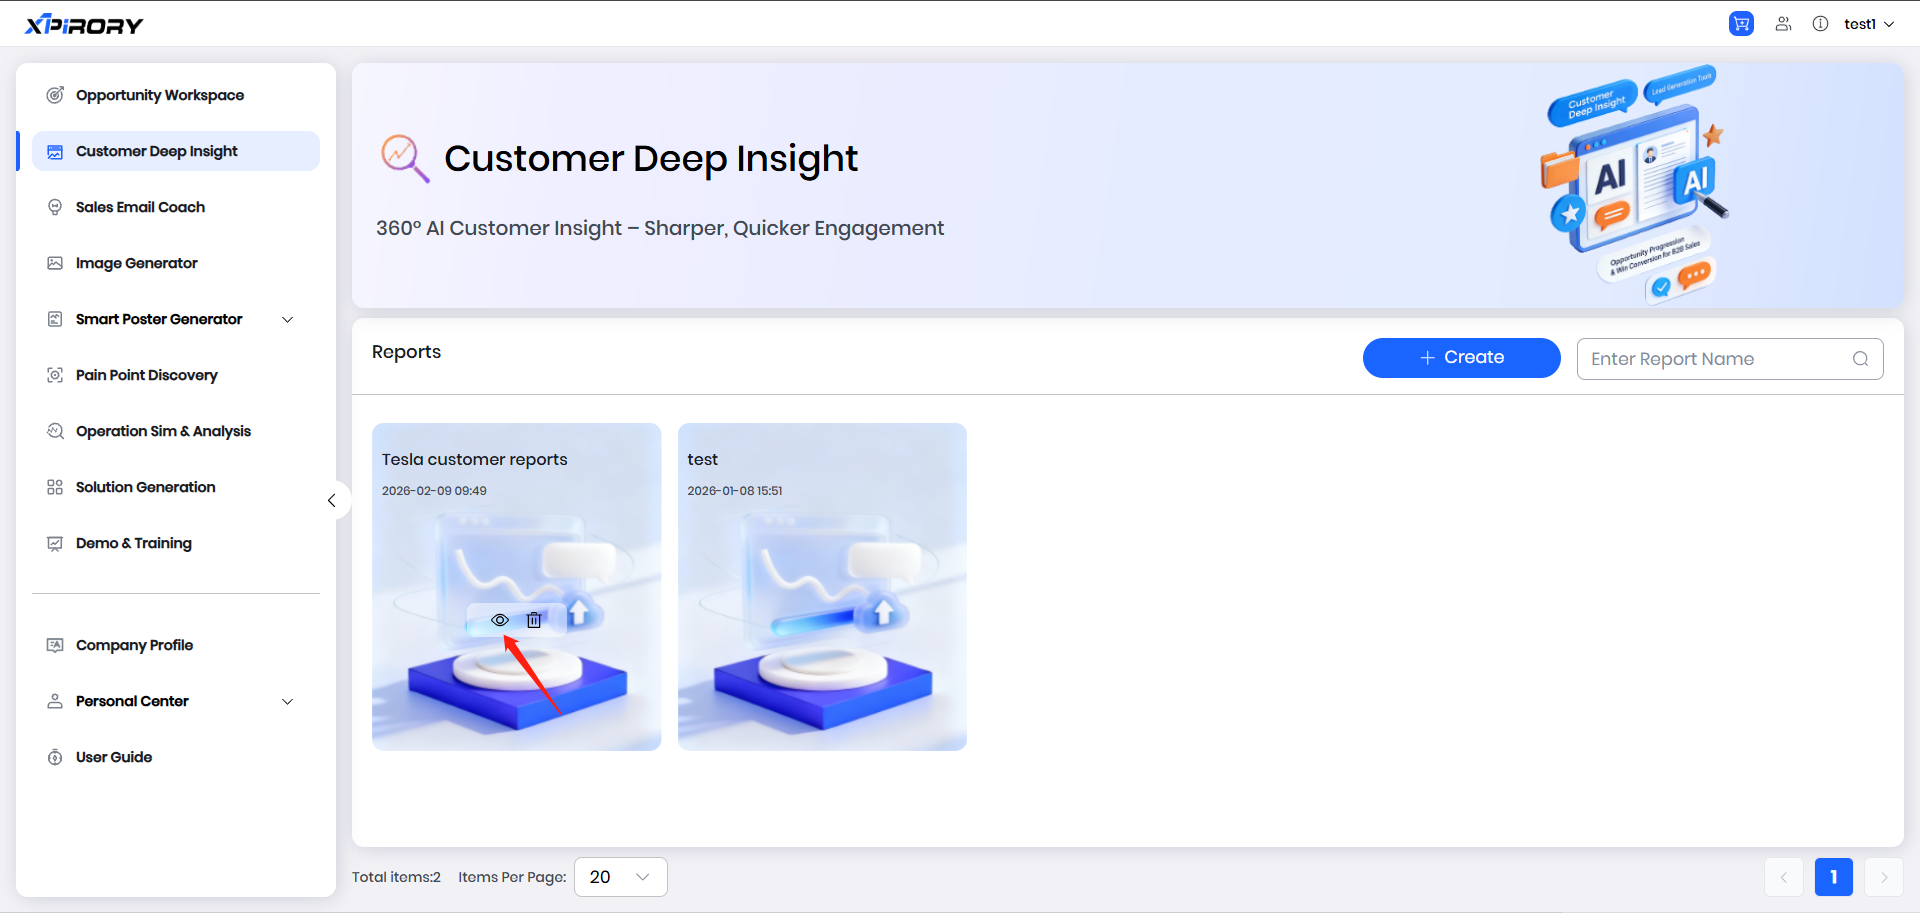
(5) After generation is complete, click the "Browse" icon on the report cover to open and view the report.

3.3 Sales Email Coach
Function Overview:
The Sales Email Coach is an intelligent guidance tool specially designed for To B sales scenarios. Relying on AI large models and an industry-specific sales challenge database, users input enterprise business and customer background information, select communication challenges (such as initial communication, deadlock, competitor comparison, etc.), and the AI combines a massive To B sales case database to deeply analyze customer types, deduce optimal communication strategies through multi-dimensional decision models, and generate complete communication plans including script content and guidance suggestions. The built-in AI translation module supports real-time conversion of multiple mainstream business languages, adapting to the business culture of the customer's country or region.
Operation Steps:
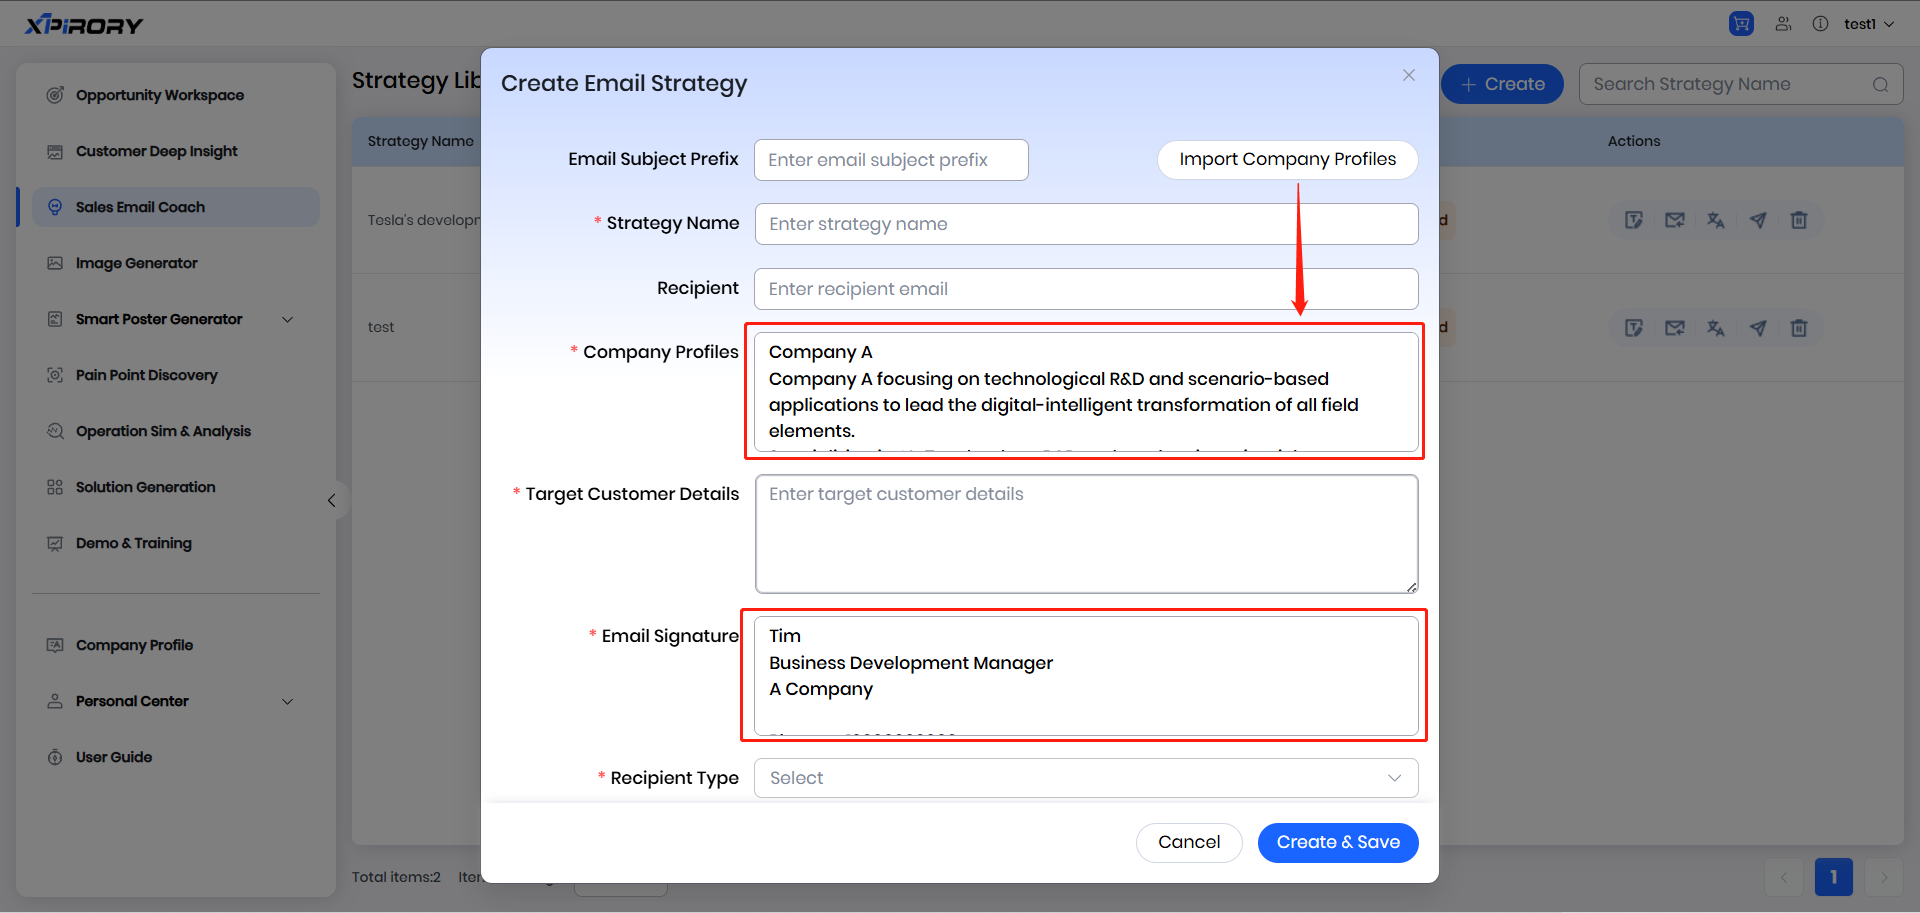
(1) Click the "+ Create" button to pop up the new strategy window.
(2) Users fill in basic information according to their actual situation. If users have pre-set information in " Company Profile" the system will automatically import enterprise information and email signature information into the dialog box. Users can also click the " lmport Company Profiles" button in the upper right corner to select other preset enterprise information.
(3) Filling Instructions:
Strategy Name: The name of the sales strategy guidance to be generated.
Company Profiles: Details of the user's enterprise.
Target Customer Details: Details of the target customer enterprise currently being communicated with.
Email Signature: The user's own email signature information.
Recipient Type: The type of target customer currently being communicated with, divided into "End Users" and "Partners."
Recipient Job Title: The position of the target customer contact currently being communicated with.
Sales Stage: Before selecting the sales stage, first choose the type of marketing email, divided into "EU: AI Marketing Email" (for end users) and "SI: AI Marketing Email" (for partners). After selecting the corresponding type, the " Scenario" option will appear. At this point, select the corresponding dilemma scenario according to the specific sales stage and issue.
Additional Notes (Optional): Supplement other information according to actual conditions to provide auxiliary explanations for the current situation.

(4) After filling in the information, click the " Create & Save " button and wait a moment to obtain the sales strategy results.
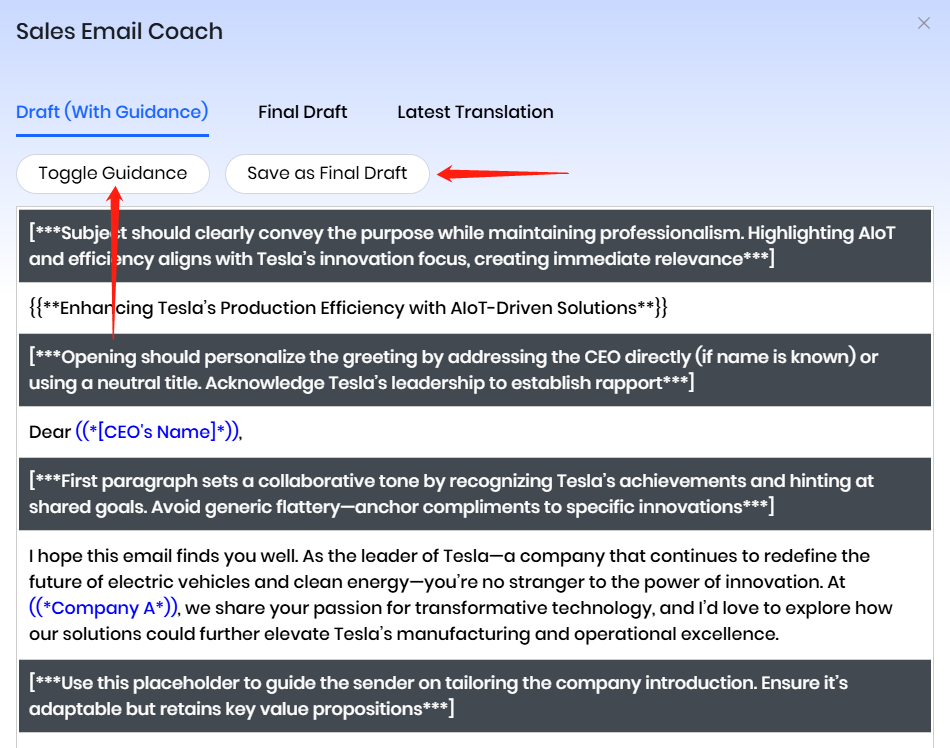
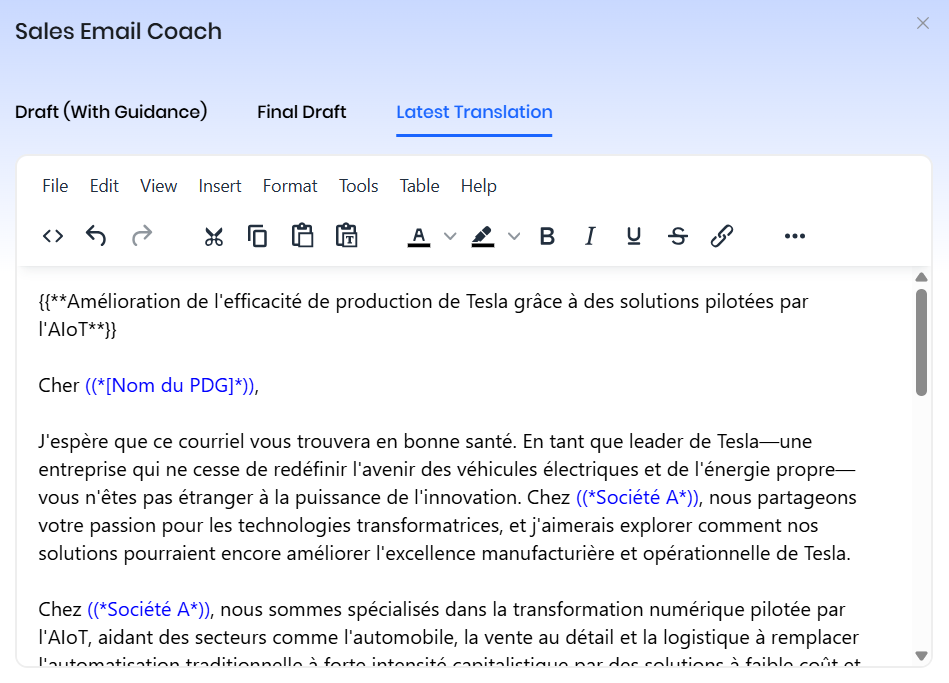
(5) Click "Edit The First Draft" to view the generated results. In the generated results, black-highlighted parts are guidance suggestions, and non-highlighted parts are generated body content. Users can manually adjust and supplement the body content according to actual conditions. After modification, click "Save as Final Draft" and the body content will be saved to the "Final Draft" page.
(6) Click the "Final Draft" tag to switch to the final draft preview and translation interface. After selecting the target language for body translation, click "Translate," and the AI will translate the full text according to the business expression habits of the target language's country.
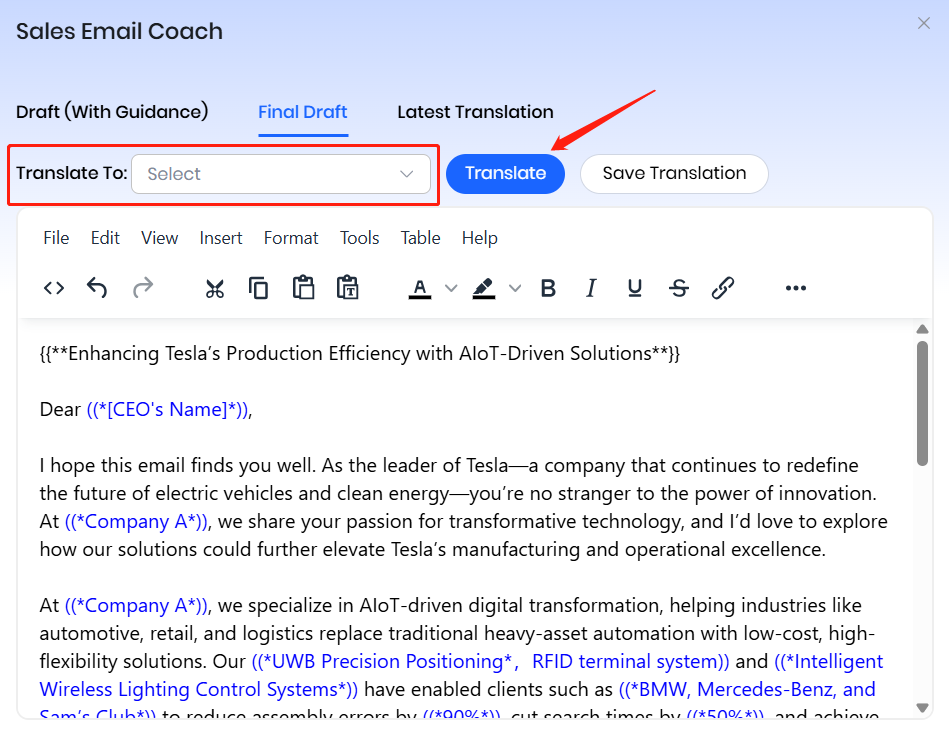
(7) After translation is complete, click "Save Translation" and the translated version of the body content will be saved to the "Latest Translation" page, which can be copied to other places for use at any time.
3.4 Image Generator
Function Overview:
Unleash your creativity with our Image Generator — transform text prompts into exquisite, high-quality visuals in just a few seconds. Simply enter descriptive keywords, phrases or complete sentences to define styles, scenes, characters and details, and our advanced AI model will generate unique, customizable images that meet diverse needs, from marketing materials to creative art and personalized illustrations. No professional design skills are required, empowering everyone to create striking visuals easily and efficiently.
Operation Steps:
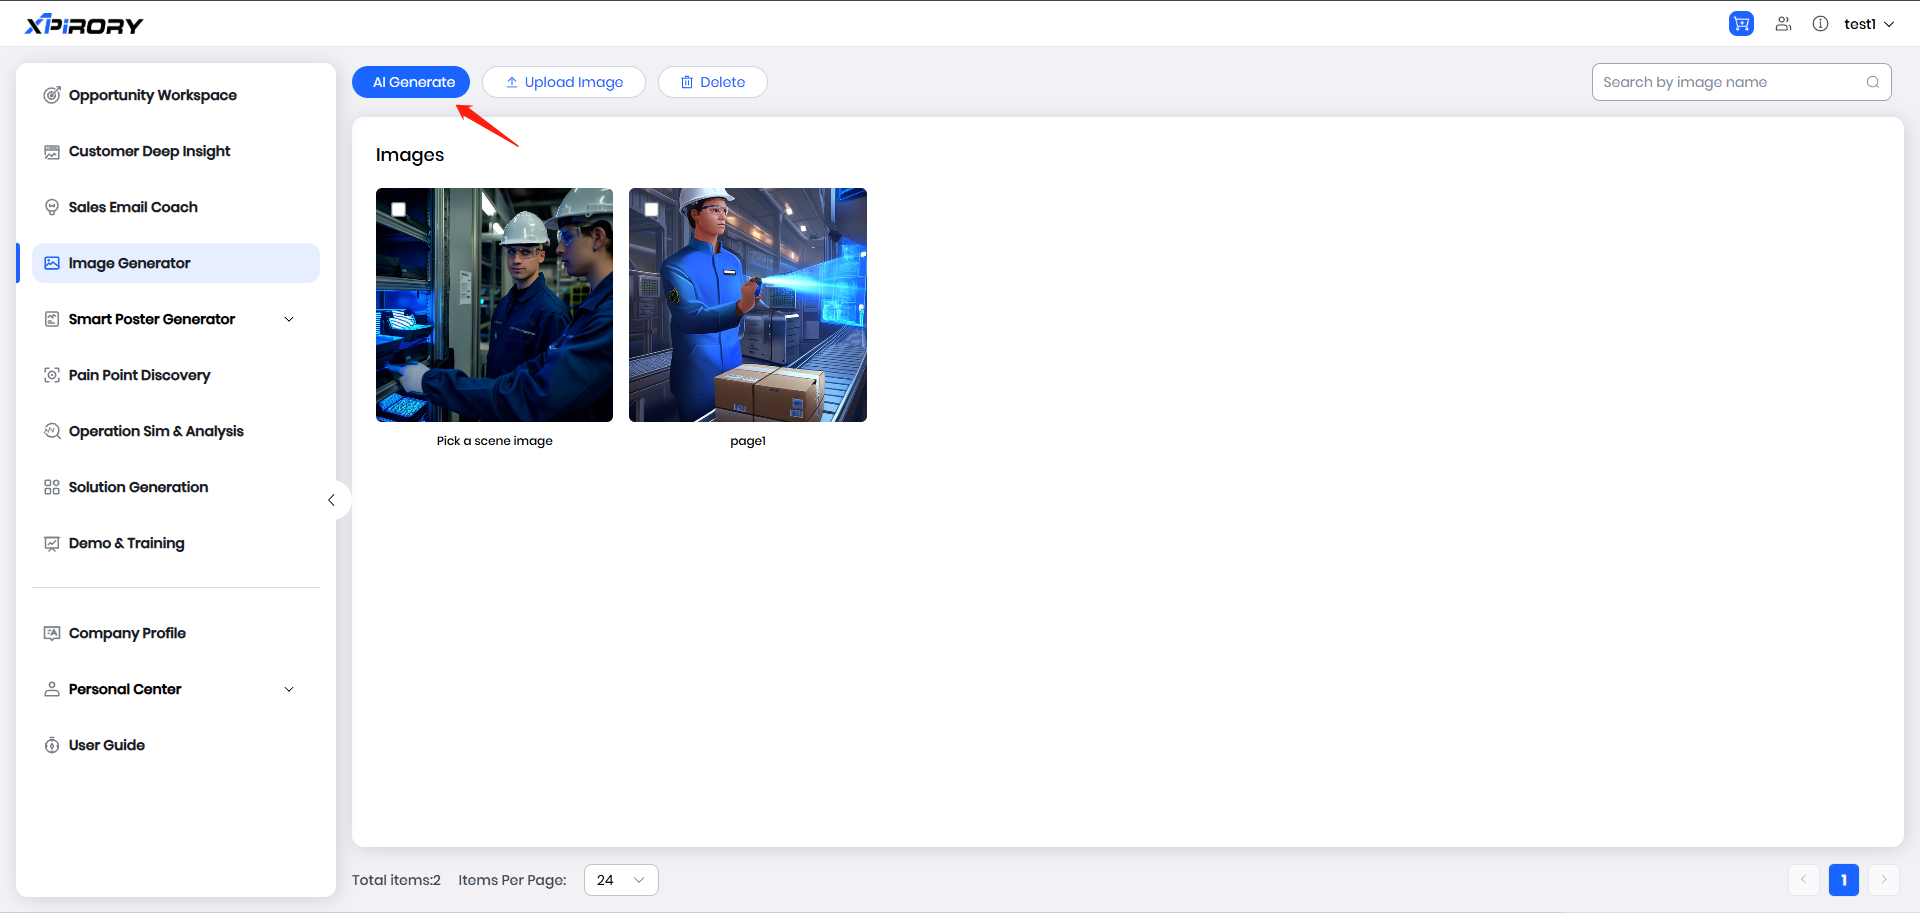
(1) Click the "AI Generate" button in the upper right corner to enter the AI image generation editing page.
(2) Select the image generation ratio through the drop-down menu.
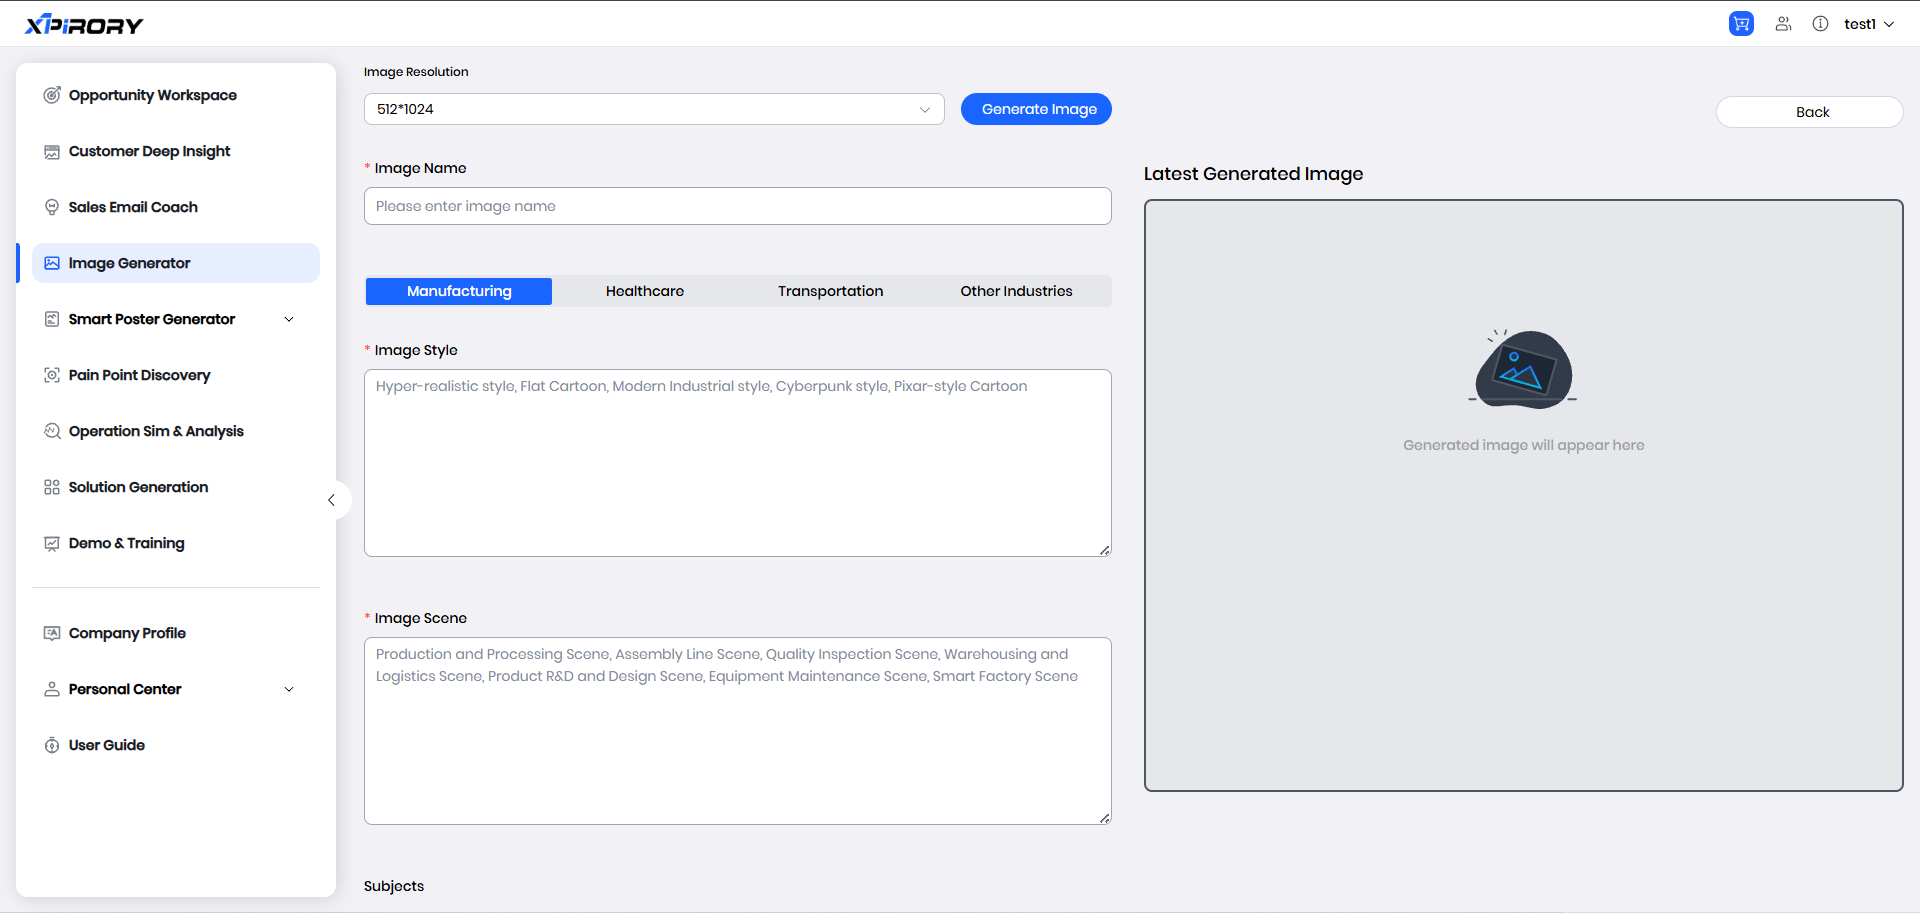
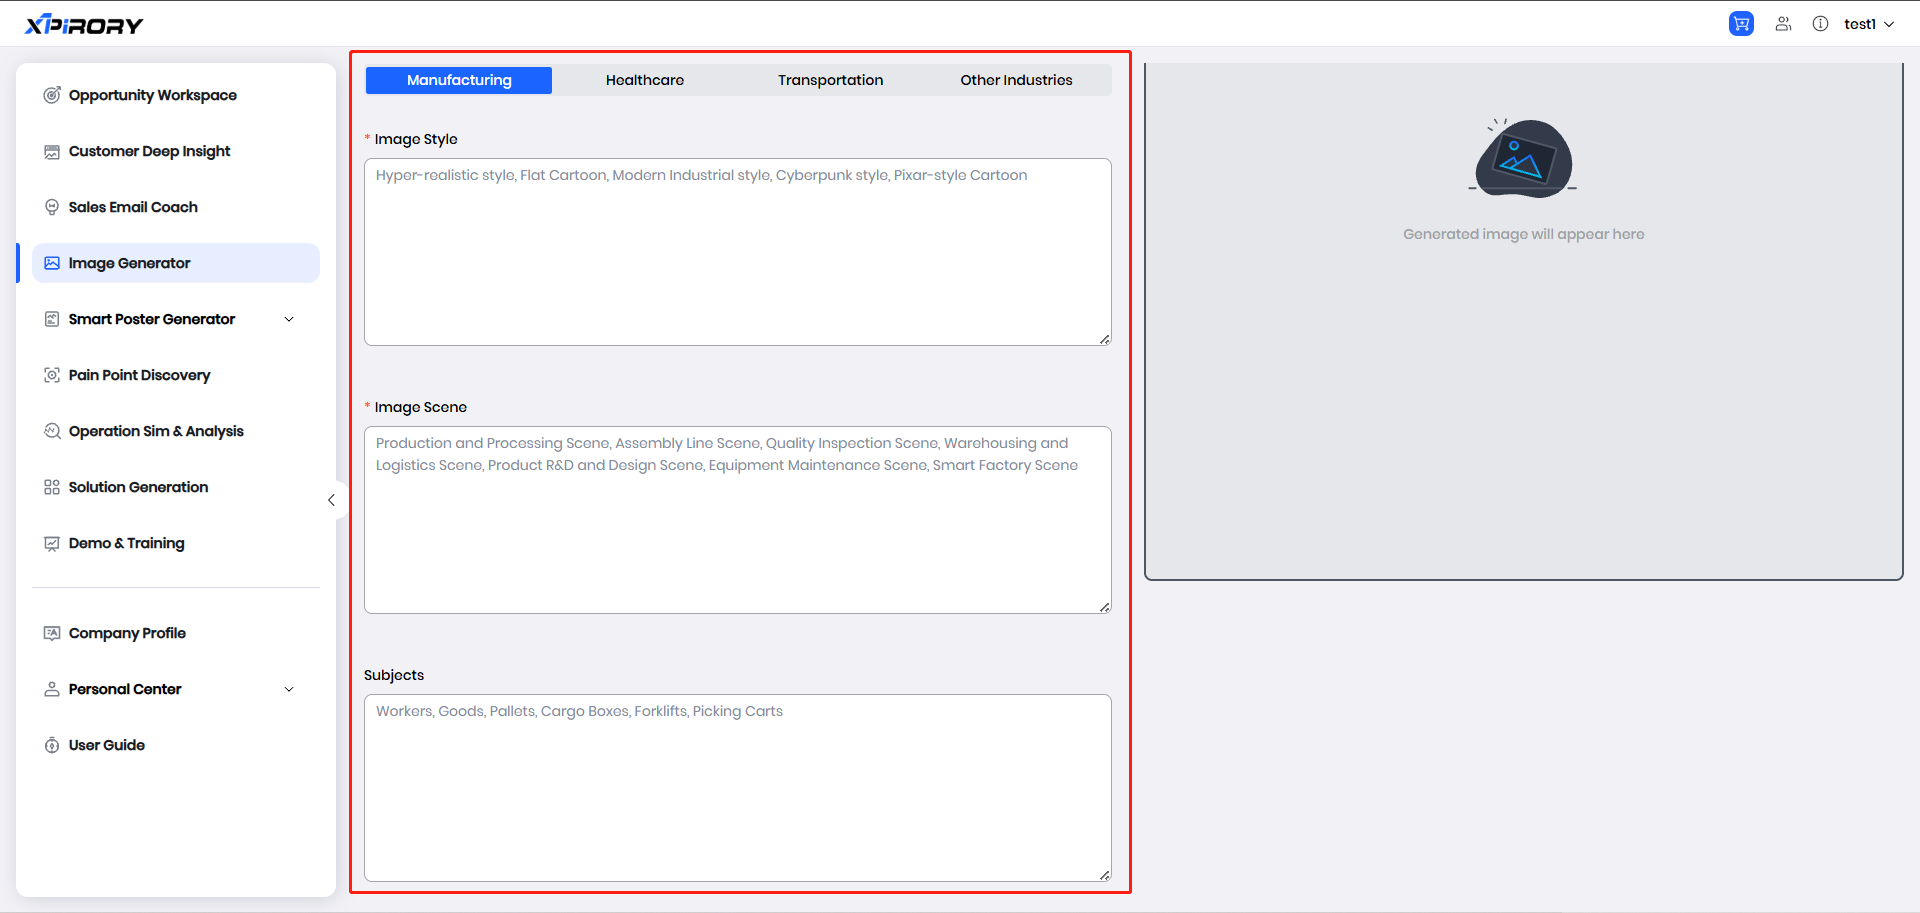
(3) Provide detailed descriptions of the image style and visual content according to the prompts in the text input field.
(4) Click the "Generate lmage" button at the top and wait a moment to see the image preview in the generation results.
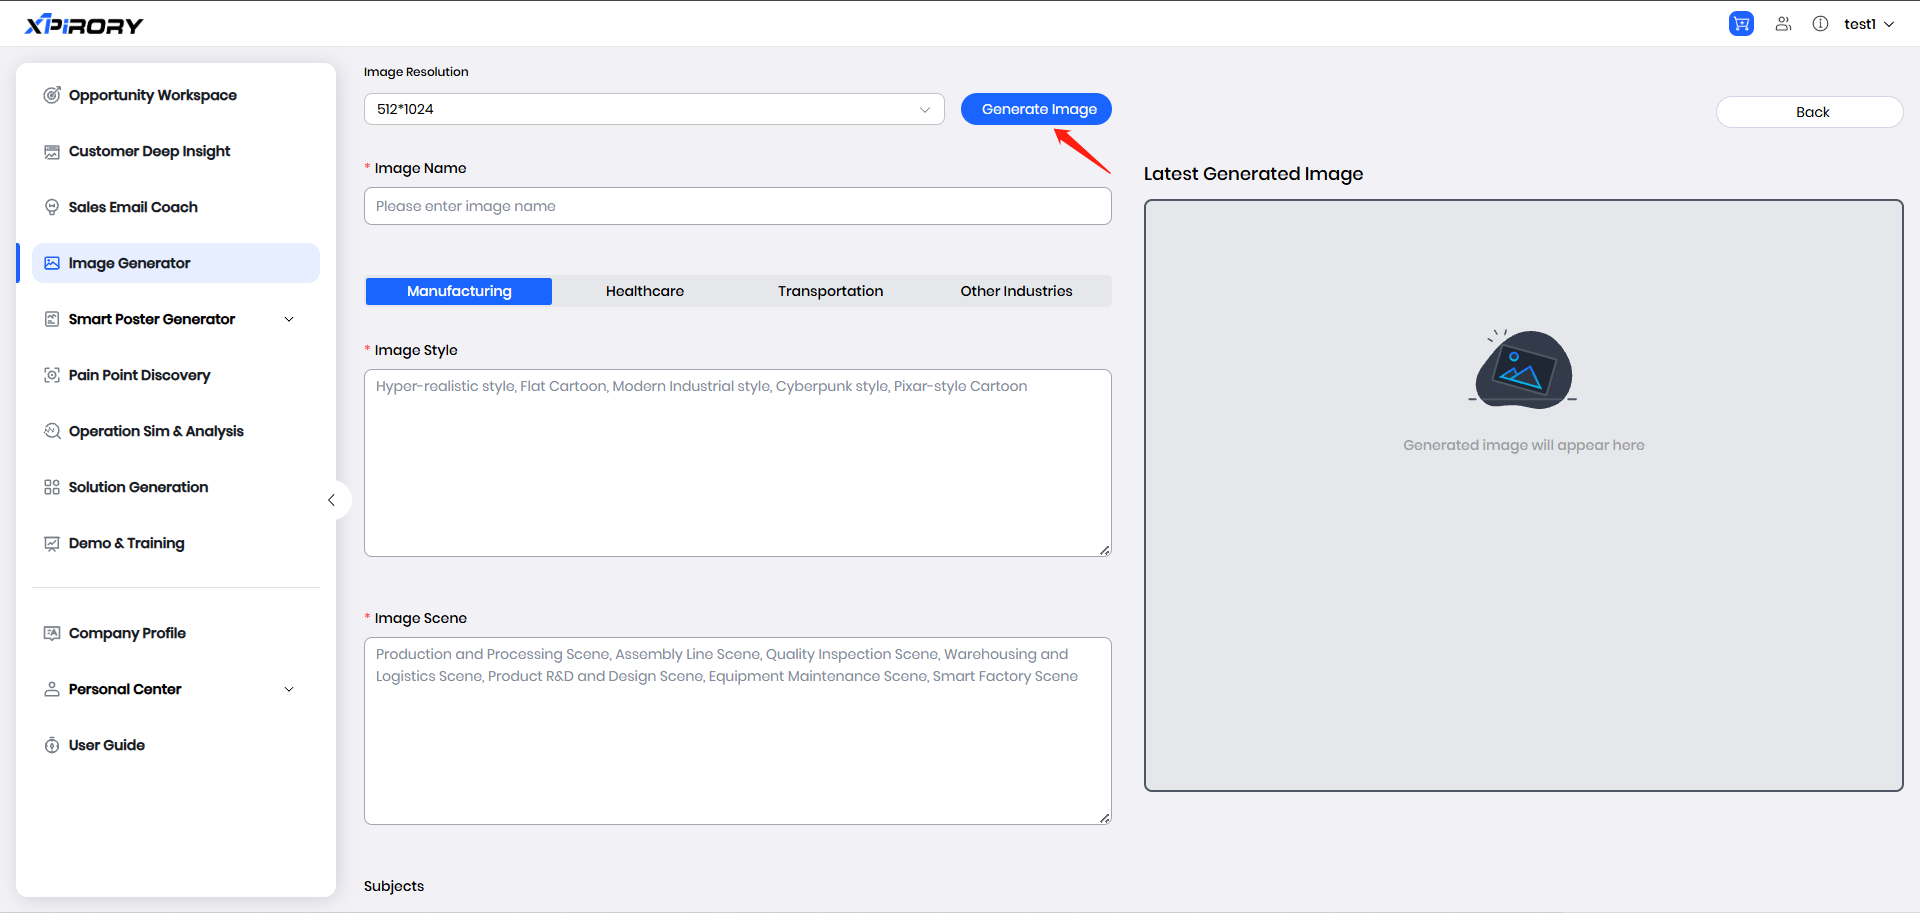
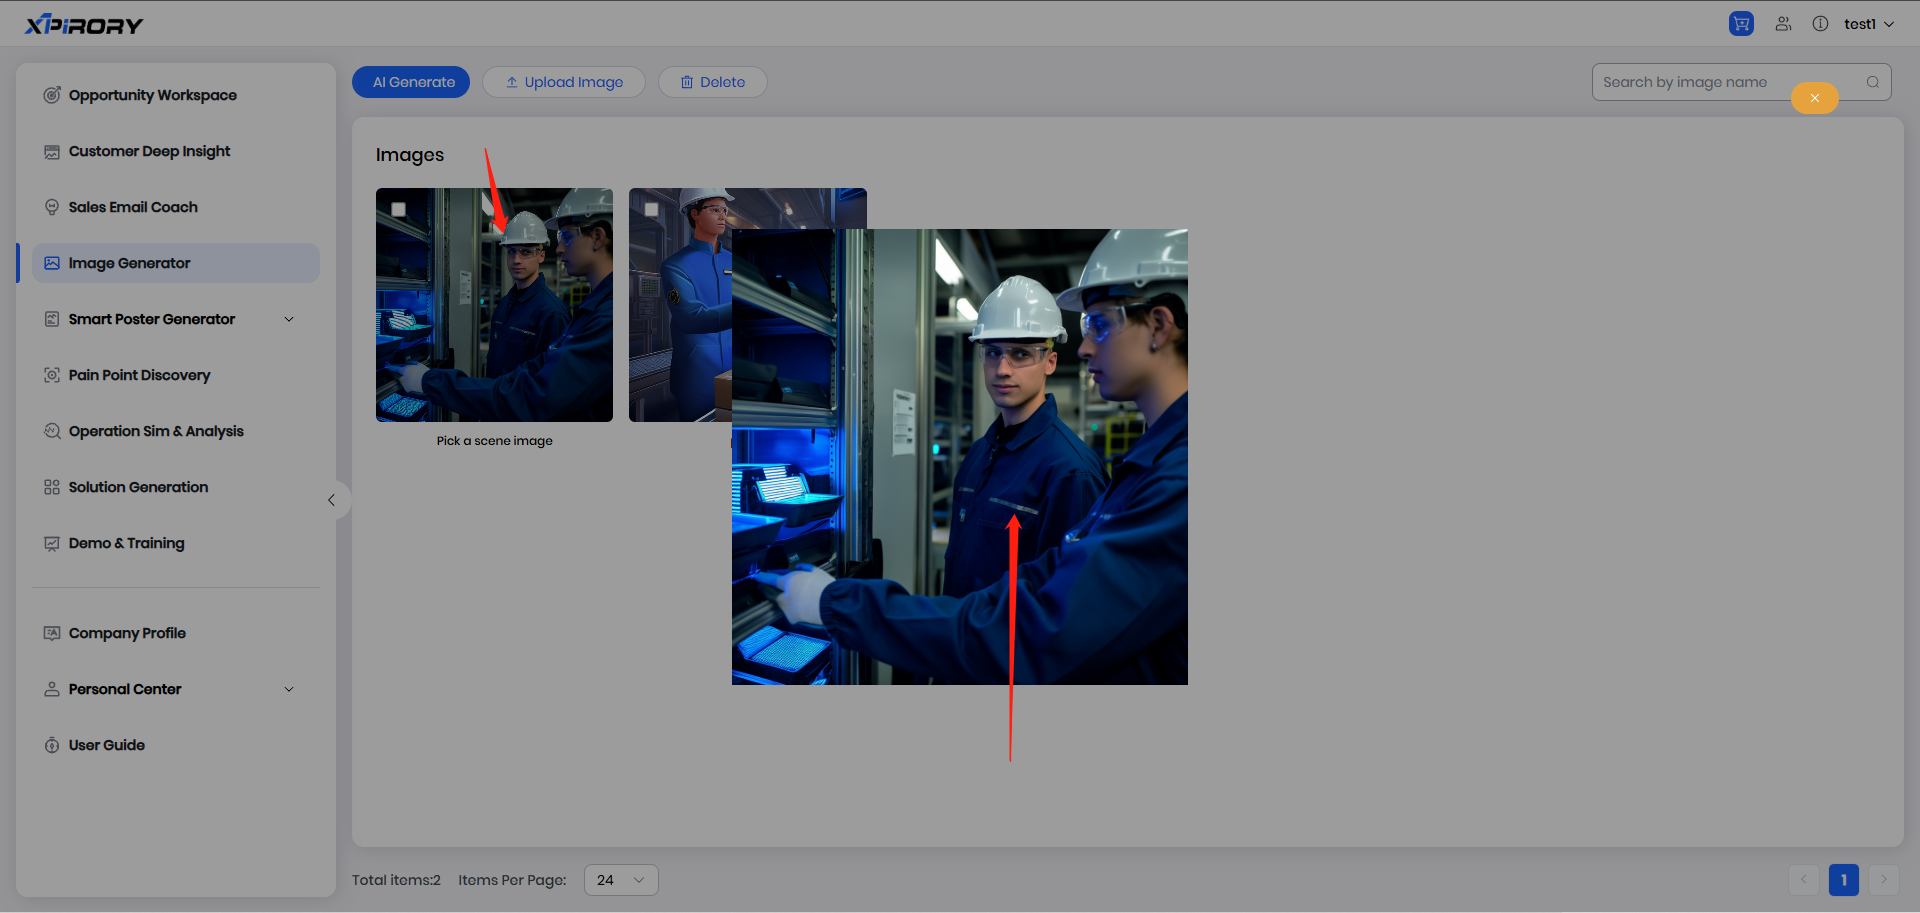
(5) Click the "Back" button in the upper right corner to return to the image list; click an image to view it in full size.
(6) Right-click the opened image and select "Save Image As" to save the image to your local device.
3.5 Smart Poster Generator
Function Overview:
The Smart Poster Generator function relies on advanced AI technology to integrate intelligent image generation, automated copywriting, and multi-language output. The AI image generation engine quickly generates high-quality images based on user-defined styles and visual content; it supports importing custom poster templates, and combines with the user's own knowledge base documents, the AI deeply analyzes and automatically generates poster copy, matching the template layout to complete content filling.
3.5.1 Poster Templates
Operation Steps:
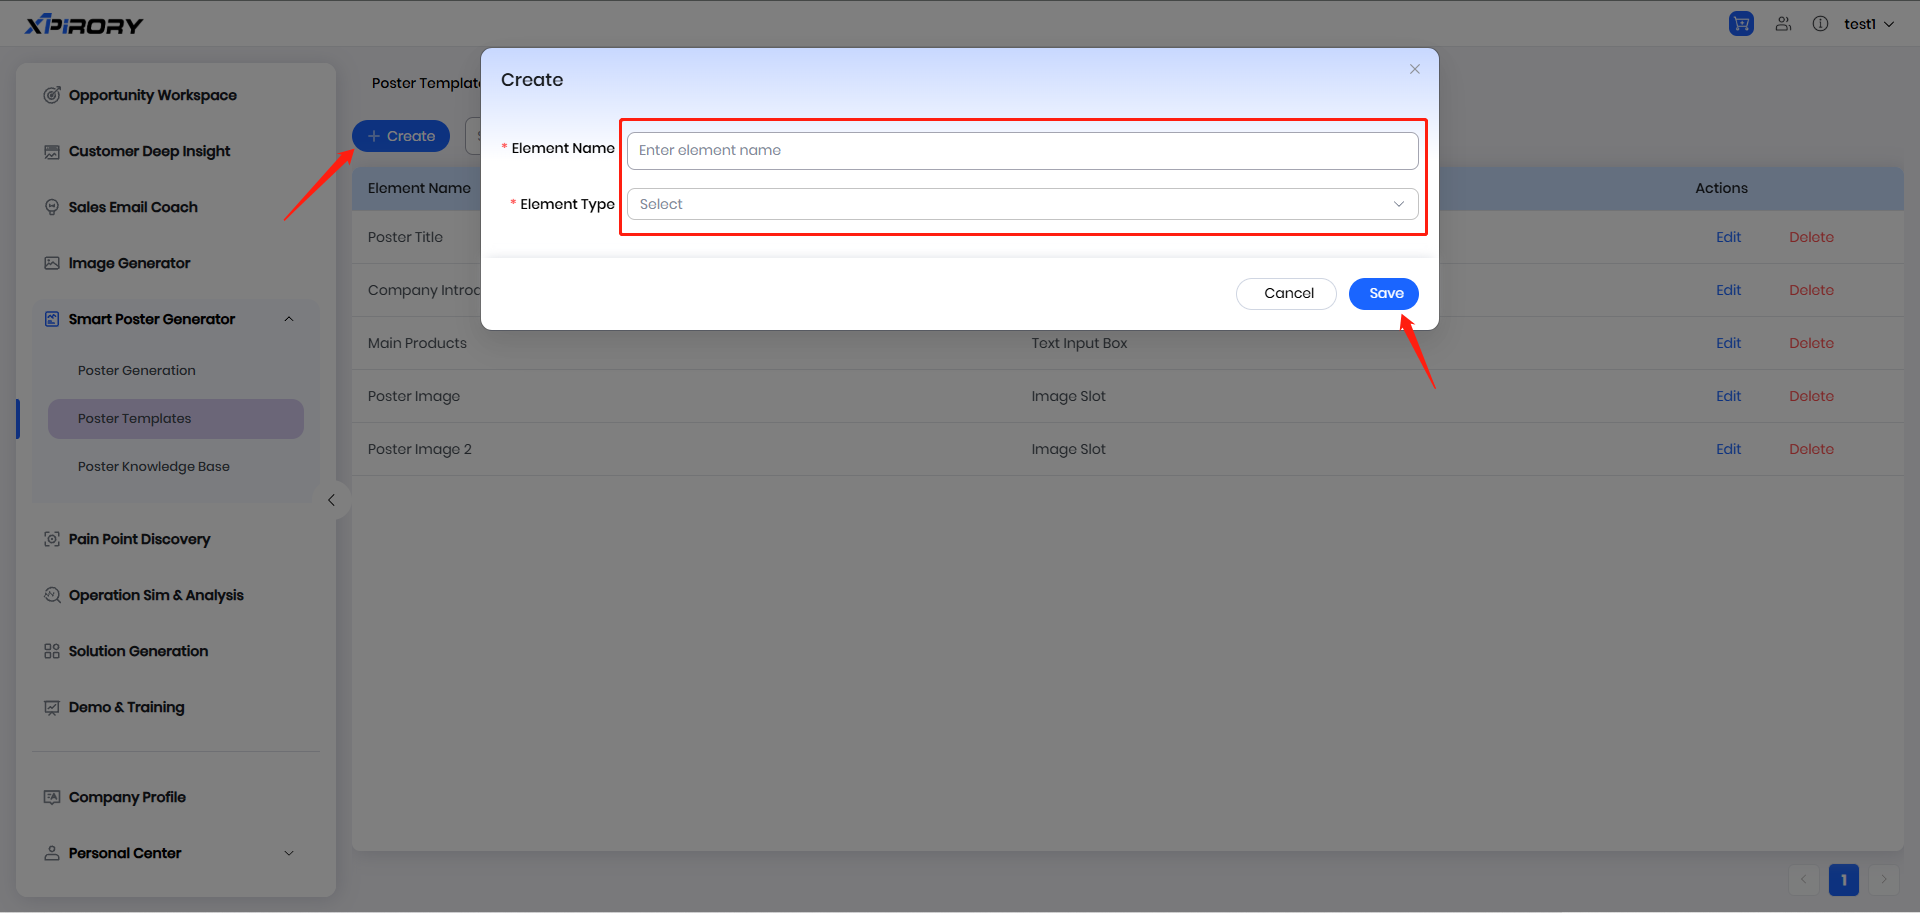
(1) Switch to the poster element maintenance interface via the "Poster Elements" tag.
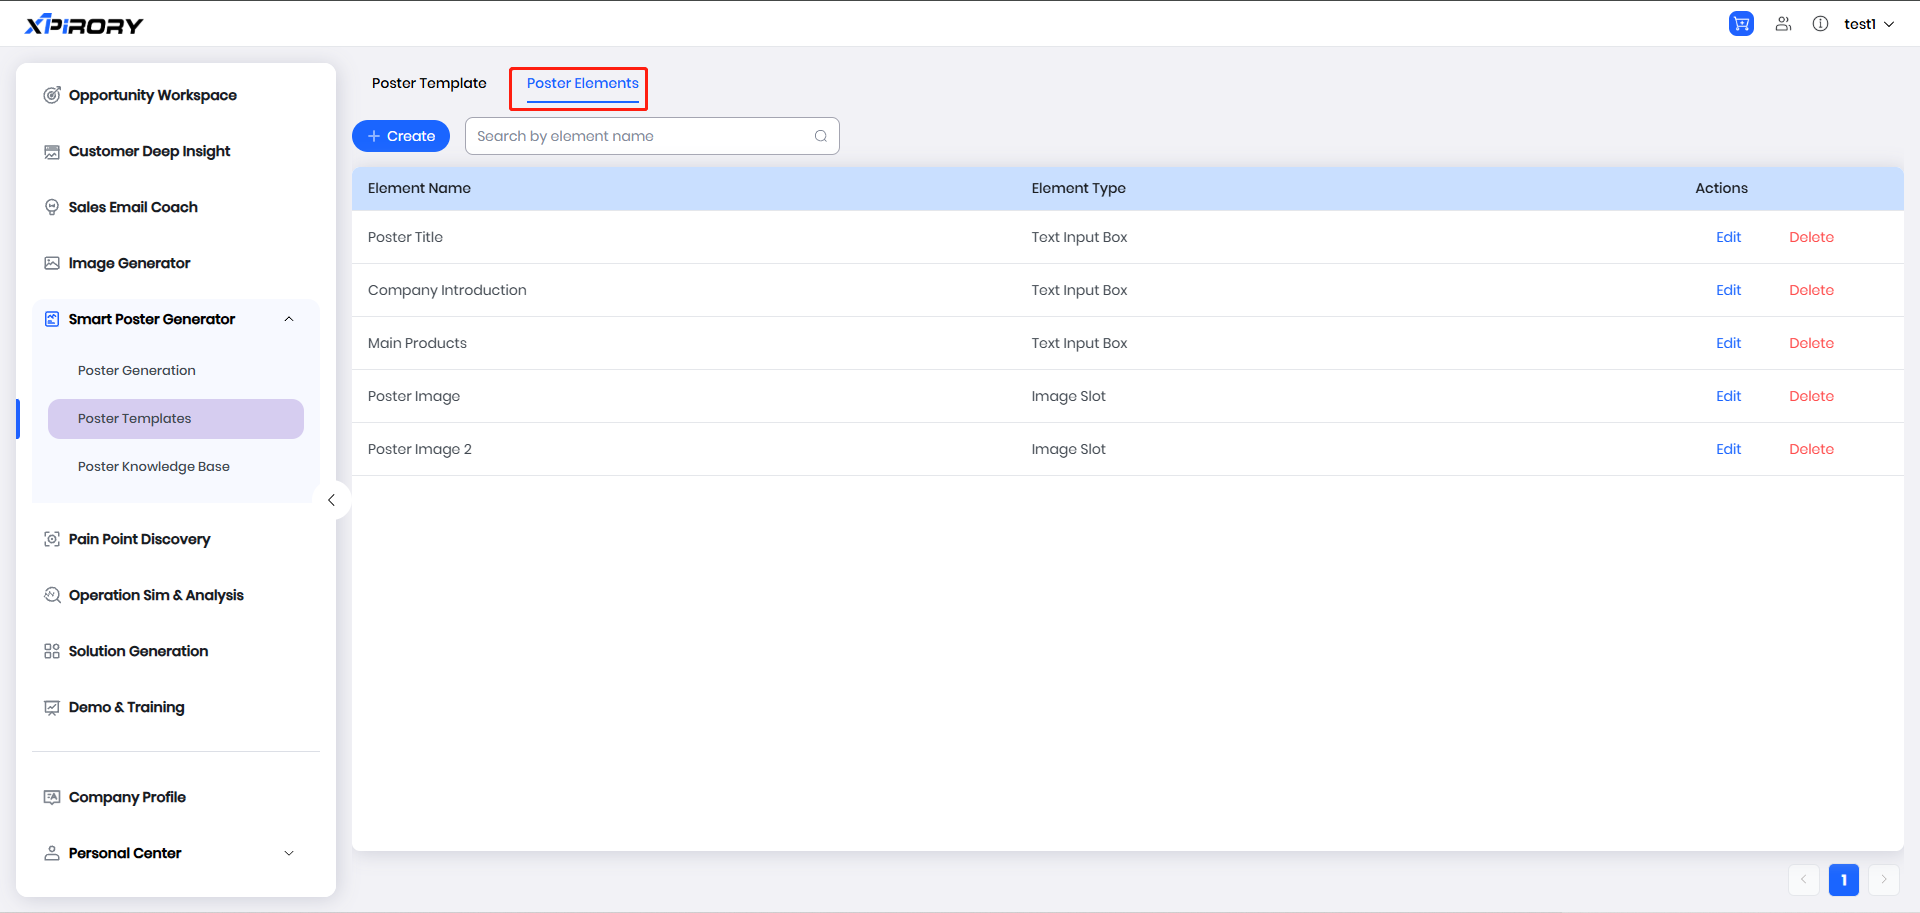
(2) Click the "Create" button to add elements needed in the poster. These elements are divided into two types: "Text Input Box" and "Image Slot" During subsequent poster generation, the system will automatically identify the corresponding element types and insert the corresponding content.
(3) After adding the required elements, click the "Poster Template" tag to switch to the poster template settings page.
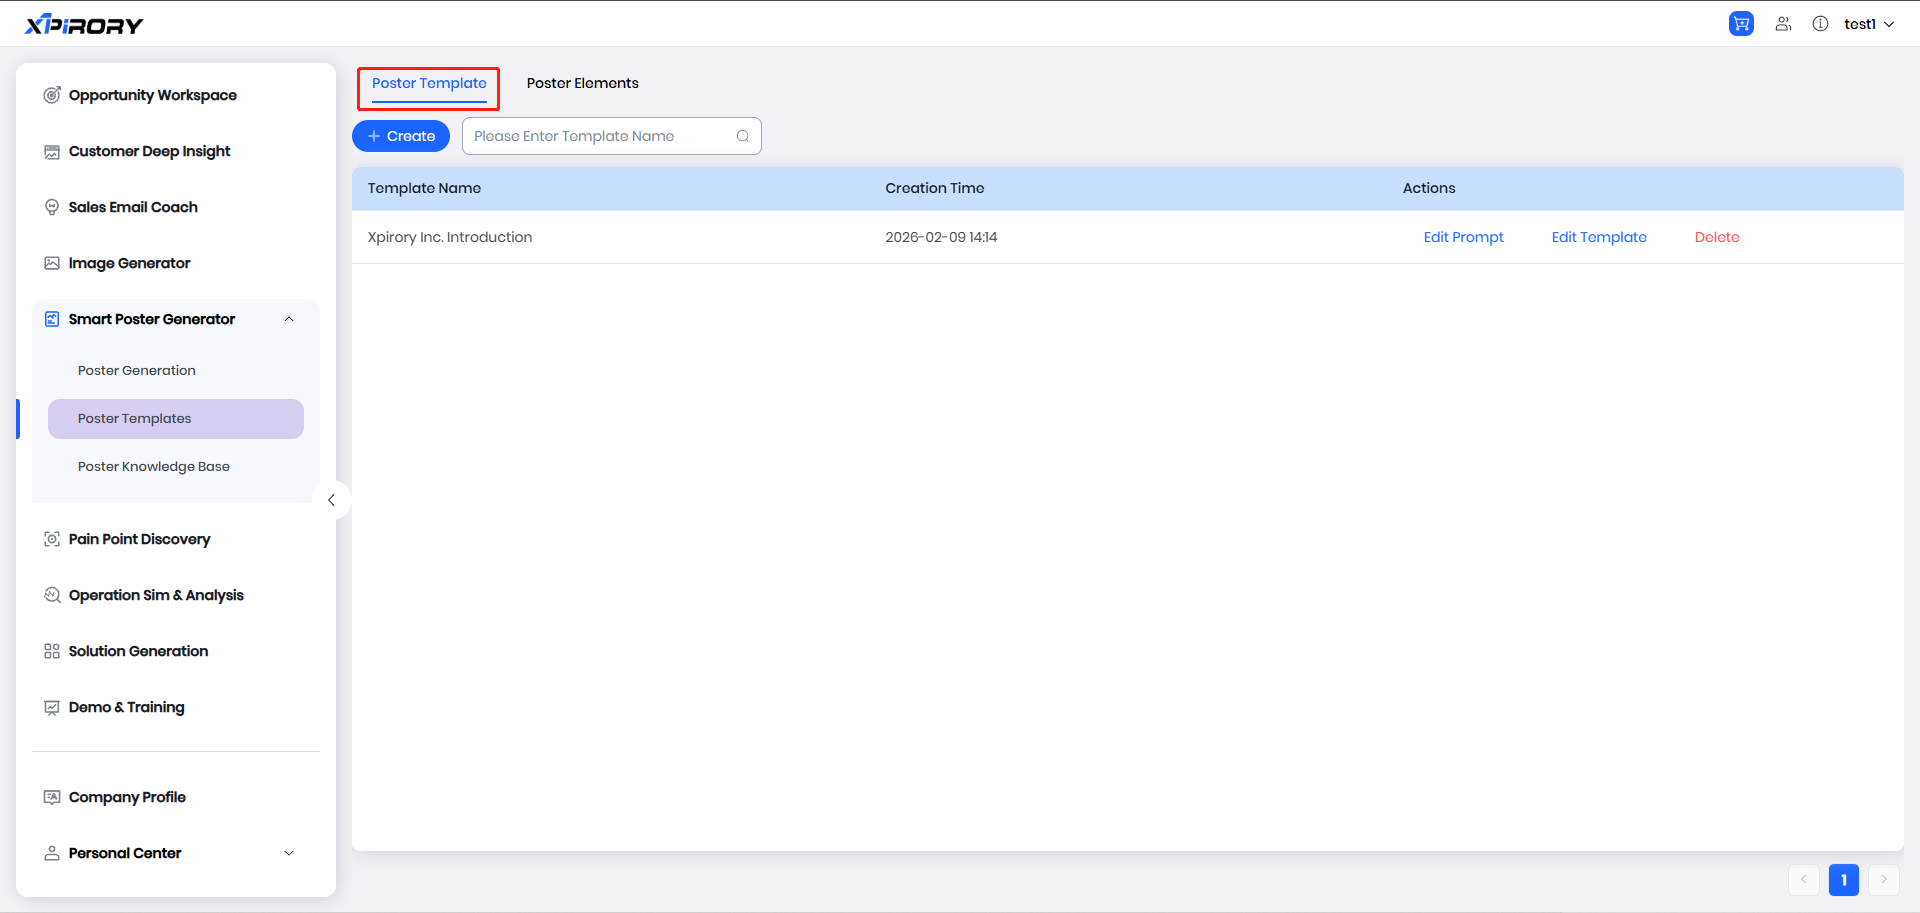
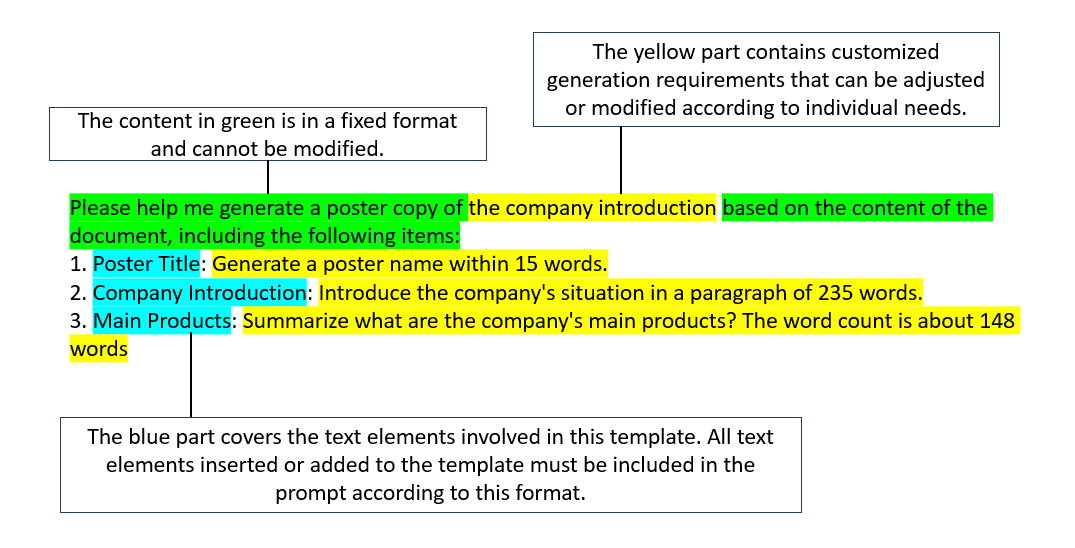
(4) After clicking "Create" set the poster template name and the prompt words for poster copy generation.
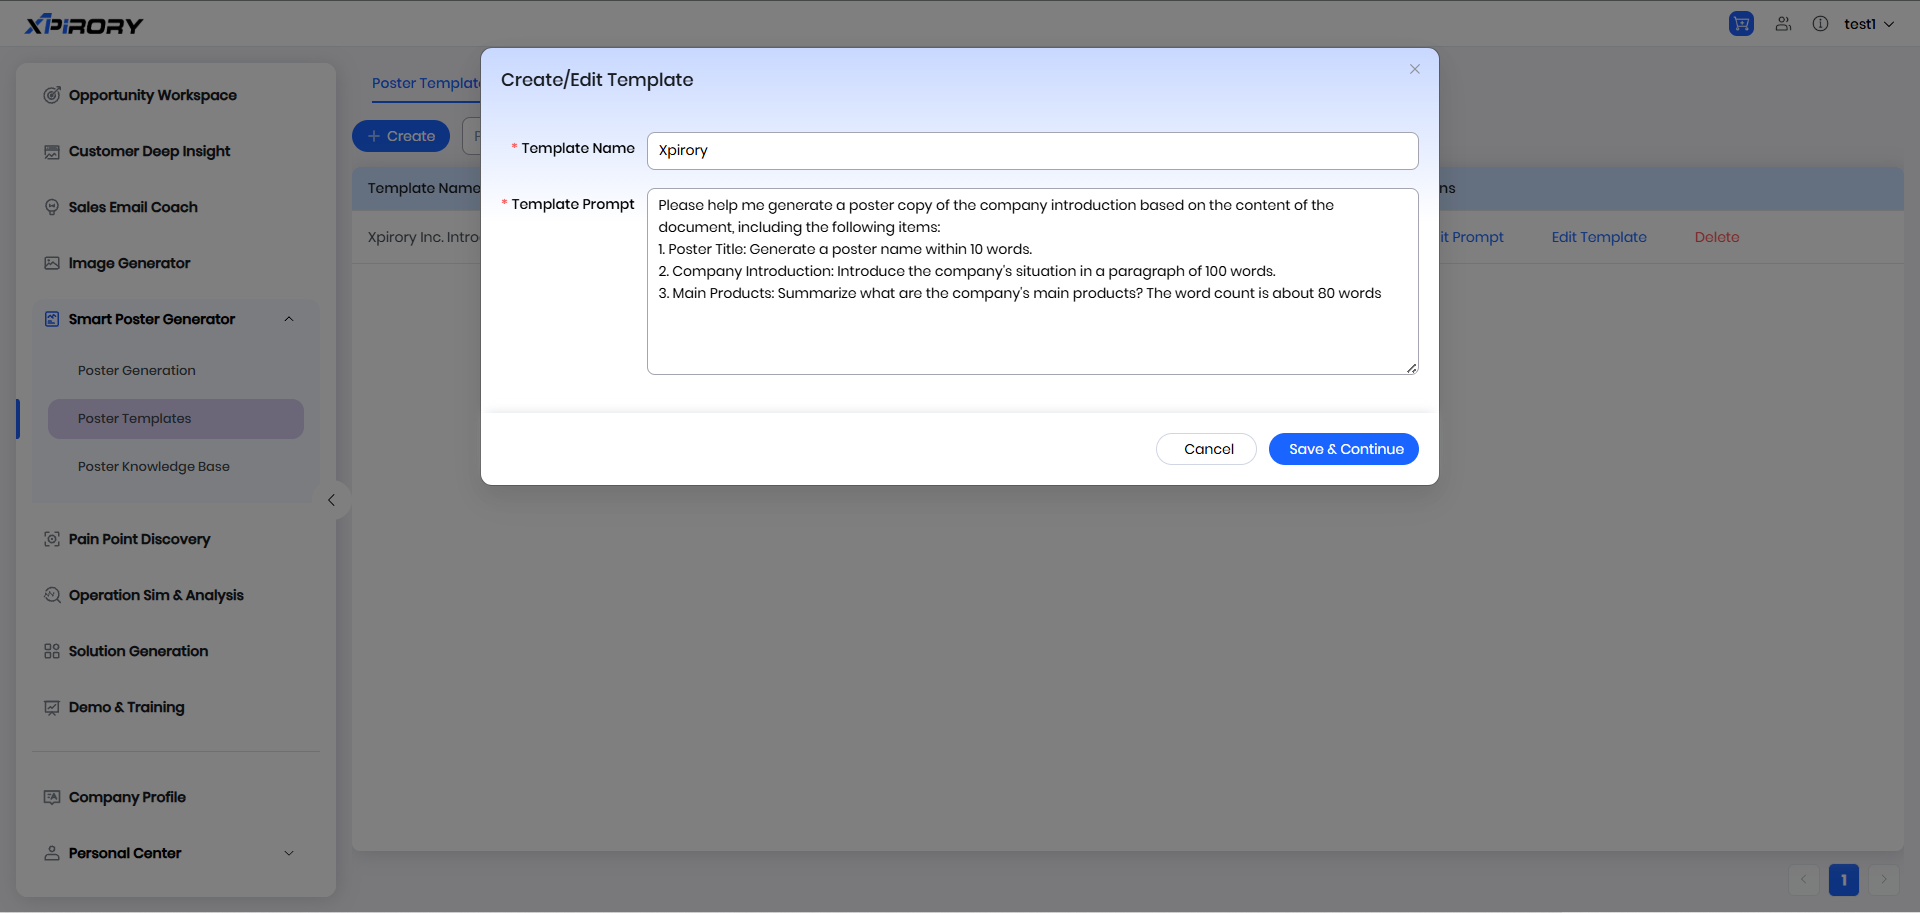
(5) Prompt word settings need to follow the following format requirements: [Note: Specific format requirements should be added here if provided by the user]
(6) After adding the prompt words, click "Save" to enter the poster template editing interface.
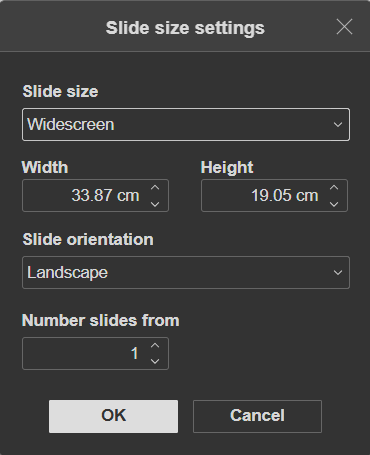
(7) Click the "Design" tag, select "Advanced settings" in "Slide Size setting," and define the poster dimensions.

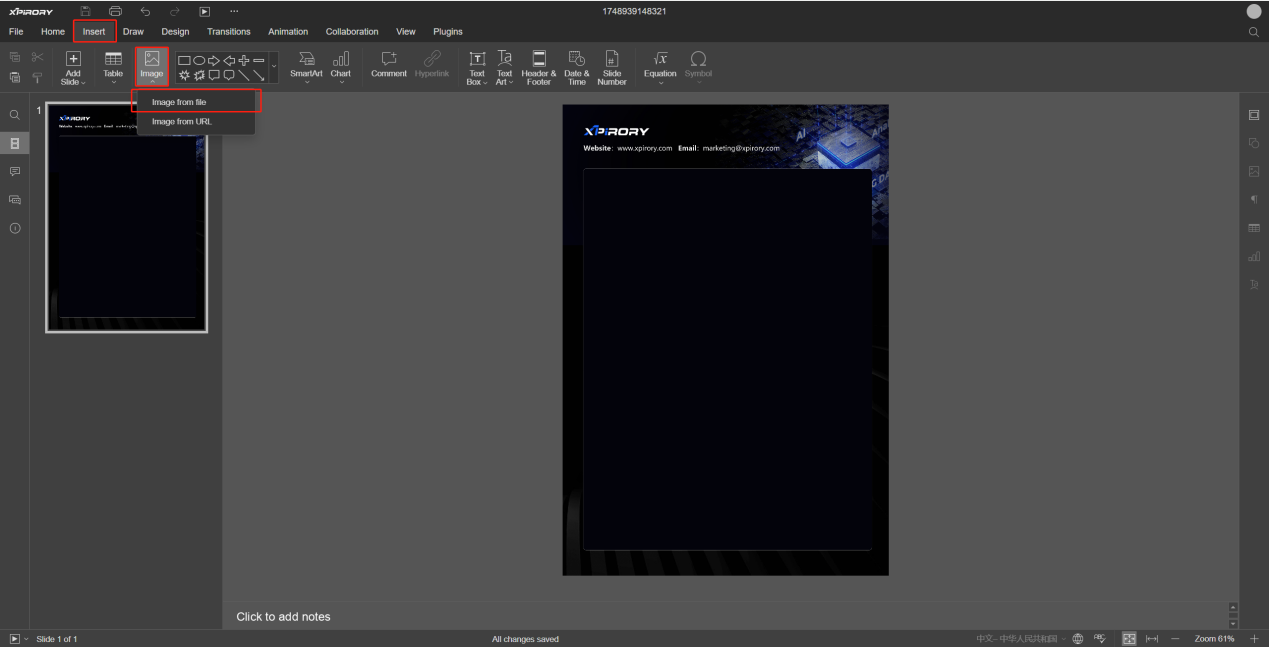
(8) If you need to add a background to the poster, insert an existing image as the background via the "Image" button in the "Insert" tag.
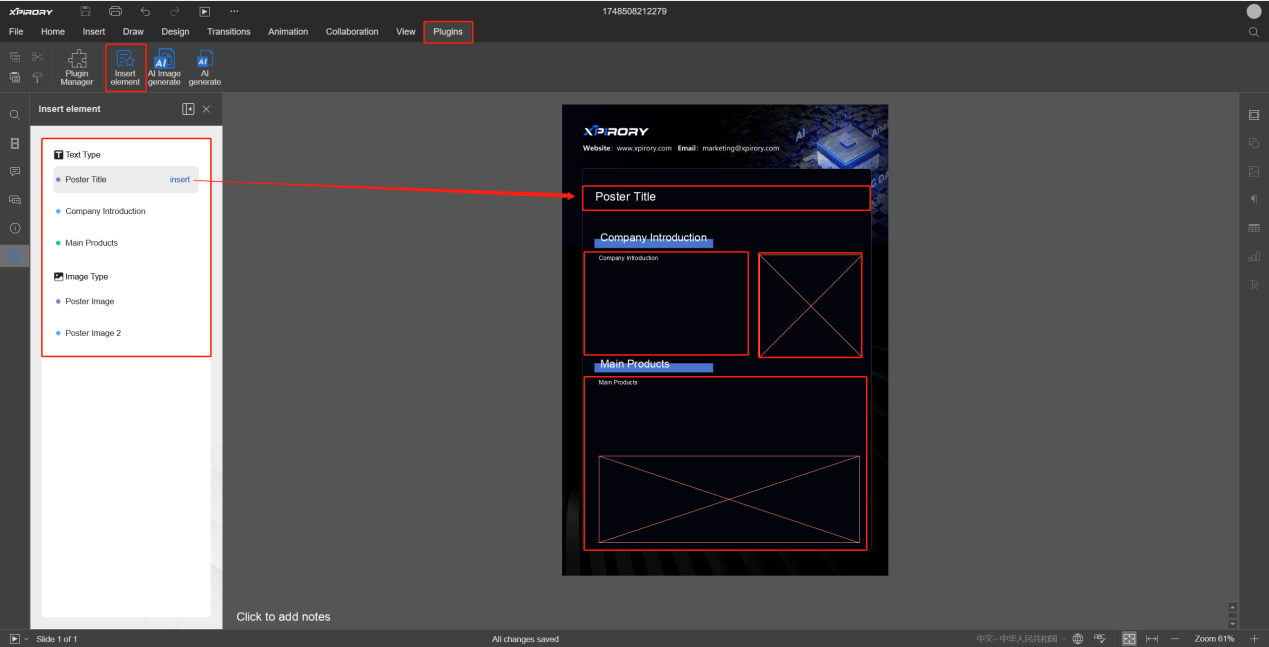
(9) Next, click the "Plugins" tag, find the "Insert element" button, and you will see the text and image elements previously added in the poster elements. Users can add these elements to the poster according to their layout needs and adjust their position, size, and other styles. The AI will automatically generate and insert copy and image content based on these elements' layout positions.
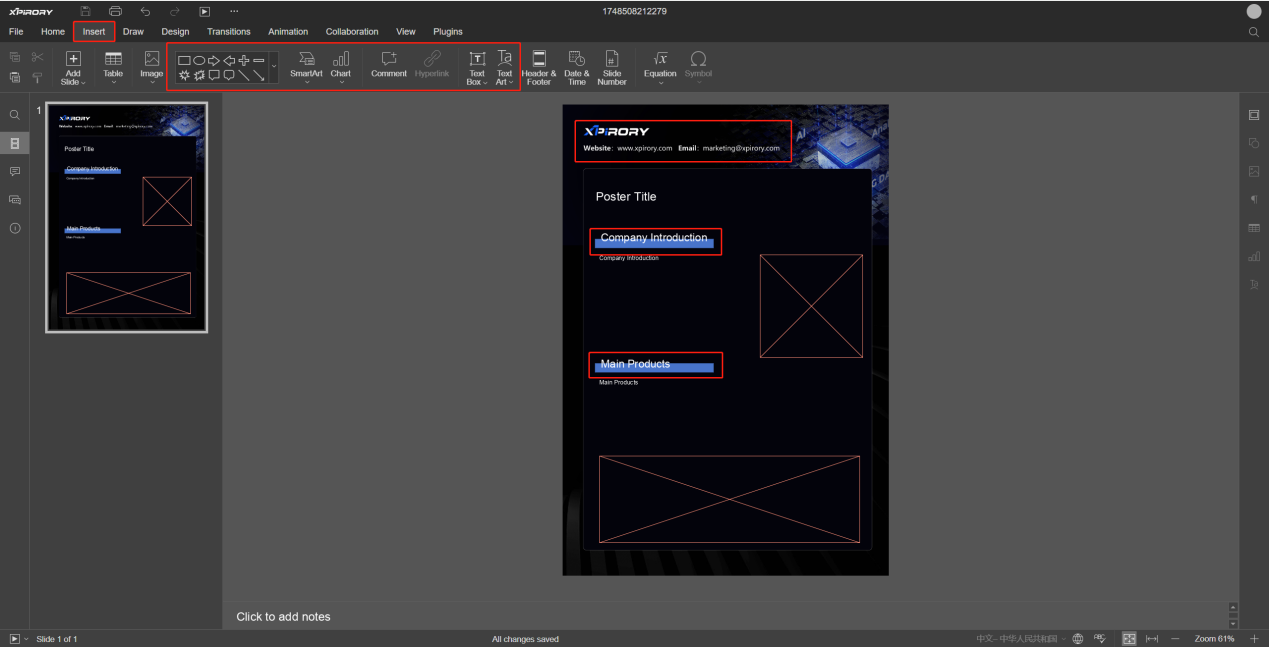
(10) For fixed elements that do not need to be generated, such as subheadings, fixed patterns, or decorative lines, they can be directly added via various tools under the "Insert" tag. These elements will not change with the generation results during subsequent poster generation.
(11) Now,the poster template is set up. The system will automatically save in real time; closing the page tag will exit the poster template editing.
3.5.2 Poster Generation
Operation Steps:
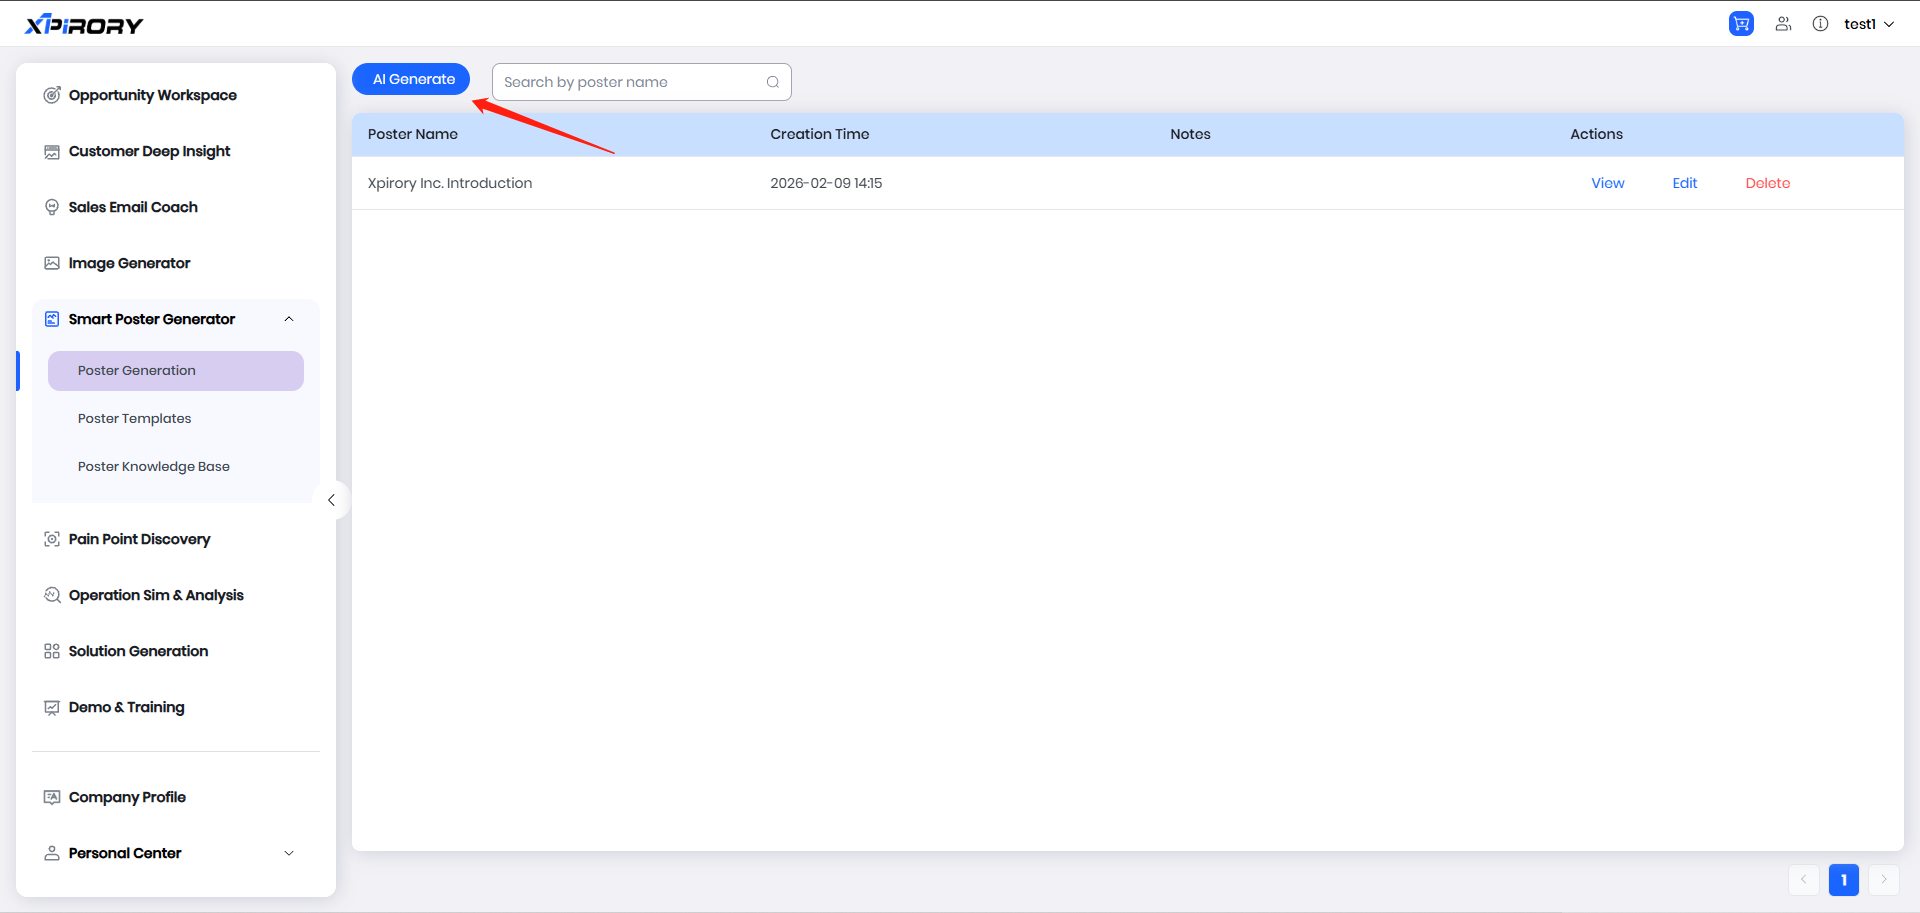
(1) Click "AI Generate" to enter the poster generation interface.
(2) Click "Upload Files" and select one or more documents for the AI to reference in this generation. After this generation task is completed, the document will be automatically saved to the poster knowledge base. It can be directly selected from the "Knowledge Base Selection" drop-down menu next time.
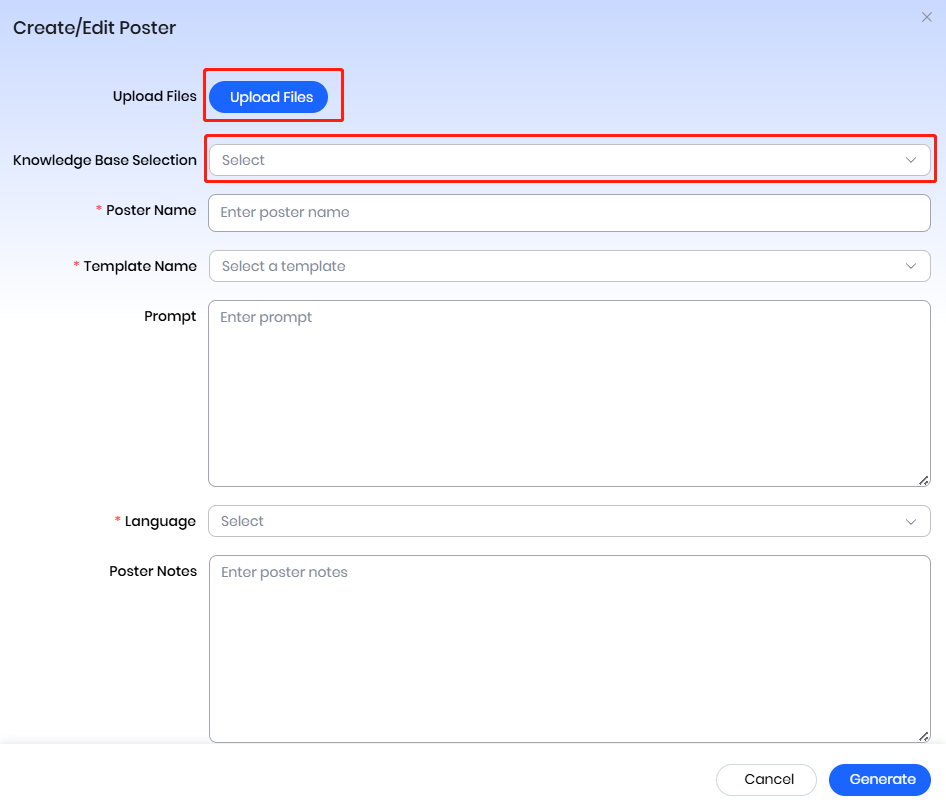
(3) Enter the poster file name, select the corresponding poster template, and fine-tune the automatically populated prompt words to help the AI better understand the generation requirements.
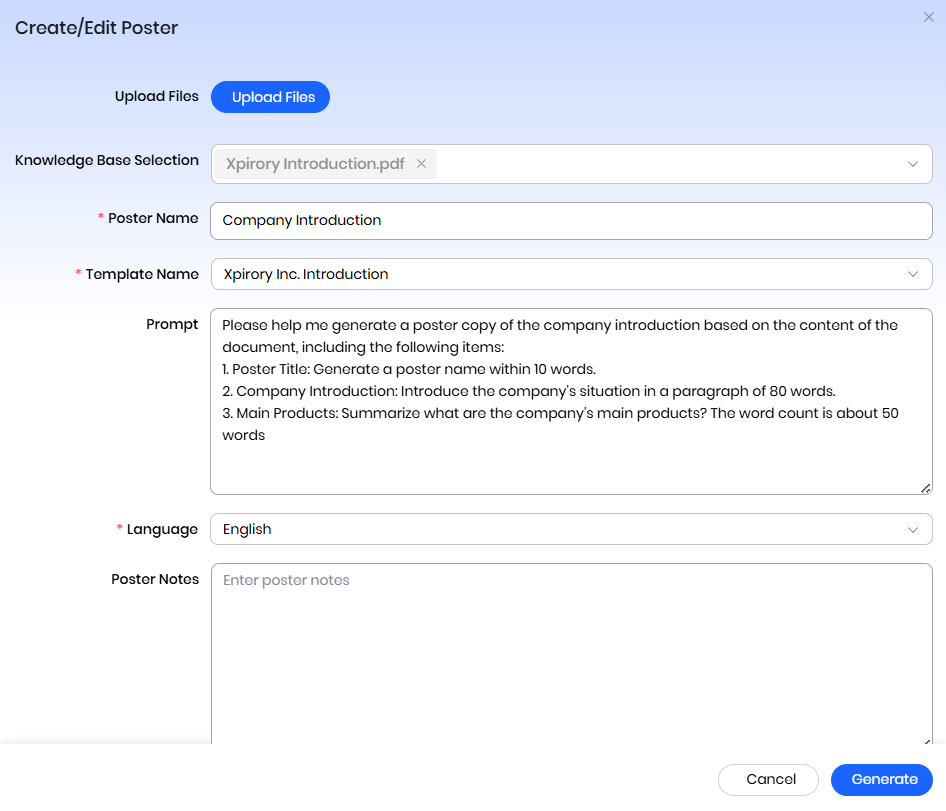
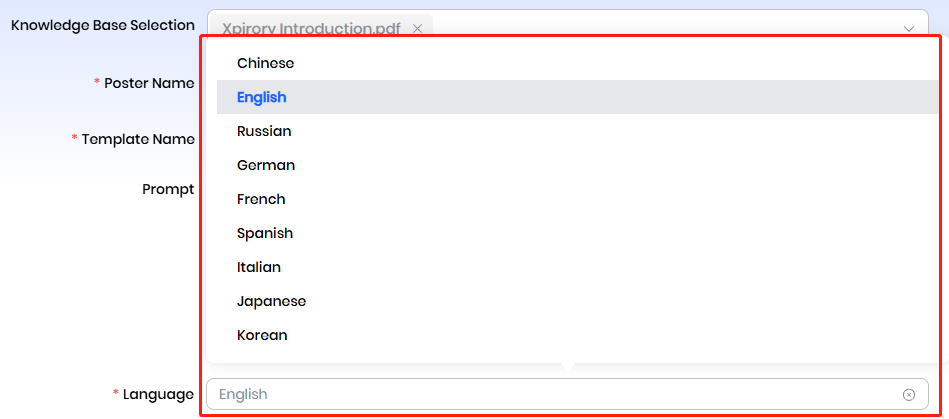
(4) Select the output language, and the AI will generate copy content according to the language requirements.
(5) Add poster notes to facilitate quick understanding of the poster's detailed information in the list later and assist in future searches.
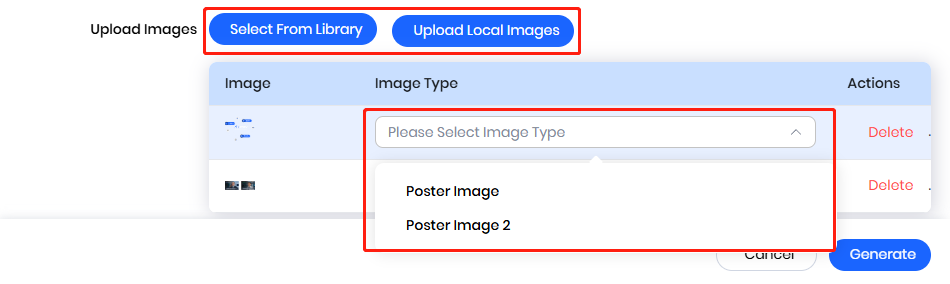
(6) Select the images to insert and set the corresponding image types; the system will automatically insert images according to the image input field type. Click the "Select From Library" button to choose AI-generated images under the "lmage Generator" menu; click the "Upload Local lmages" button to select and insert images from your local computer.
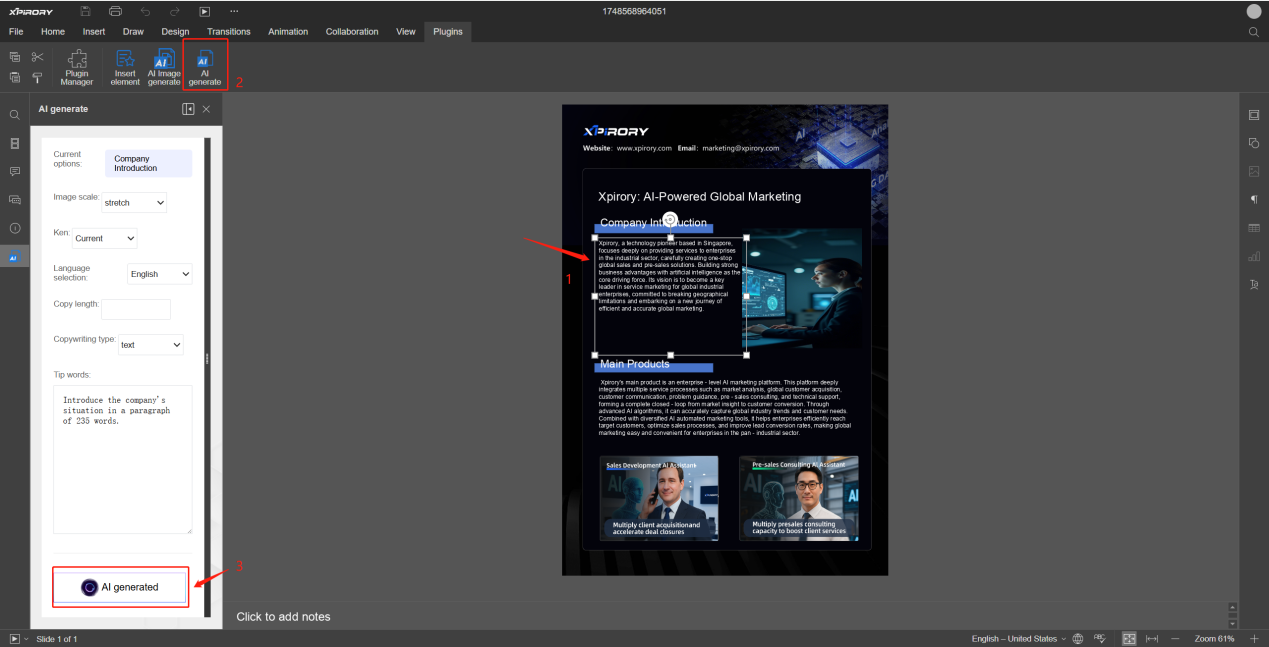
(7) Click "Generate" and after the AI completes generation, the system will automatically open the poster editing interface.
(8) For copy content that needs modification or adjustment, use the "AI generate" tool under the "Plugins" tag to regenerate the content. After generation, directly copy and paste the result into the text field to complete the modification and replacement.
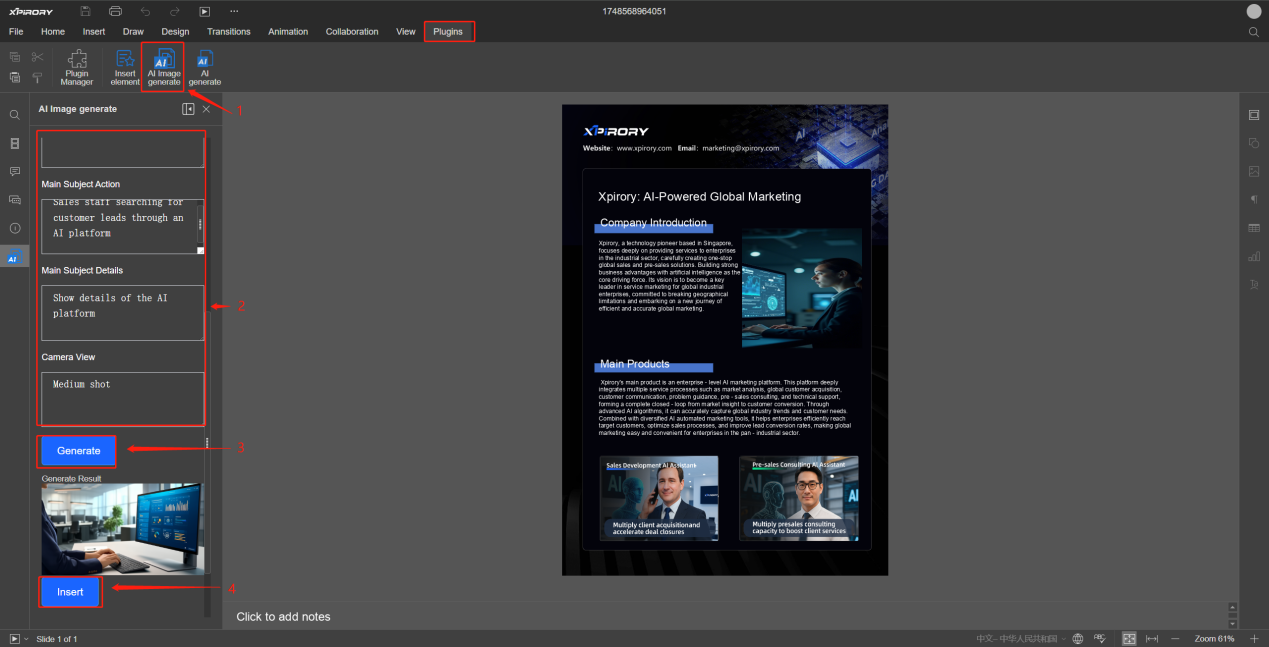
(9) For image content that needs replacement, use the "AI Image Generate" tool under the "Plugins" tag to generate new images for replacement.
3.5.3 Poster Knowledge Base
Operation Steps:
(1) Reference documents uploaded during poster generation will be automatically saved to the poster knowledge base management list. Users can edit file descriptions or delete reference files here.
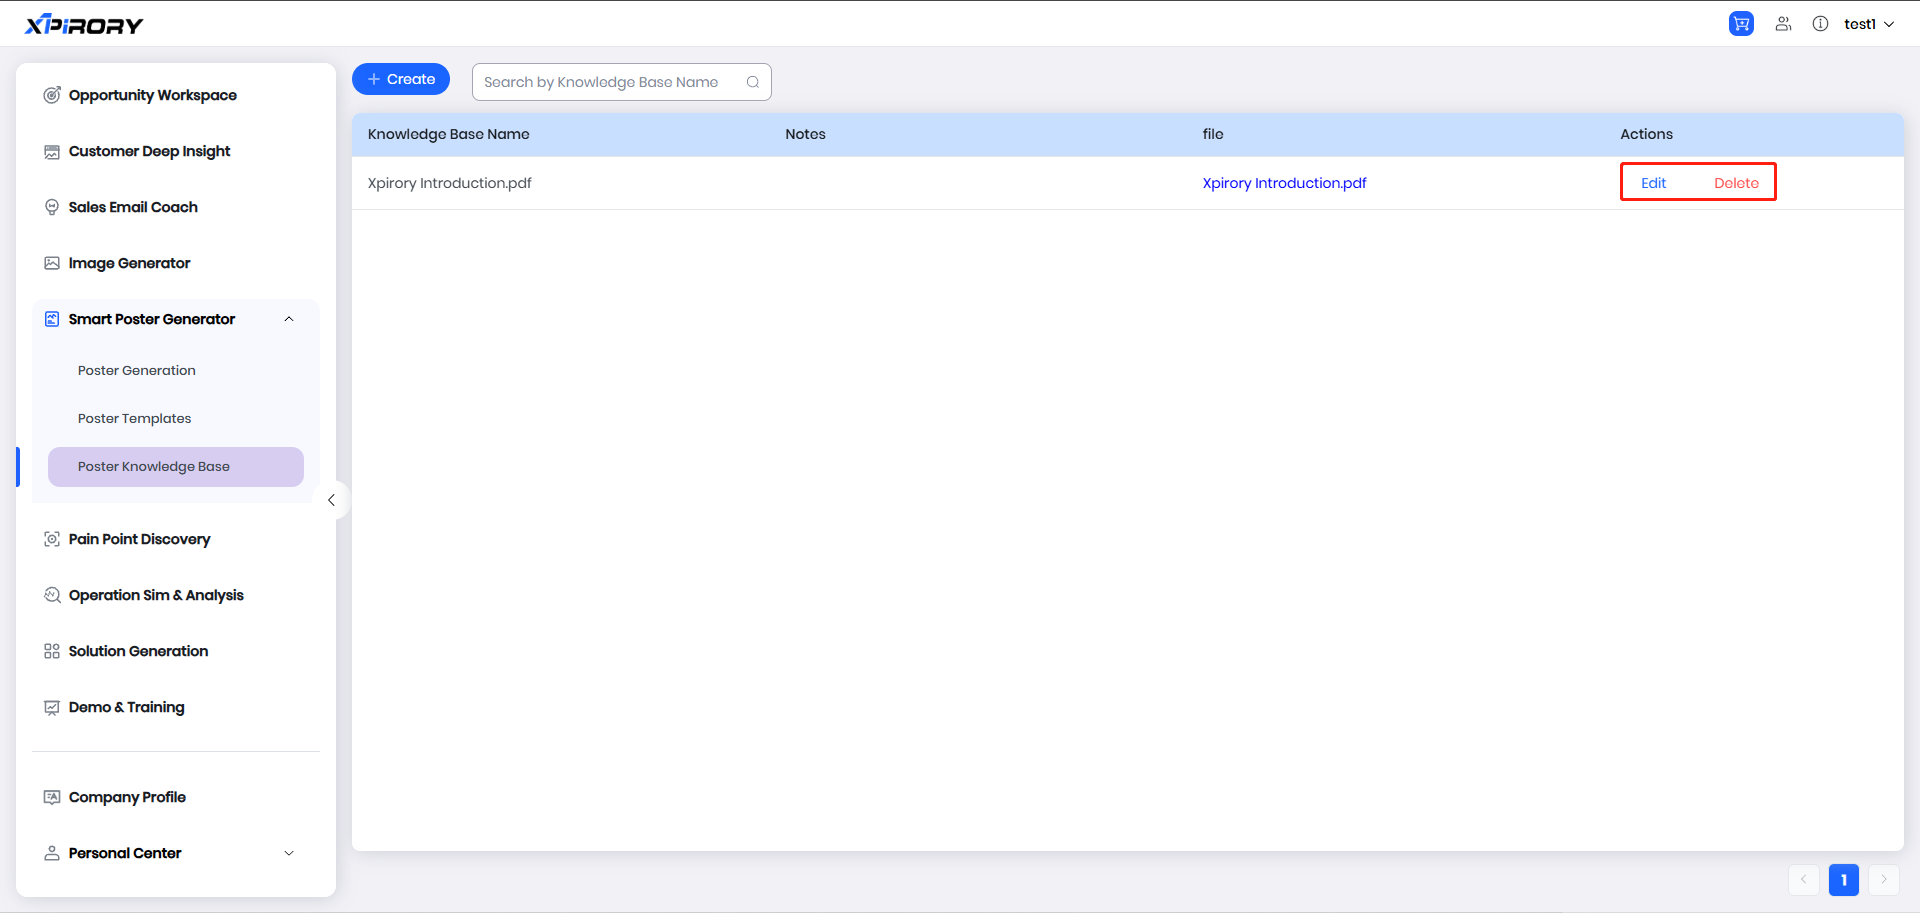
(2) In addition, commonly used reference documents can be added in advance via the "Create" button for quick selection and use during future poster generation.

3.6 Pain Points Discovery
Function Overview:
The Pain Points Discovery is an AI-powered intelligent retrieval platform for enterprises to categorically display solutions and business pain point knowledge. Users can showcase enterprise solutions through hierarchical classification by L1 Category, L2 Category, L3 Category, Pain Points, Solutions, etc. Pre-sales personnel can use this tool to guide and help customers quickly explore pain points and solutions, efficiently mining project opportunities. Meanwhile, leveraging the AI retrieval function, users can search for operational management challenges in natural language, and the AI will combine professional knowledge from the solution knowledge base to output answers and provide solution document indexes. With the built-in Pain Points Discovery feature, users can independently configure industry classifications and associate pain points with solutions, and all configuration results are real-time synced to the feature.
3.6.1 Basic Data Management
The Basic Data Management serves as the management backend for the Pain Points Discovery, allowing users to configure relevant categories, pain points, and solutions according to their needs to achieve optimal display effects.
3.6.1.1 AI Generate
This functional module leverages AI to quickly realize automatic generation, automatic association, and automatic classification insertion of Categories, Pain Points, and Solution Library between respective modules.
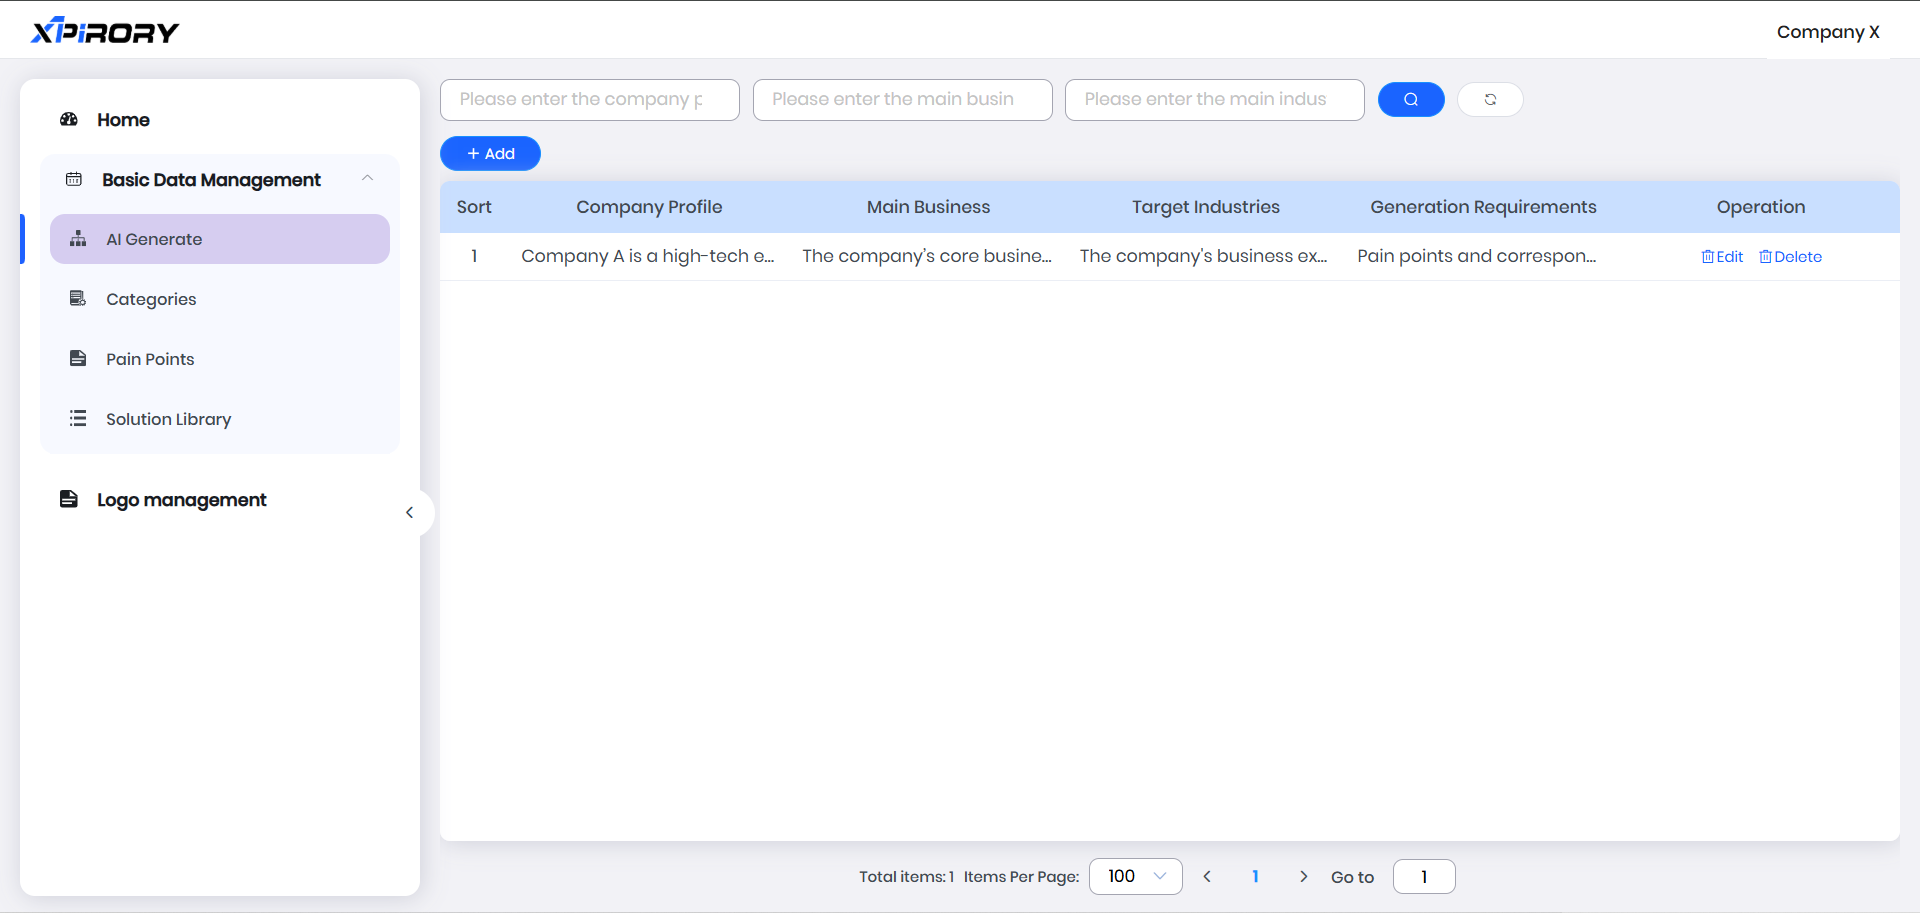
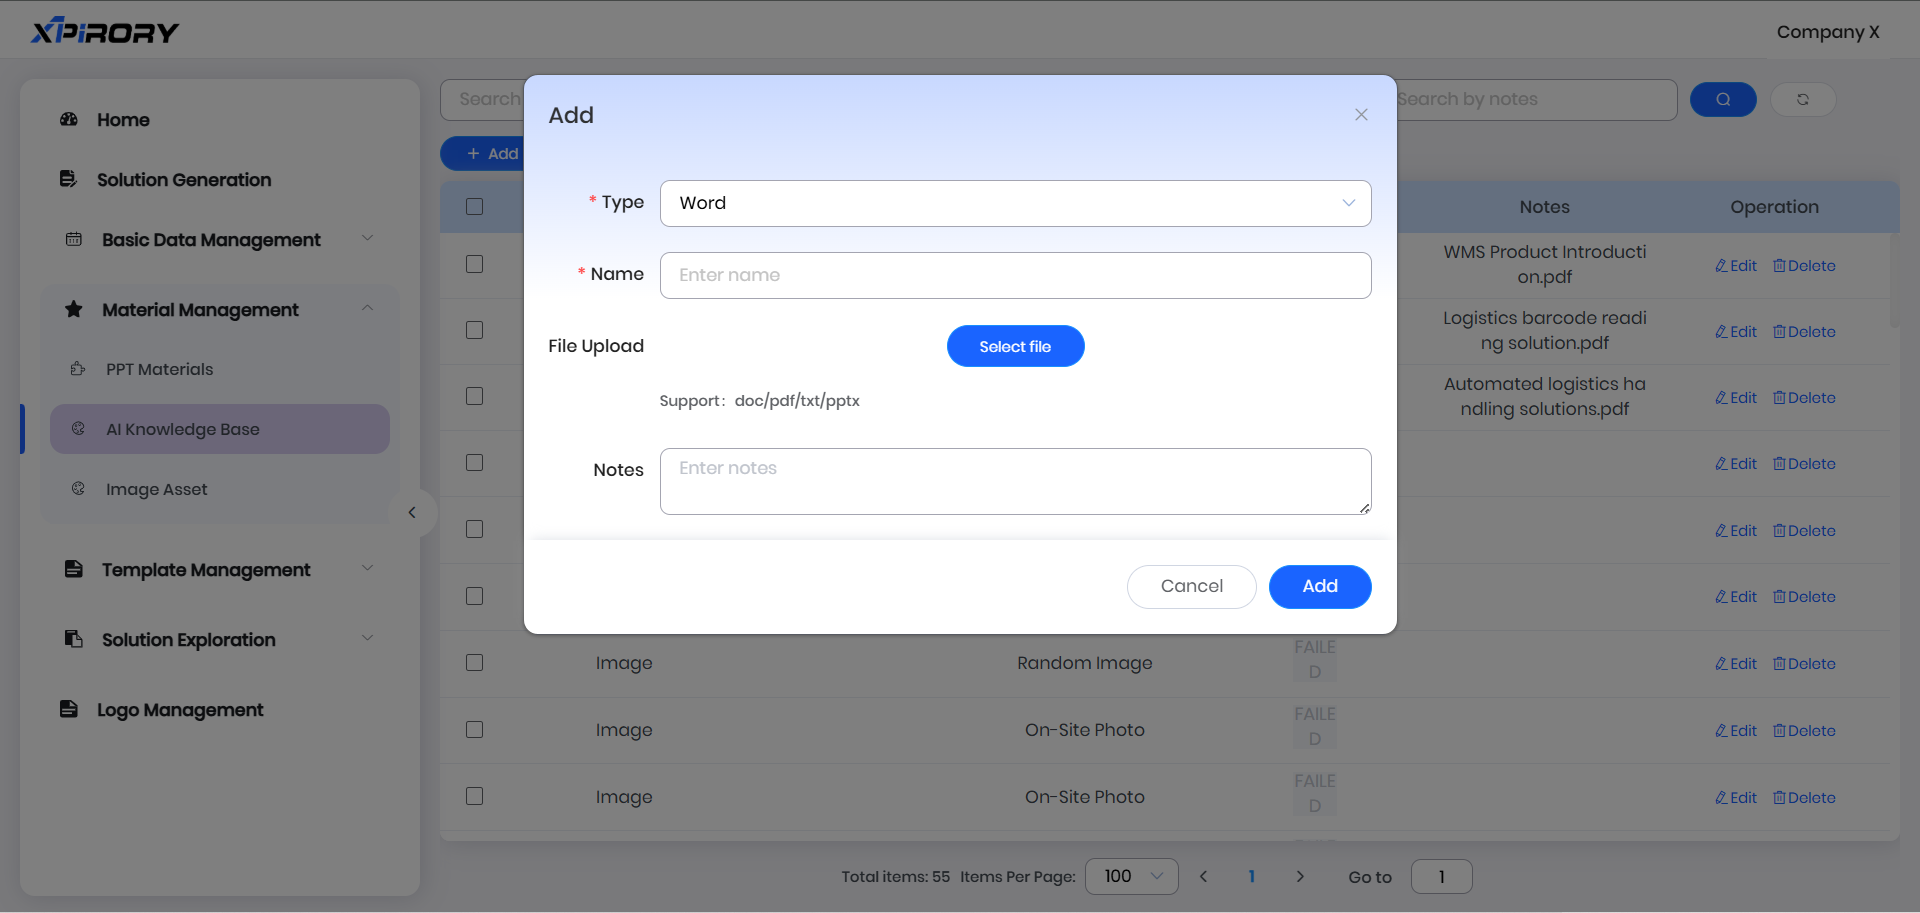
(1) Click the Add button and fill in the information as prompted in the pop-up window.
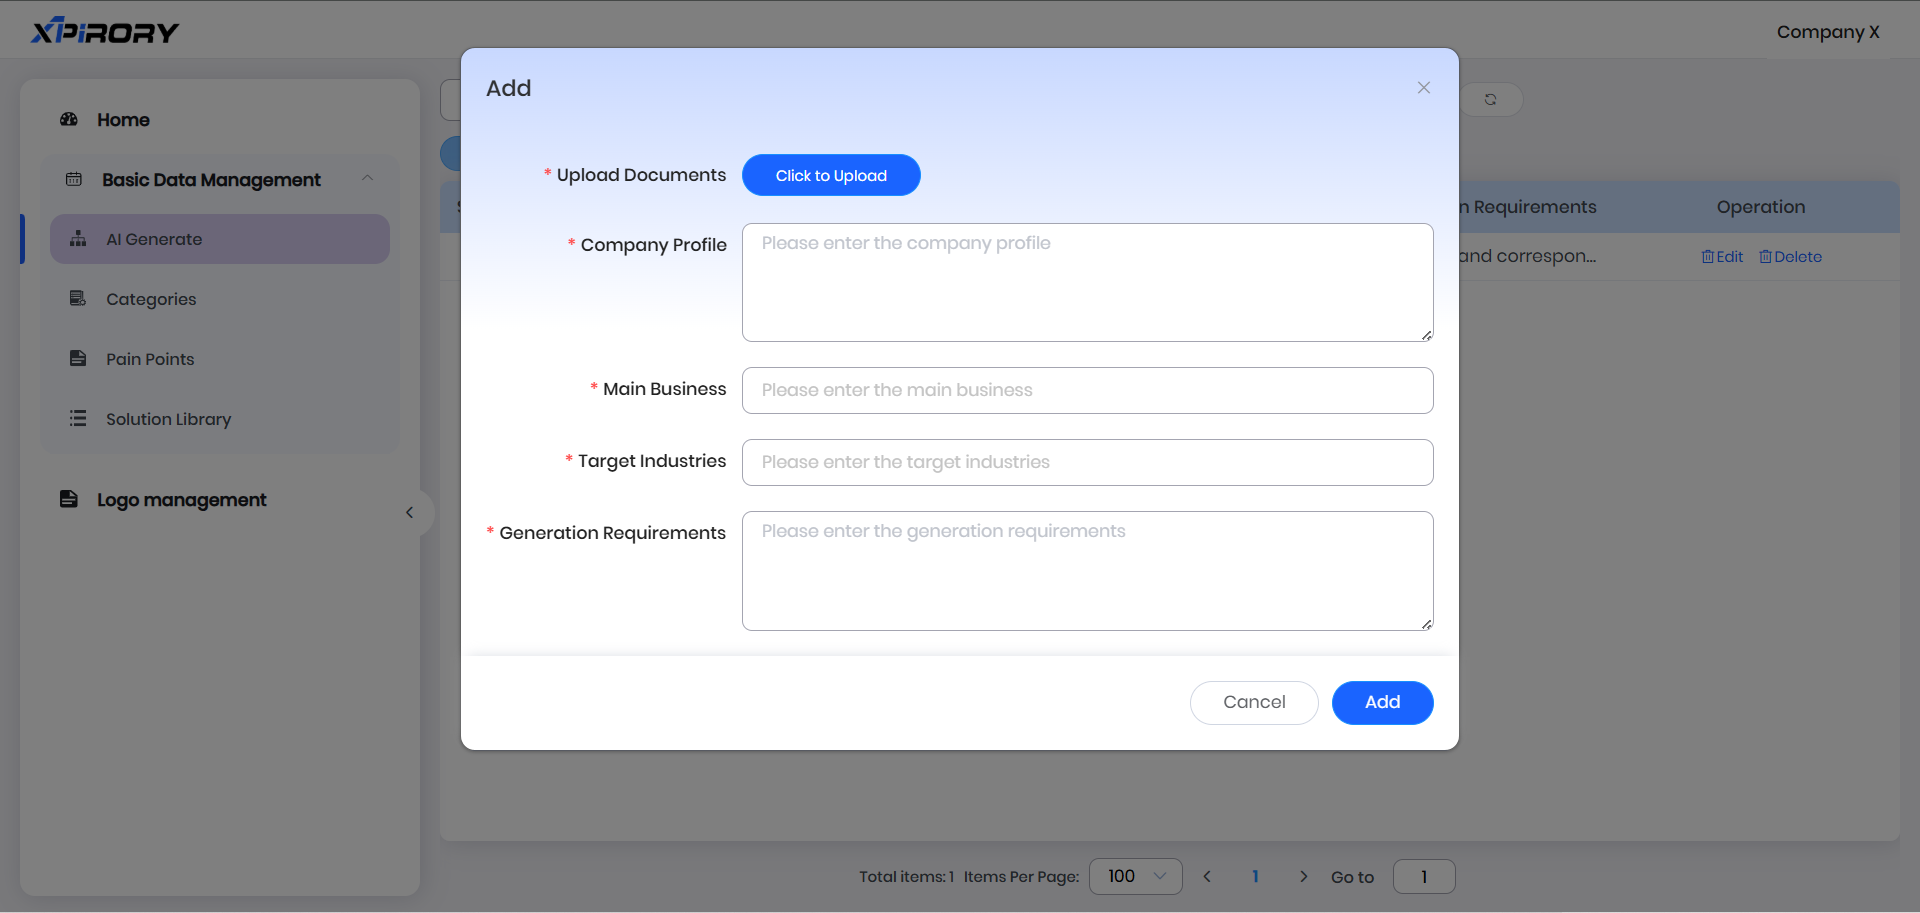
Filling Instructions
Upload Documents: Click to select and upload relevant files to the system.
Company Profile: Enter the company's introduction information.
Main Business: Enter the company's core business content.
Target Industries: Enter target industries and customer information.
Generation Requirements: Enter requirements for automatic generation (e.g., division by industry or business process).
Finally, click the Add button in the pop-up window to complete the addition.
(2) Click the Edit operation in the Operation column corresponding to the added data, and a pop-up window will display the automatically generated content.
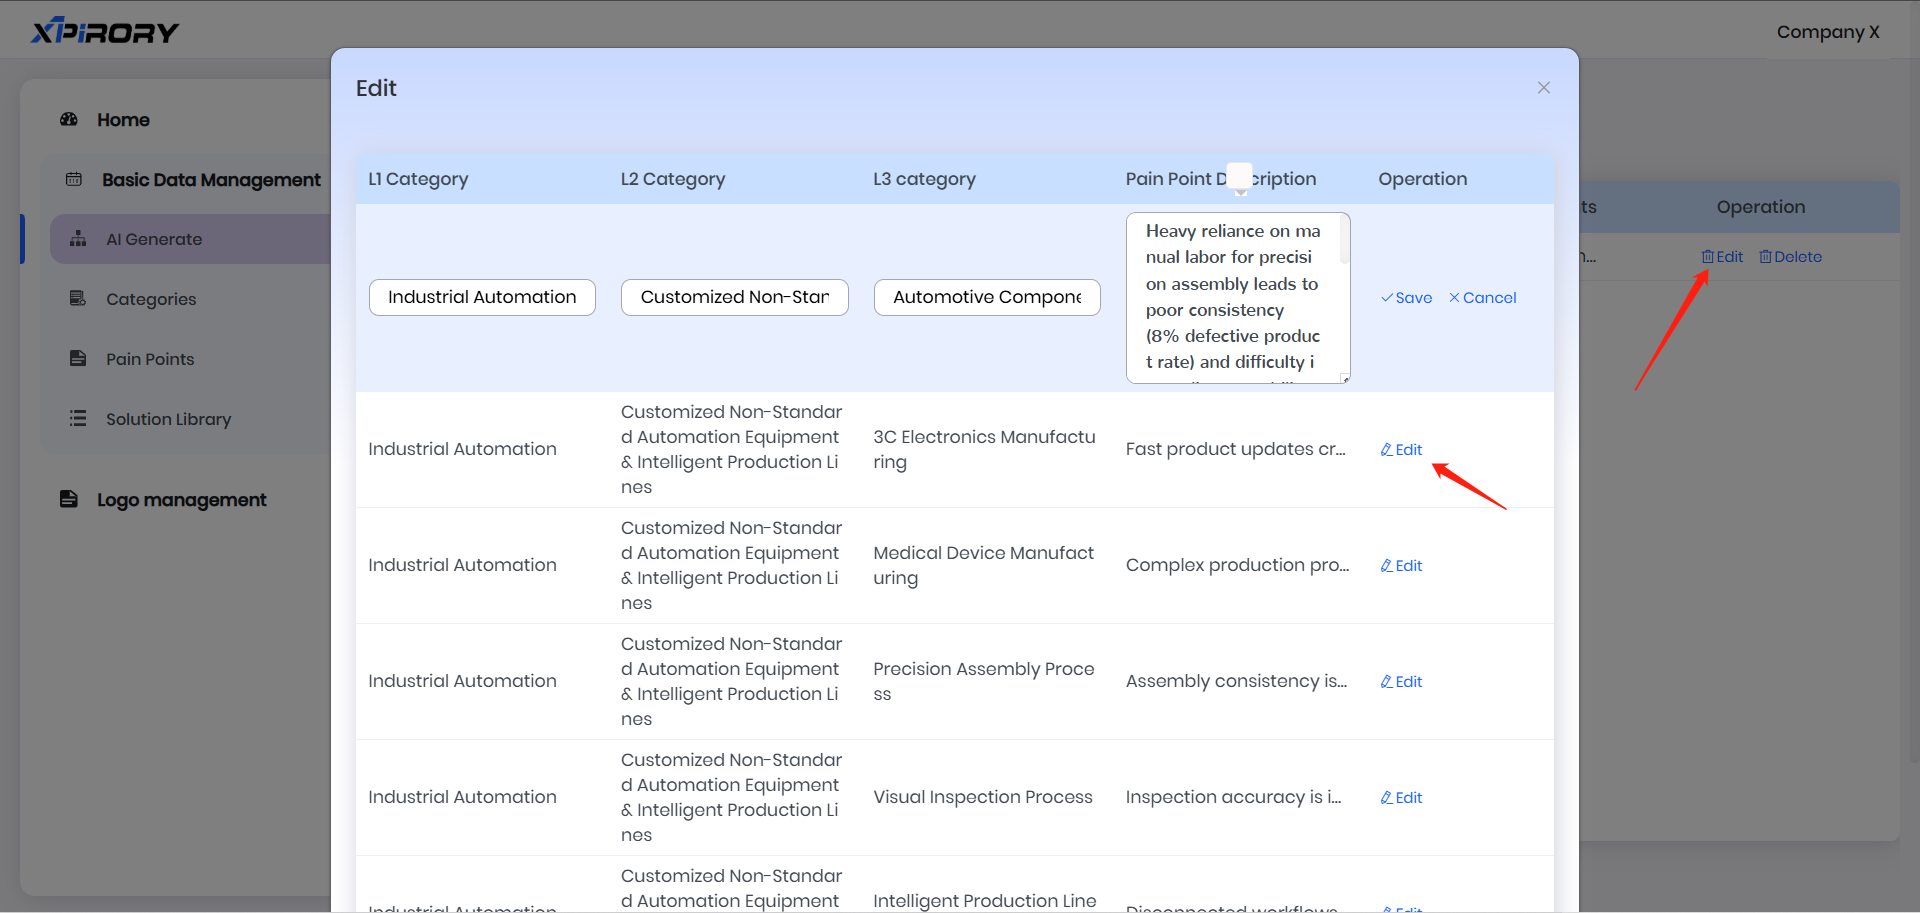
Click Edit in the pop-up window to revise the content, and click Save when satisfied.
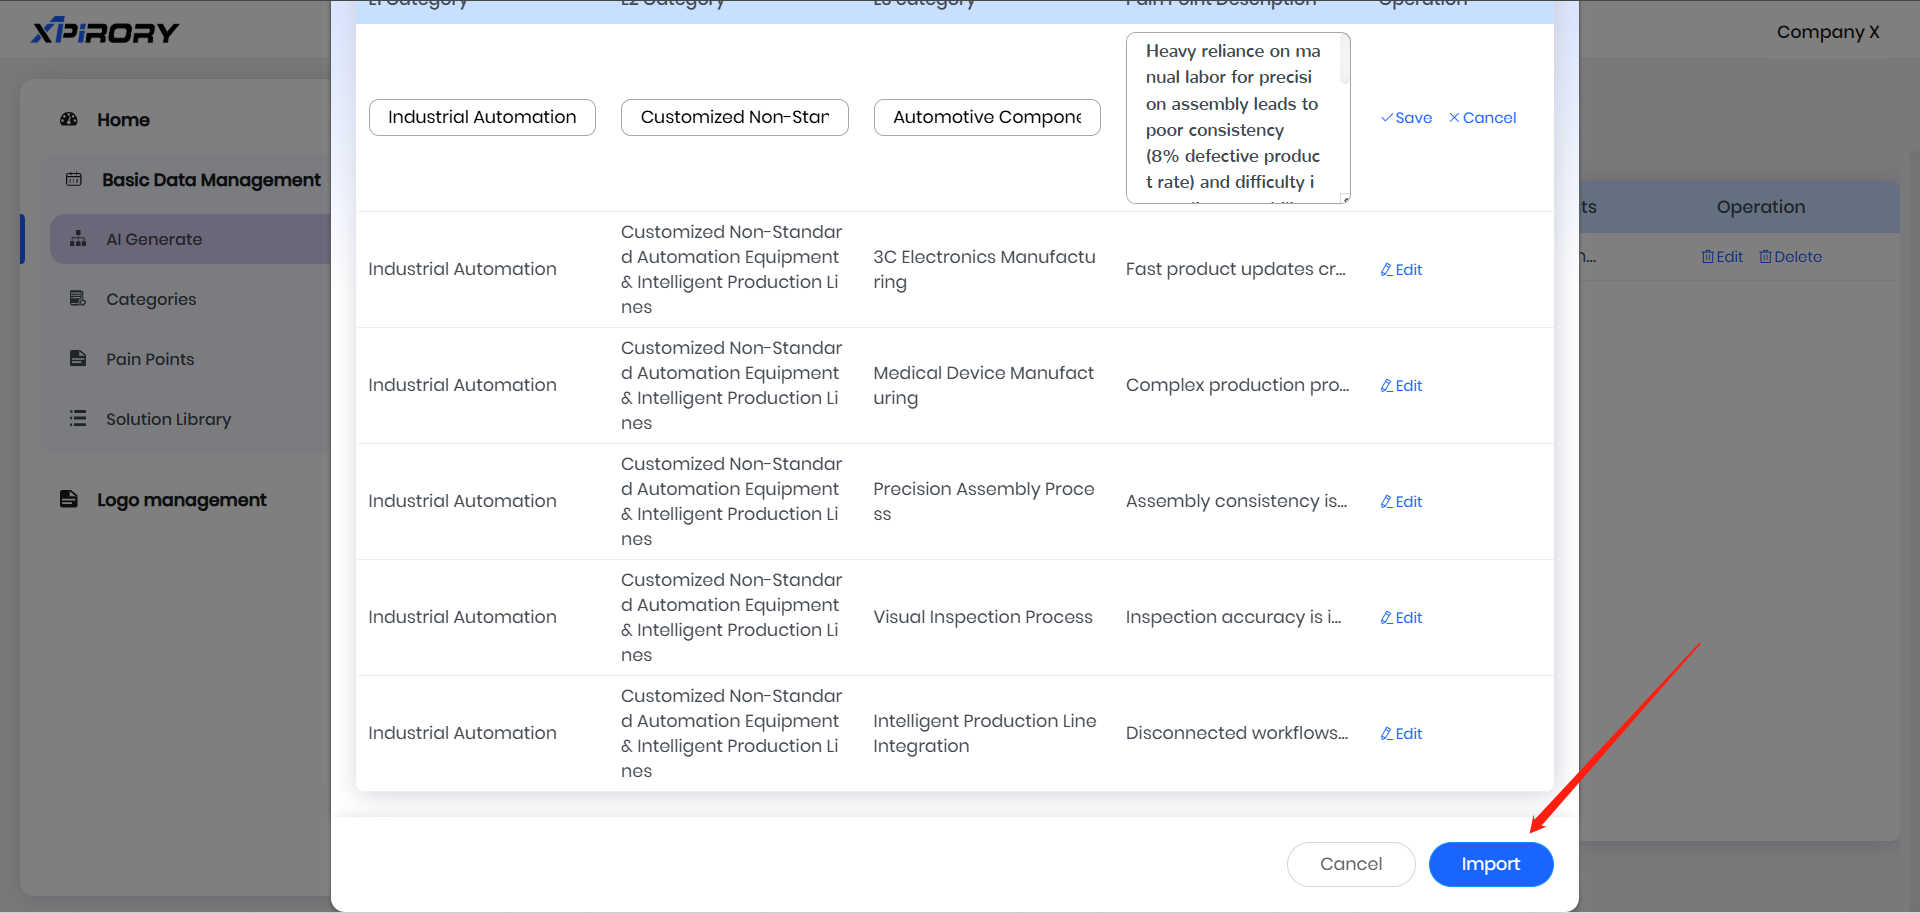
(3) Click Import at the bottom of the pop-up window to insert the generated data into Categories, Pain Points, and Solution Library.
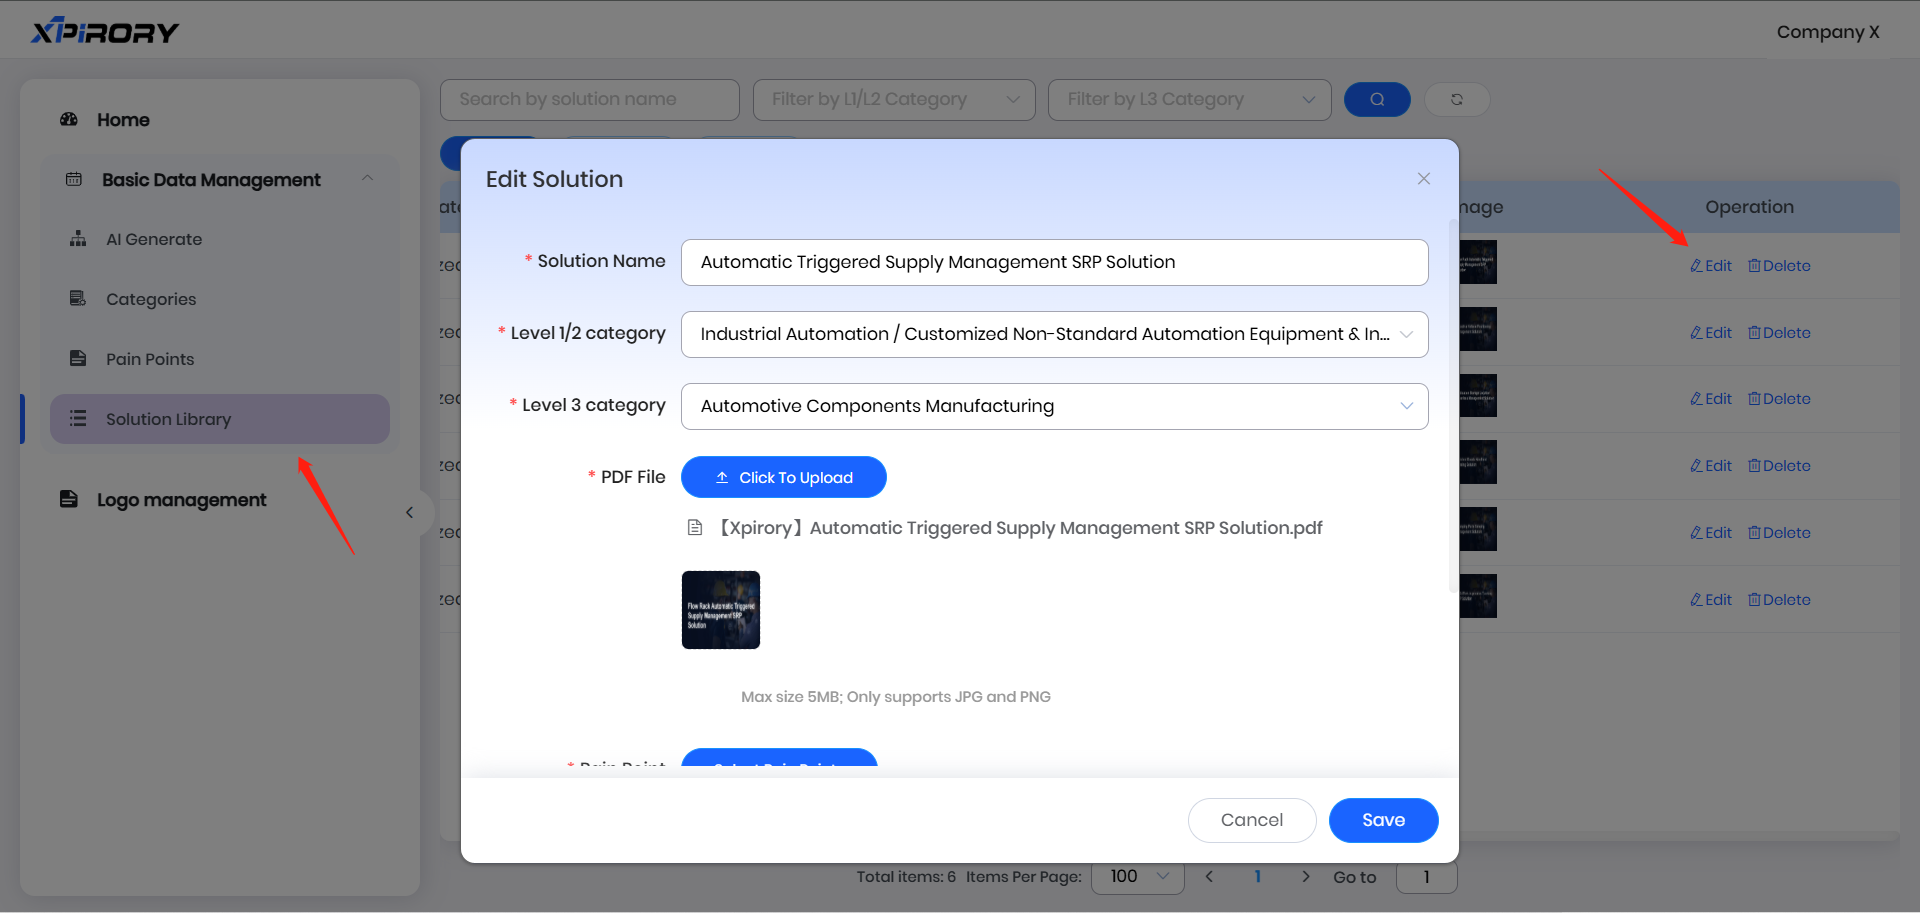
(4) Click the Solution Library on the left. For the imported entry, click Edit in the corresponding Operation column. In the pop-up window, supplement the Solution Name and upload the solution file. Finally, click the Save button in the pop-up window to complete the process.
3.6.1.2 Categories
Three-tiered structures can be created in Category Management to display pain points and solutions.
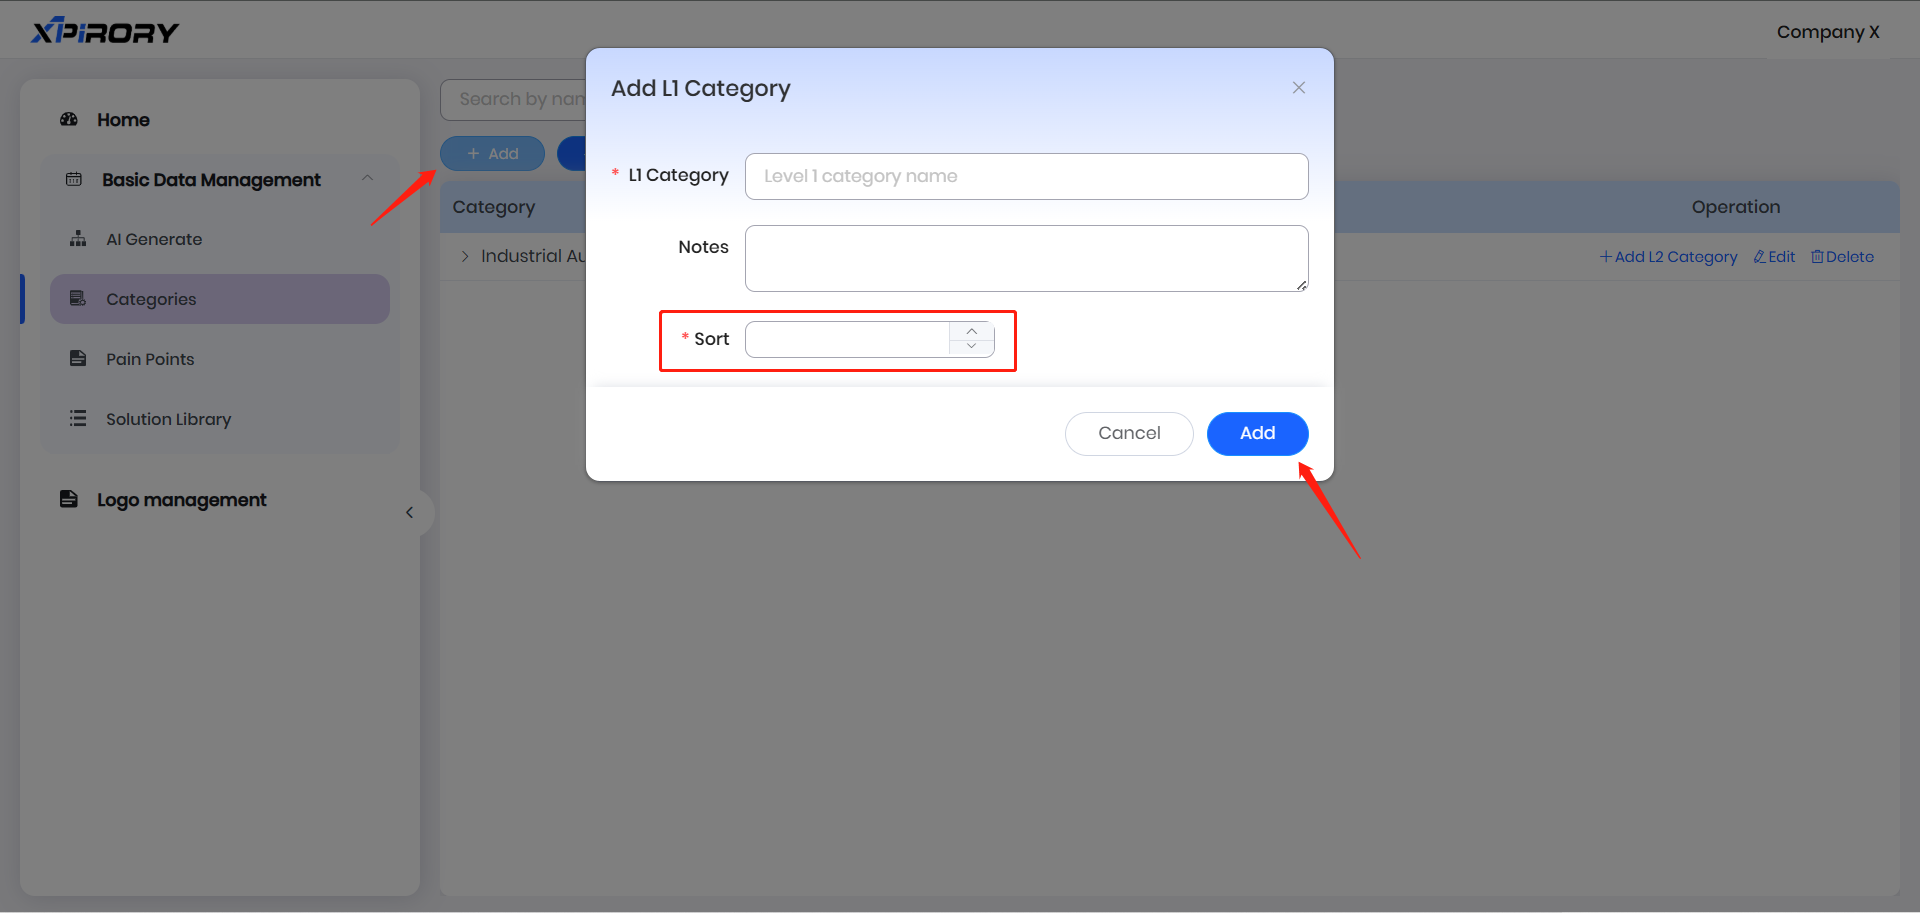
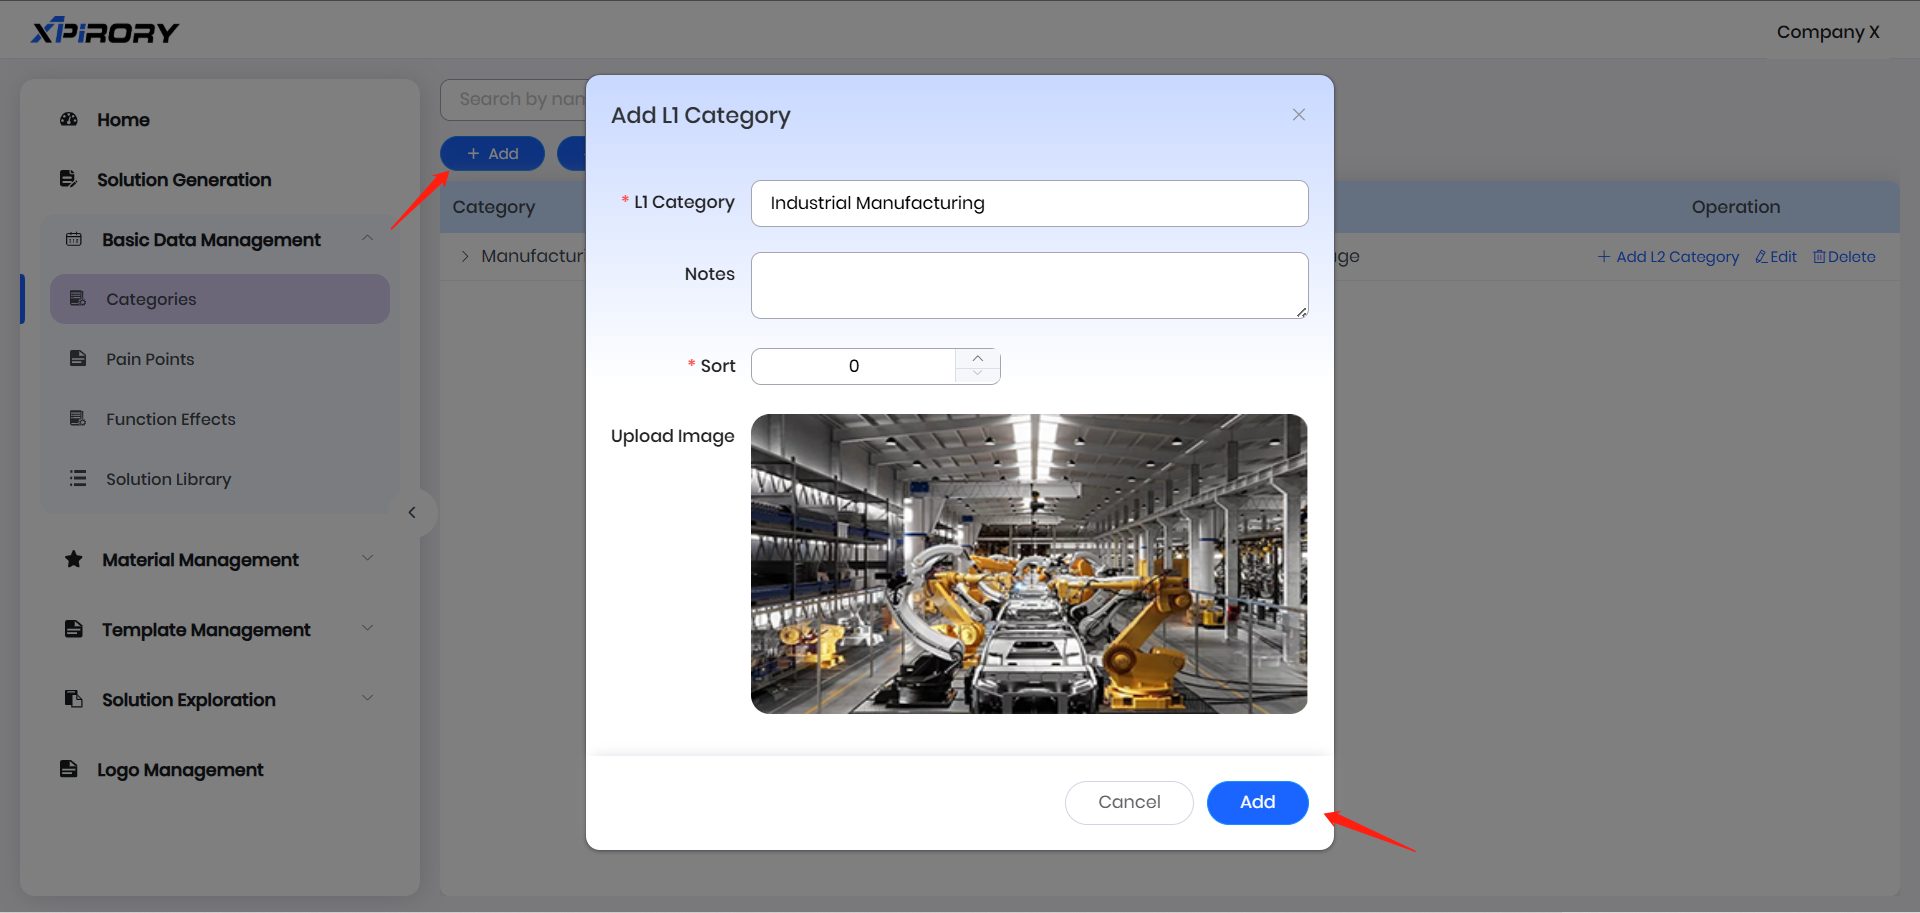
(1) Click "Add" to set the name and display order of L1 Category via a pop-up window. The smaller the sorting value, the higher the ranking.
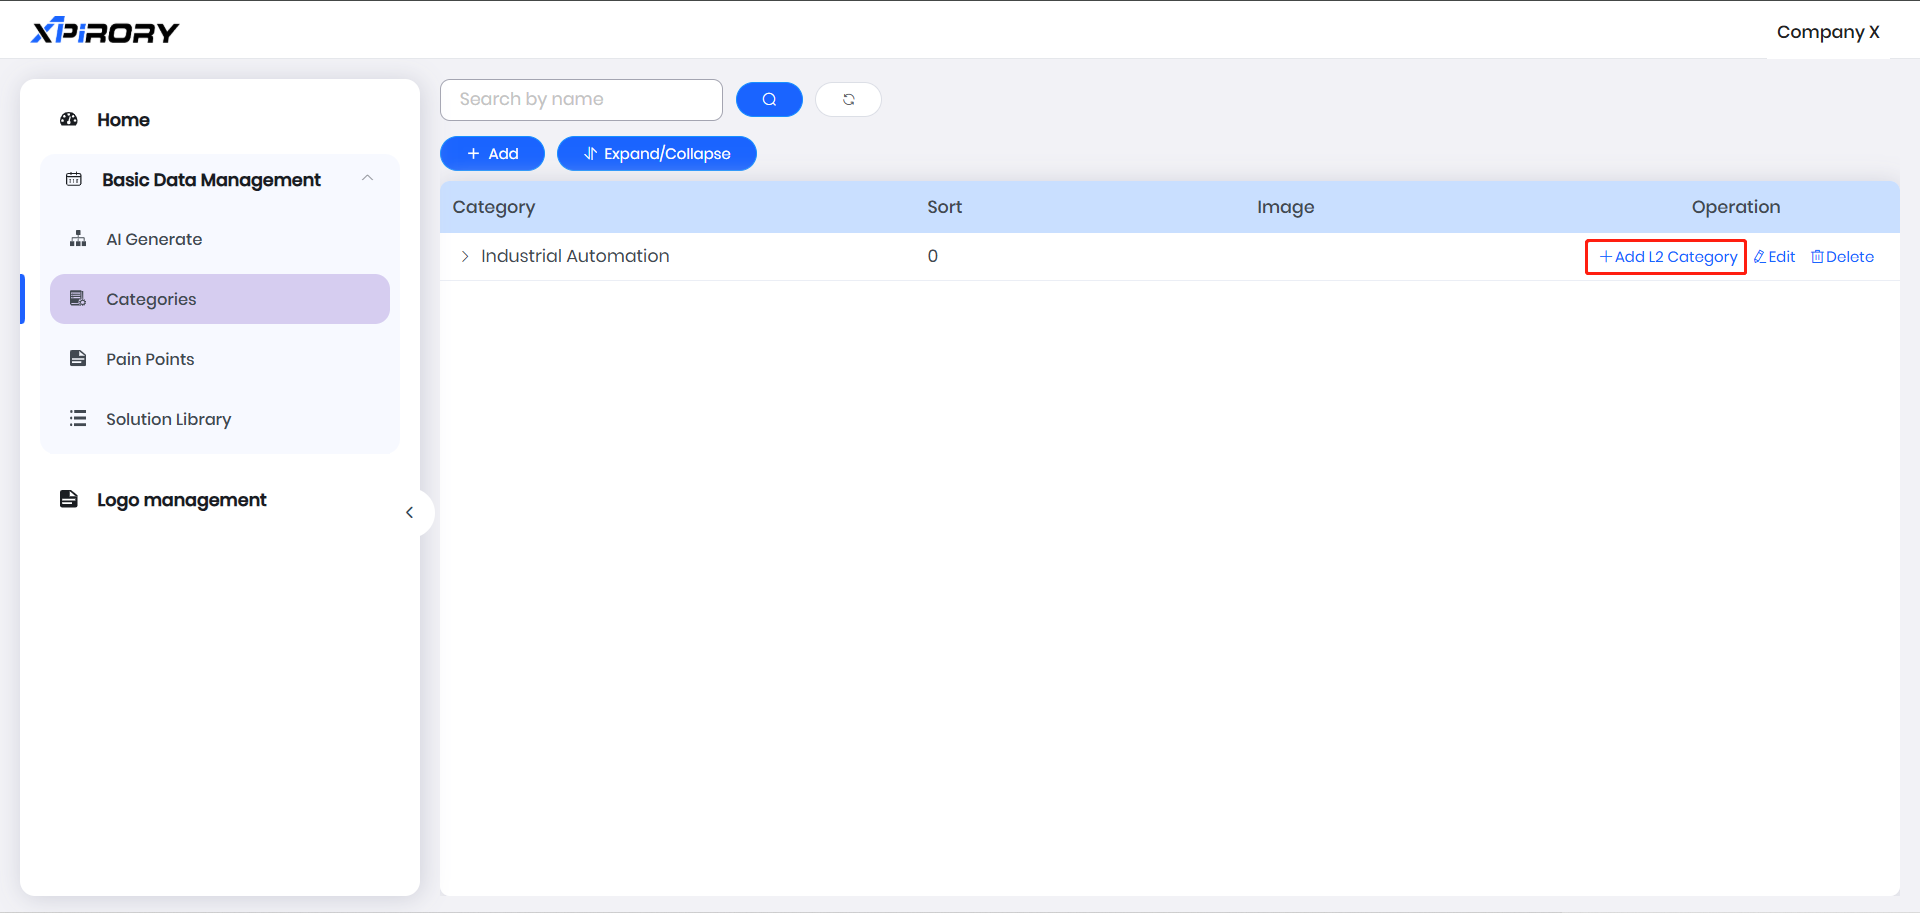
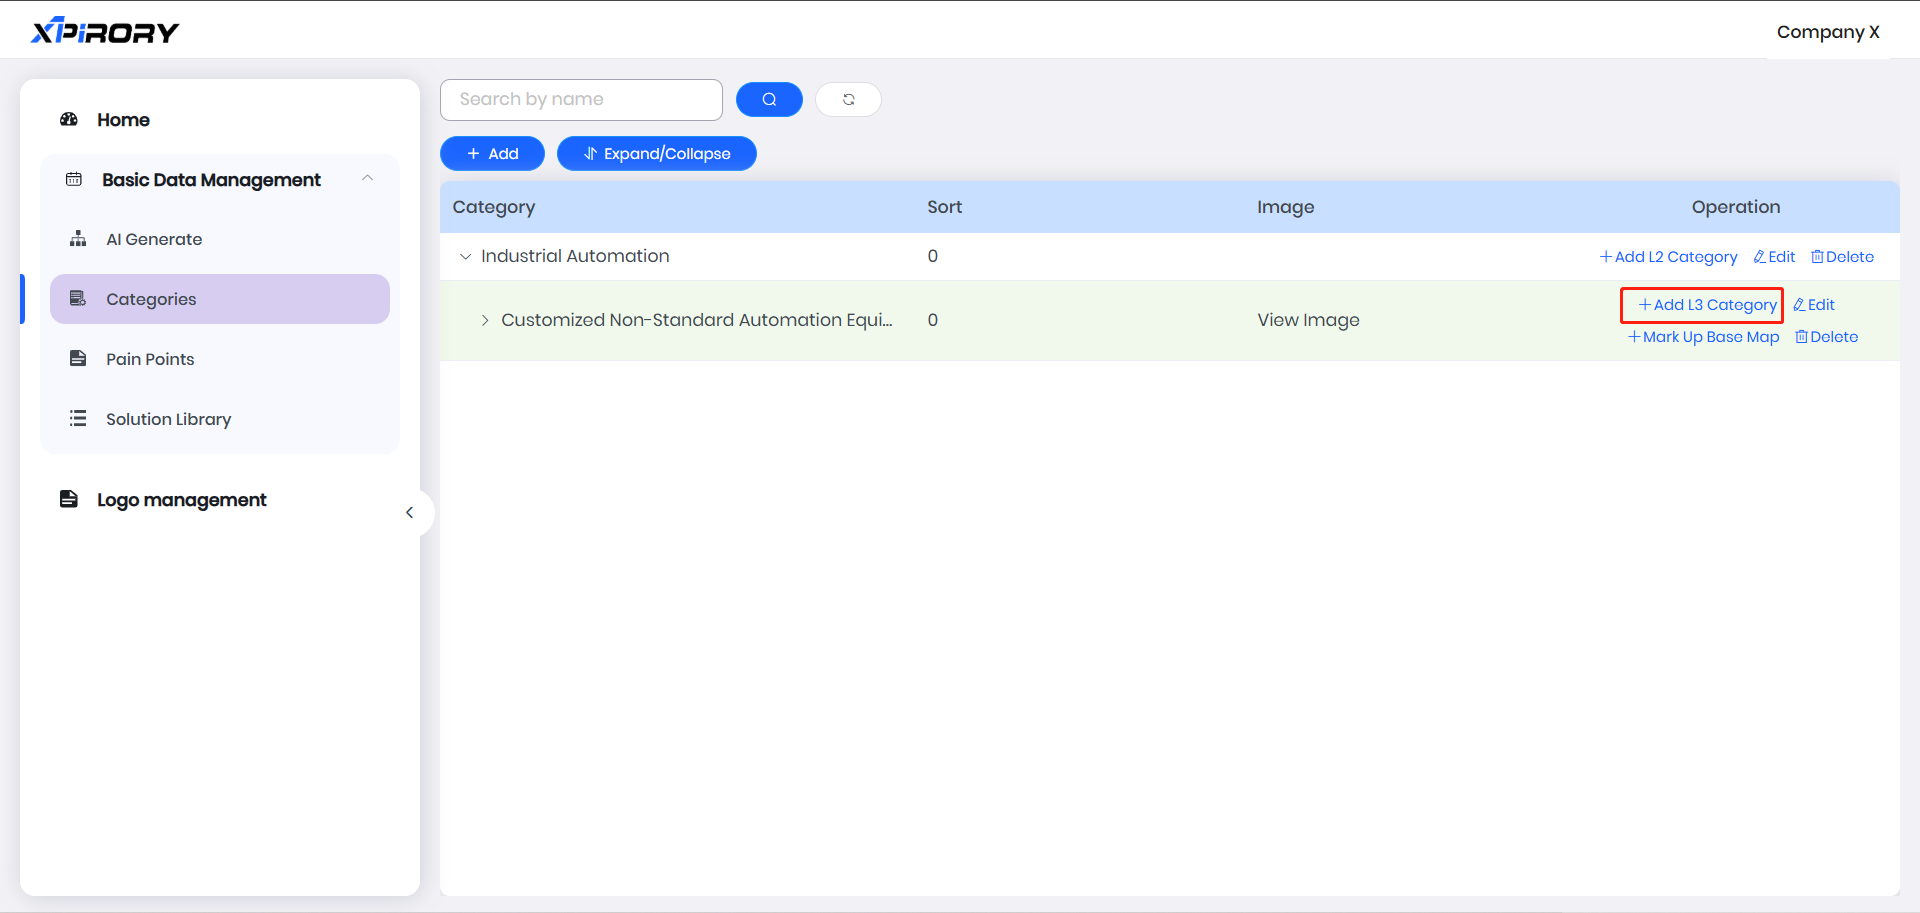
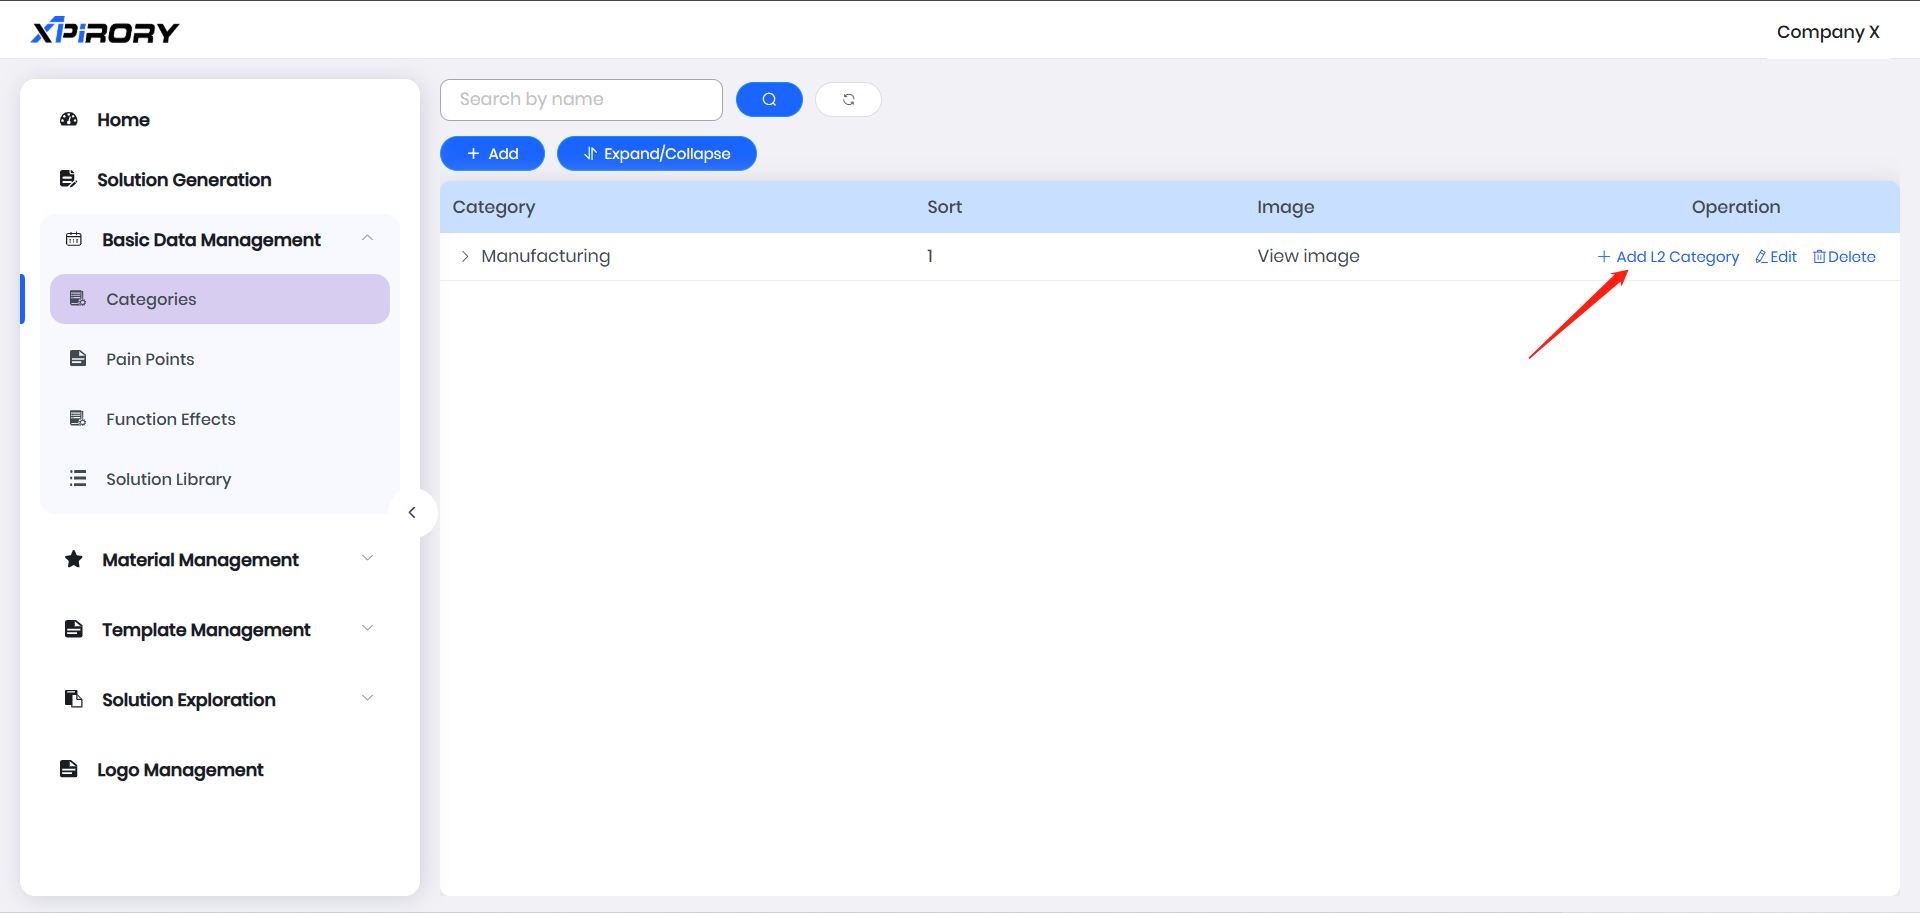
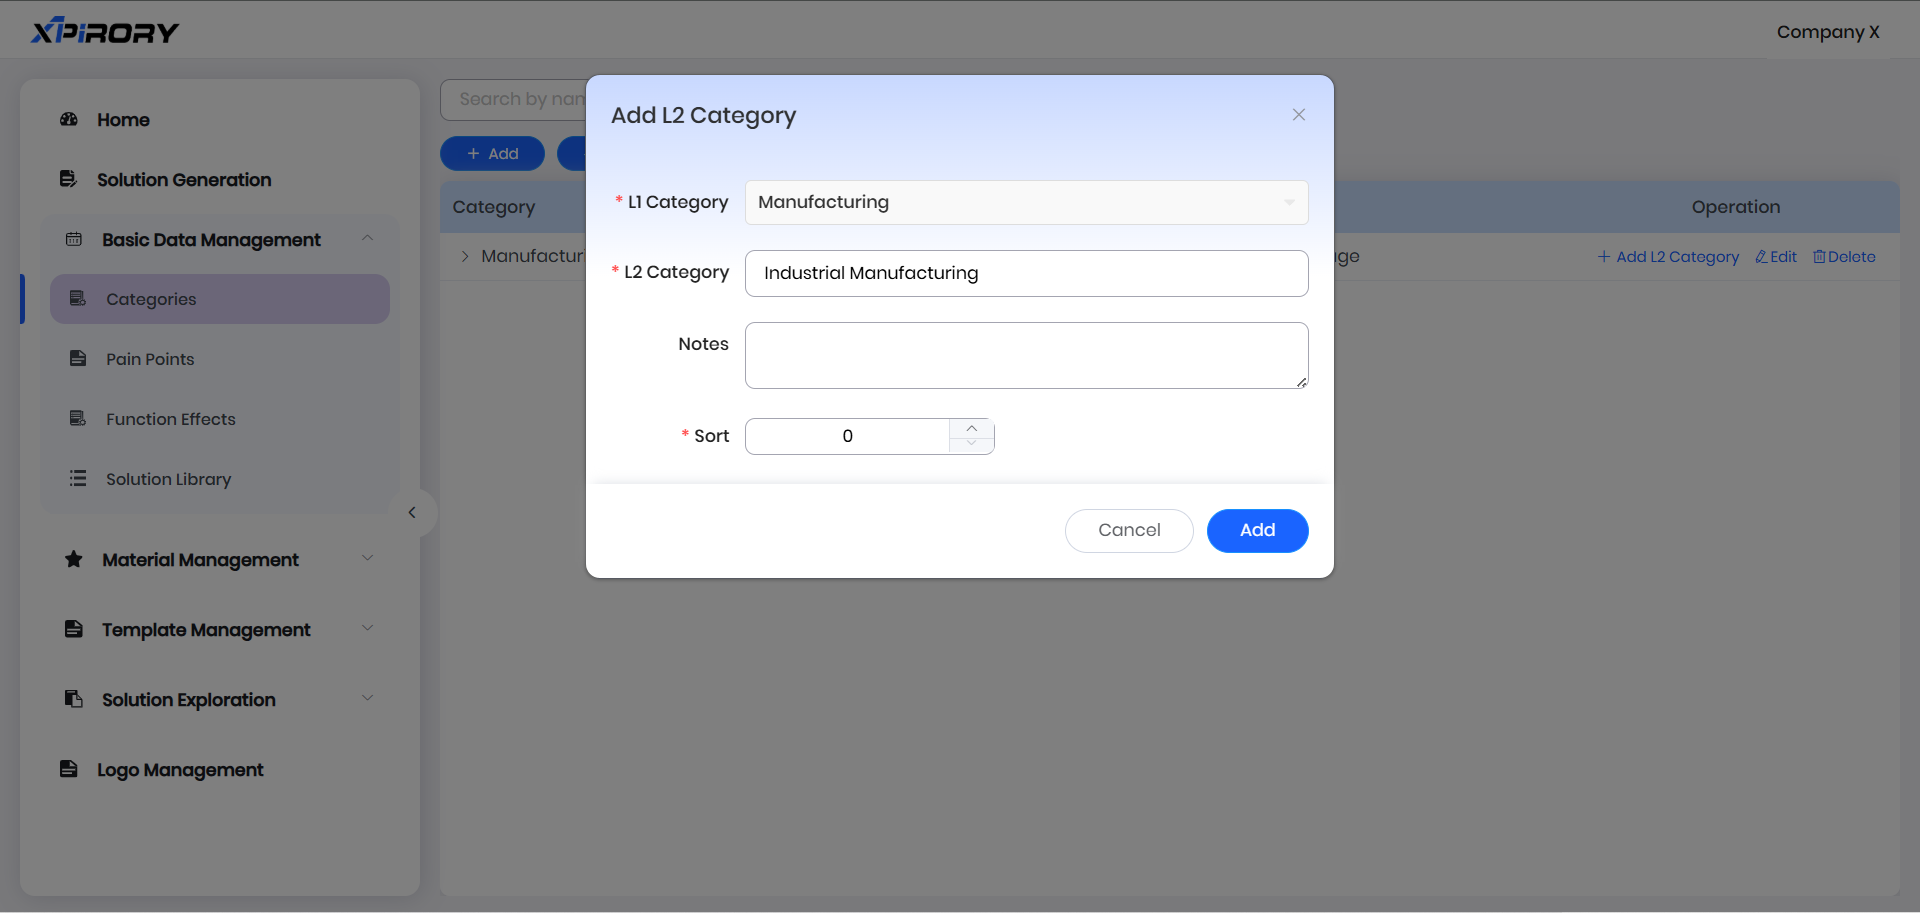
(2) In the operation area behind the L1 Category name, click "Add L2 Category" to set the name and order of L2 Category. The smaller the sorting value, the higher the ranking.
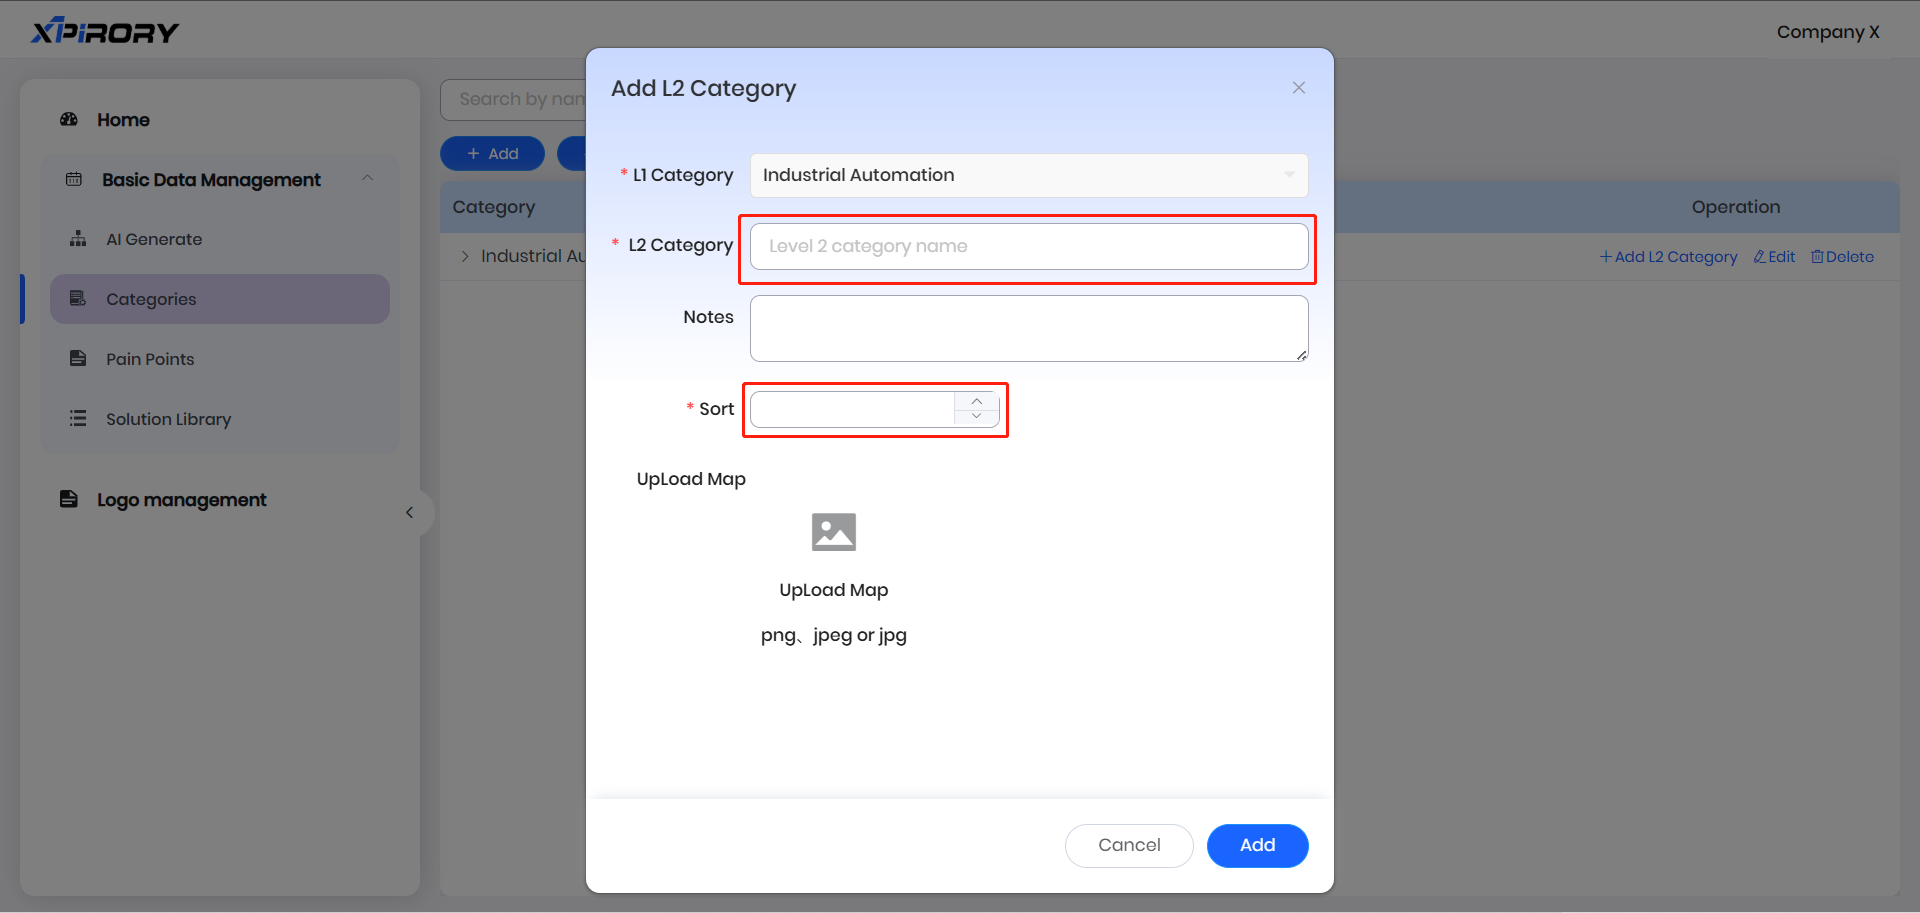
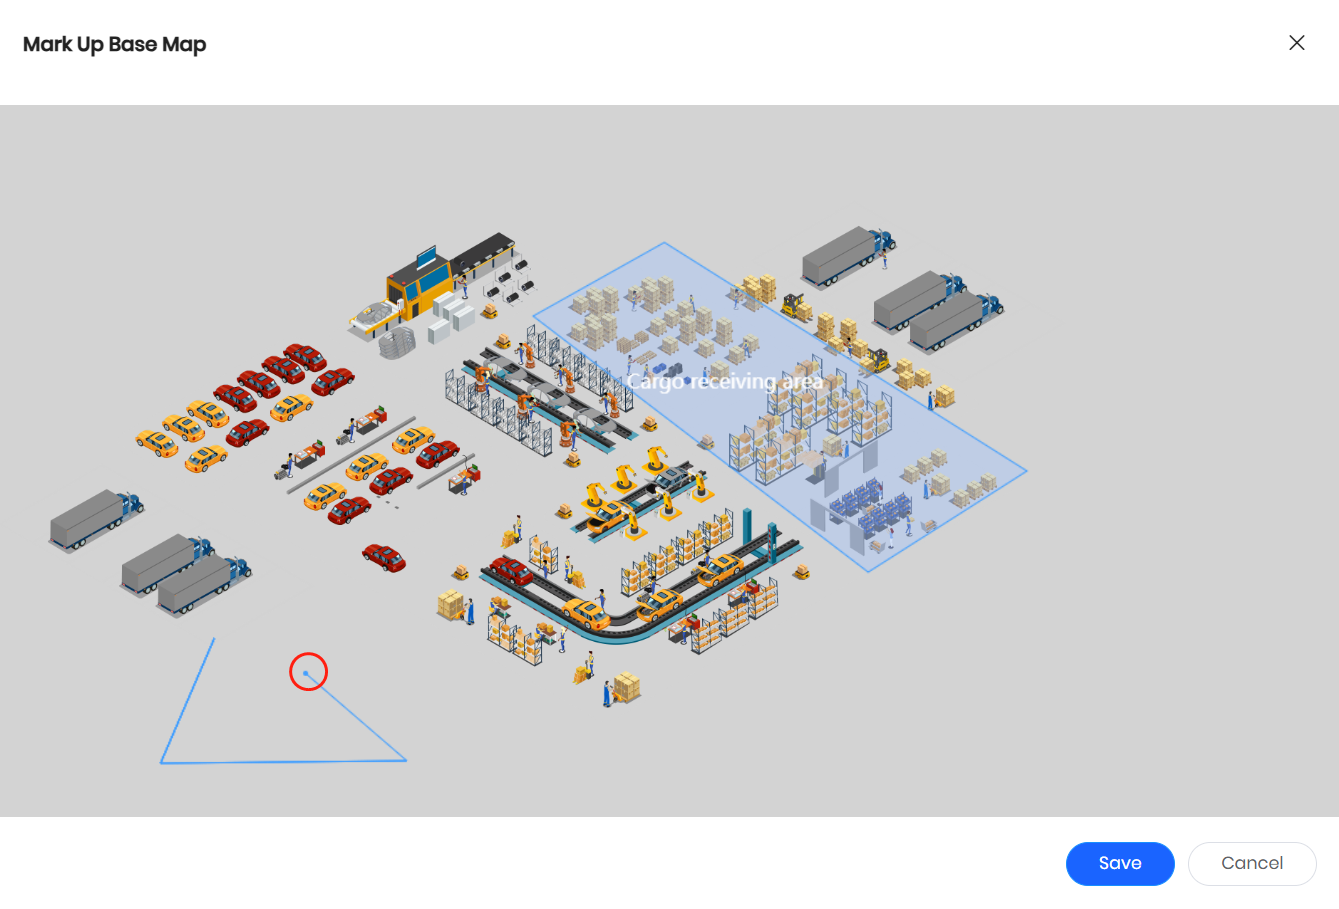
(3) A panoramic image of the category needs to be uploaded in the L2 Category settings window as the basis for L3 Category division.
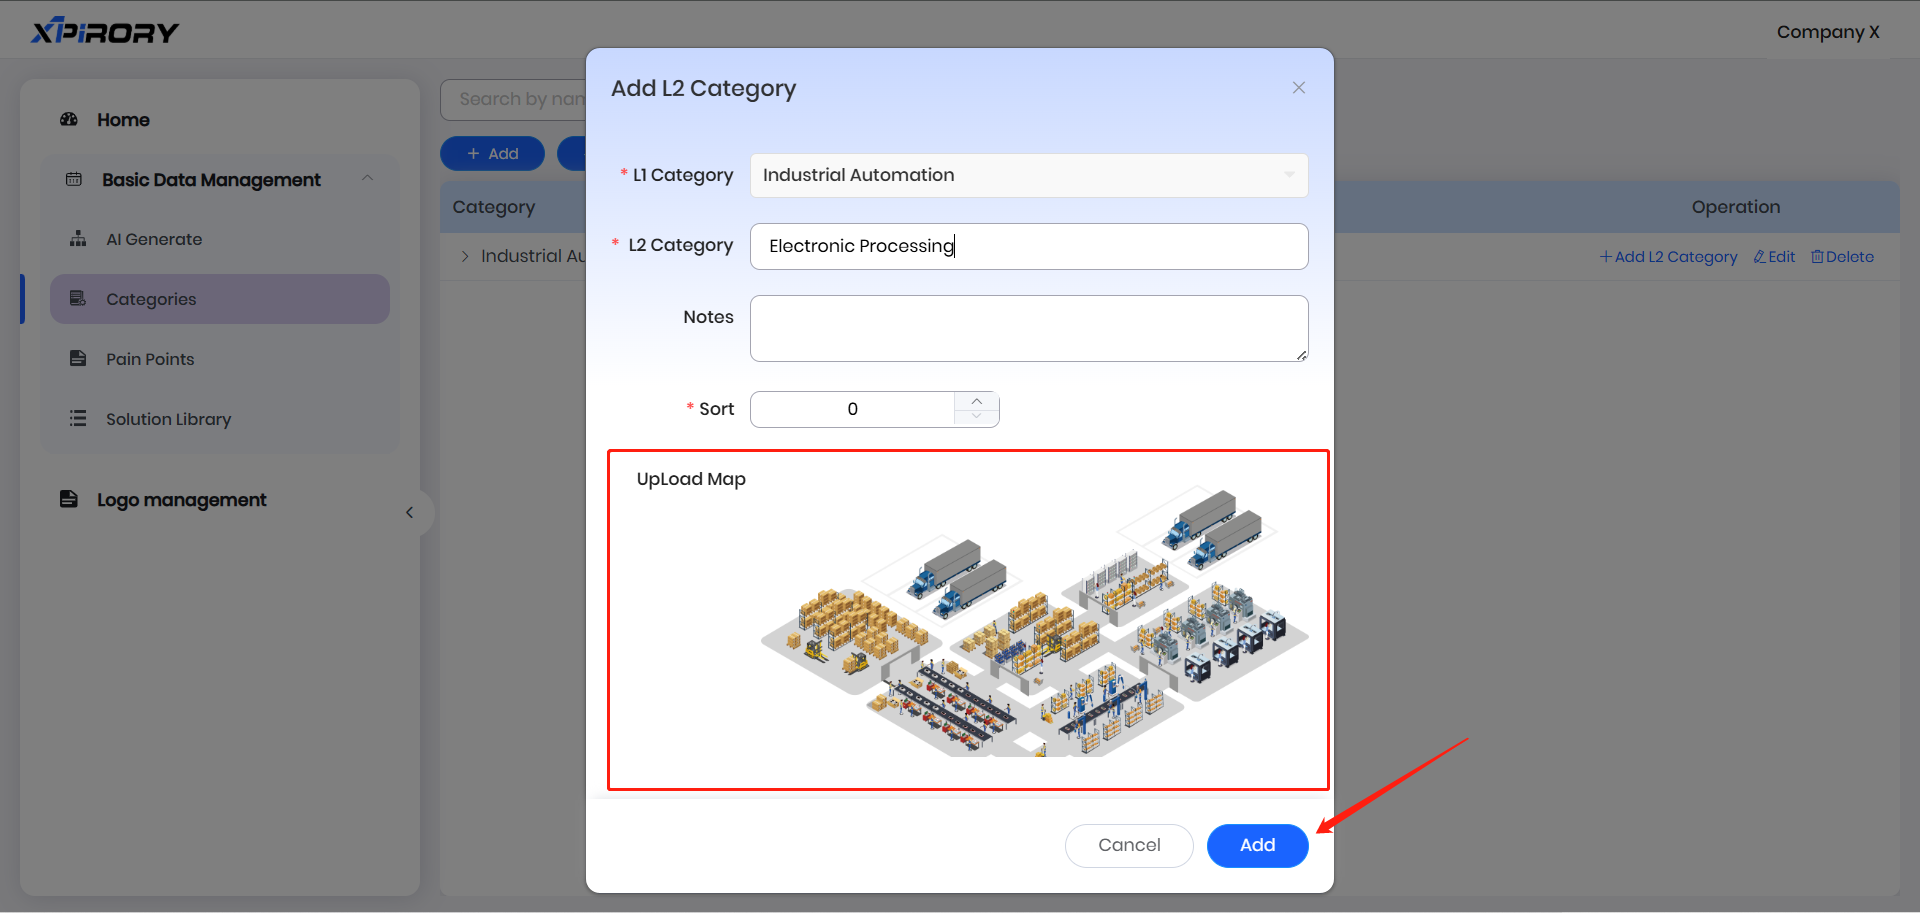
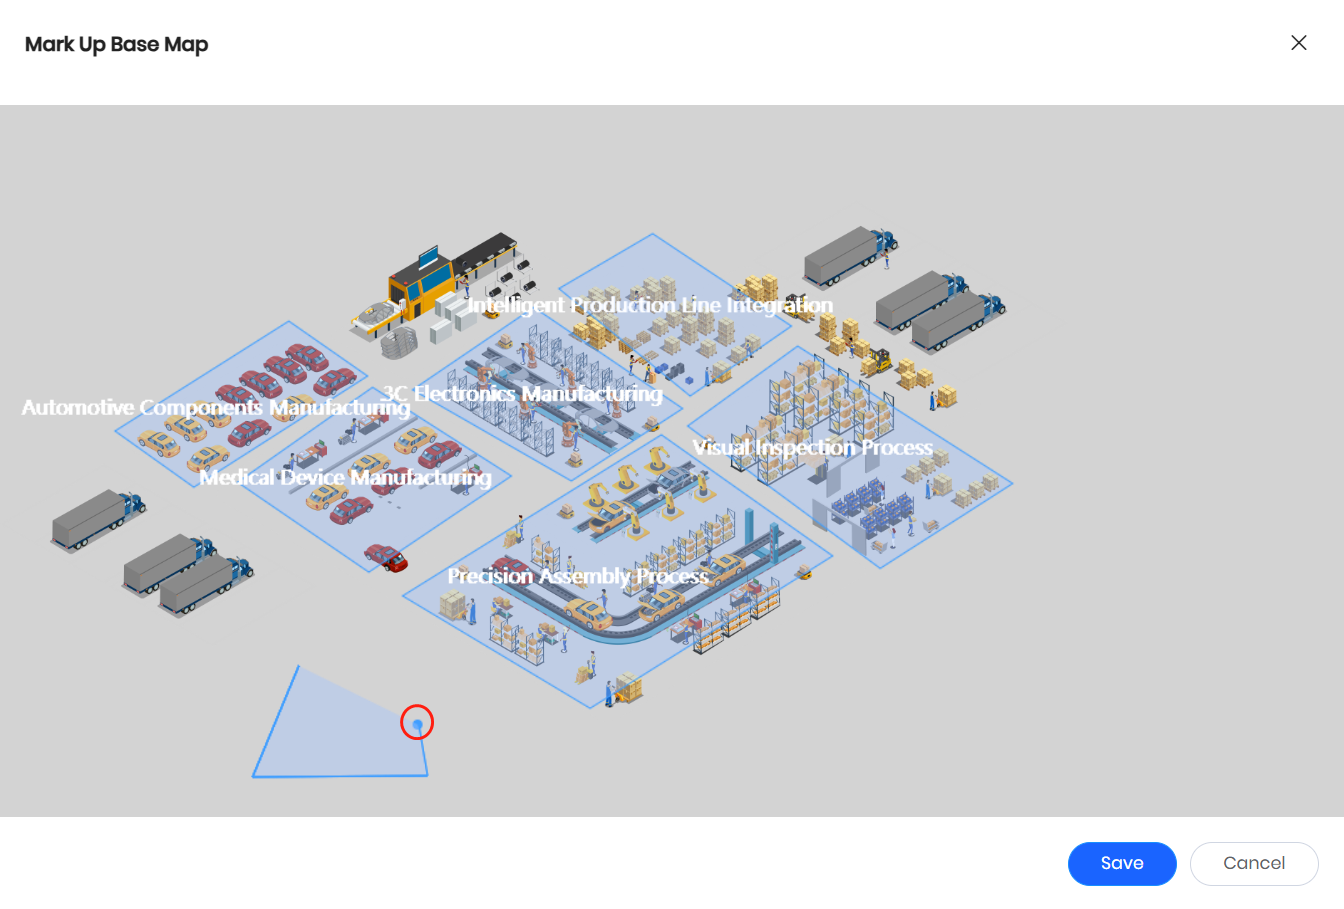
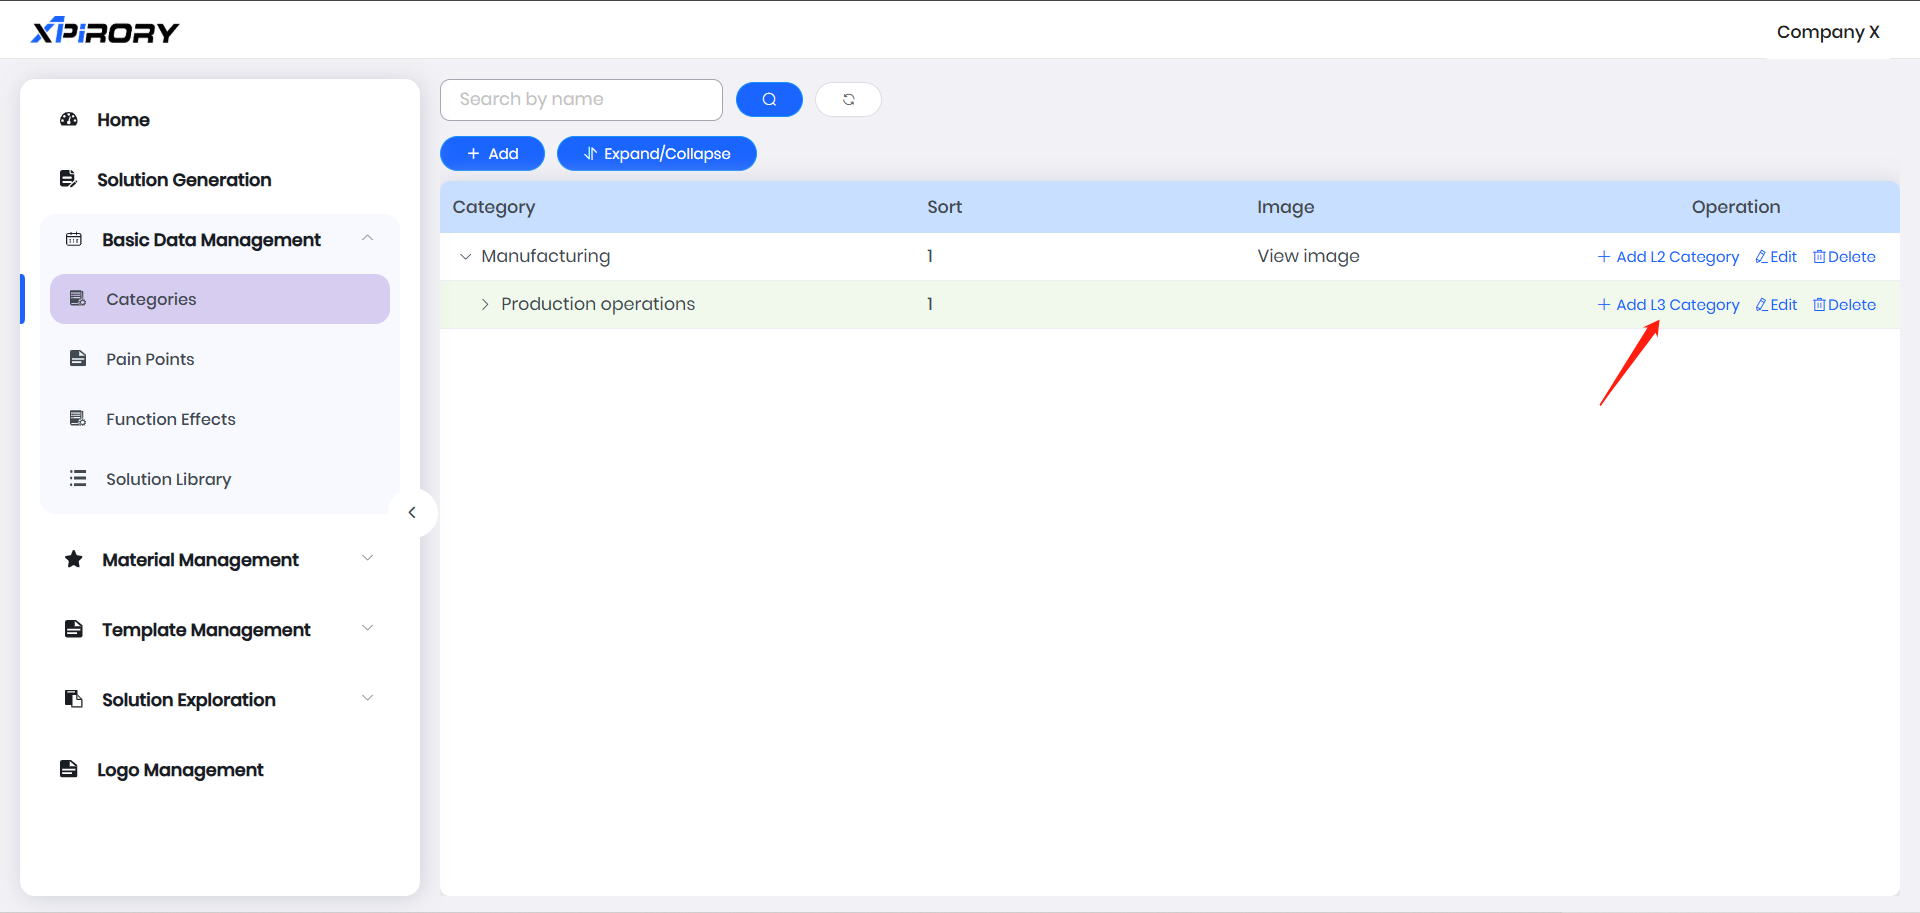
(4) After uploading the panoramic image, click "Mark Up Base Map" in the operation area behind the L2 Category name to perform L3 Category division.
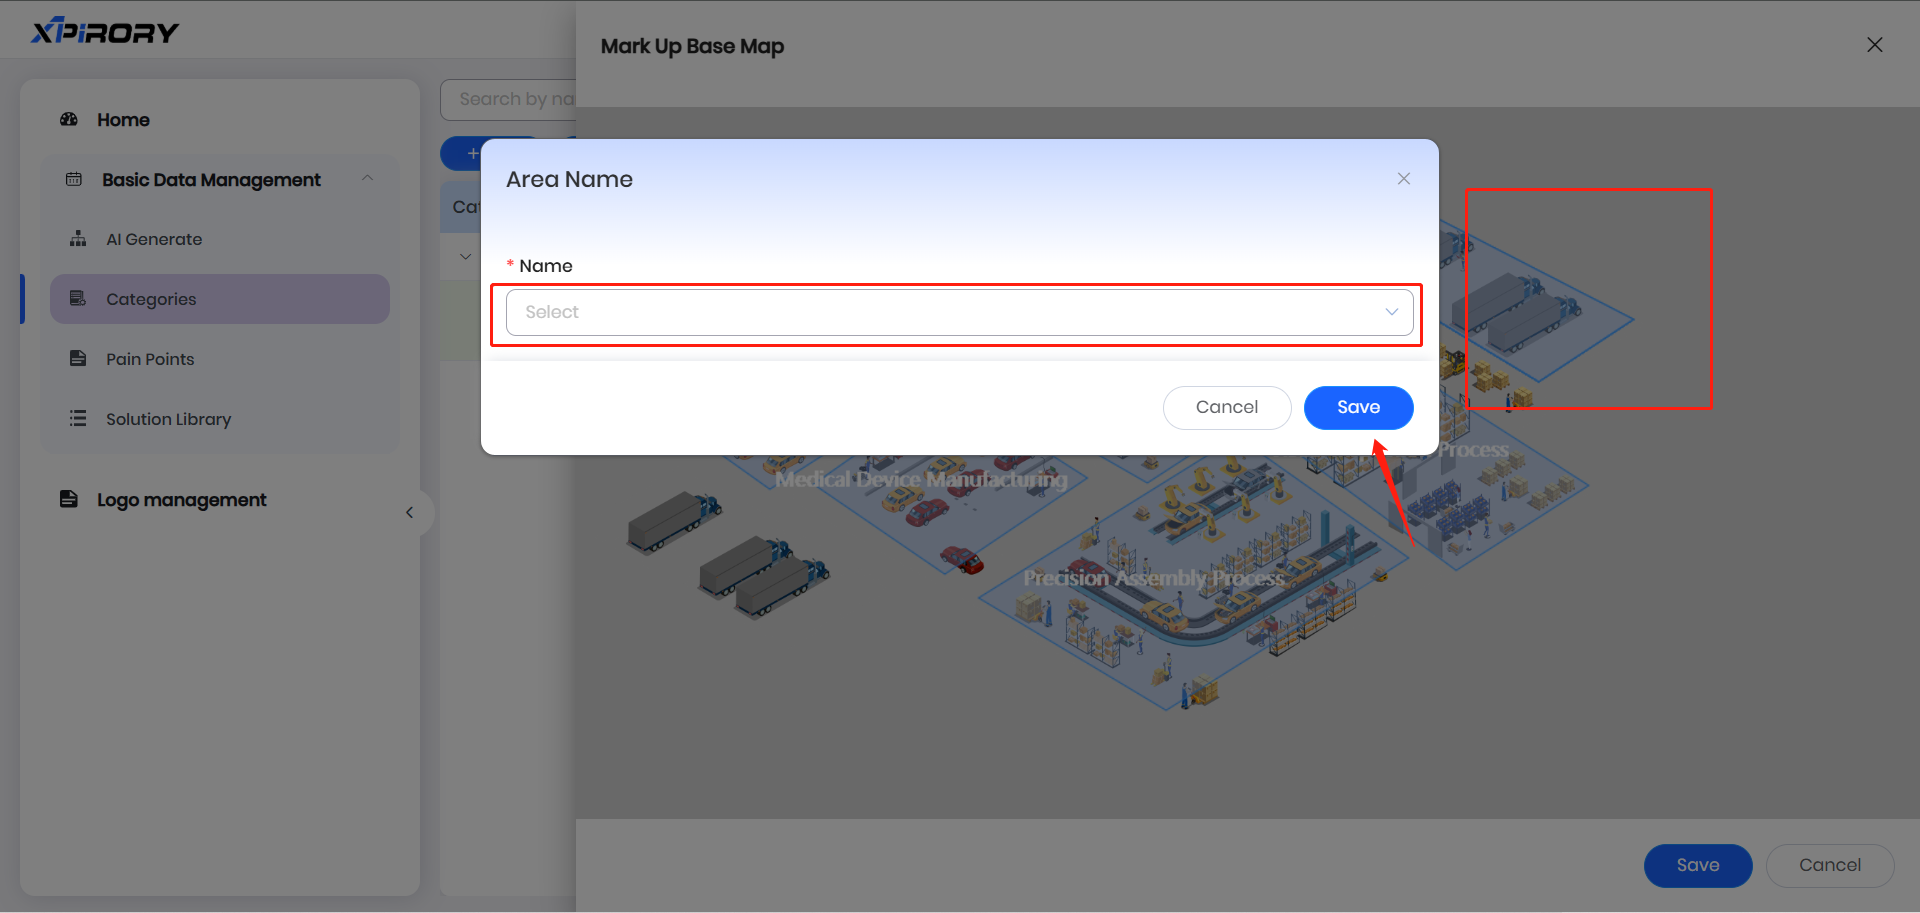
(5) In the popped-up base map interface, after continuously clicking multiple points with the mouse to form a closed area, a pop-up window for setting the L3 Category name will appear. Enter the region name and click the "Save" button to complete one L3 Category. Other L3 Categories are set in the same way.
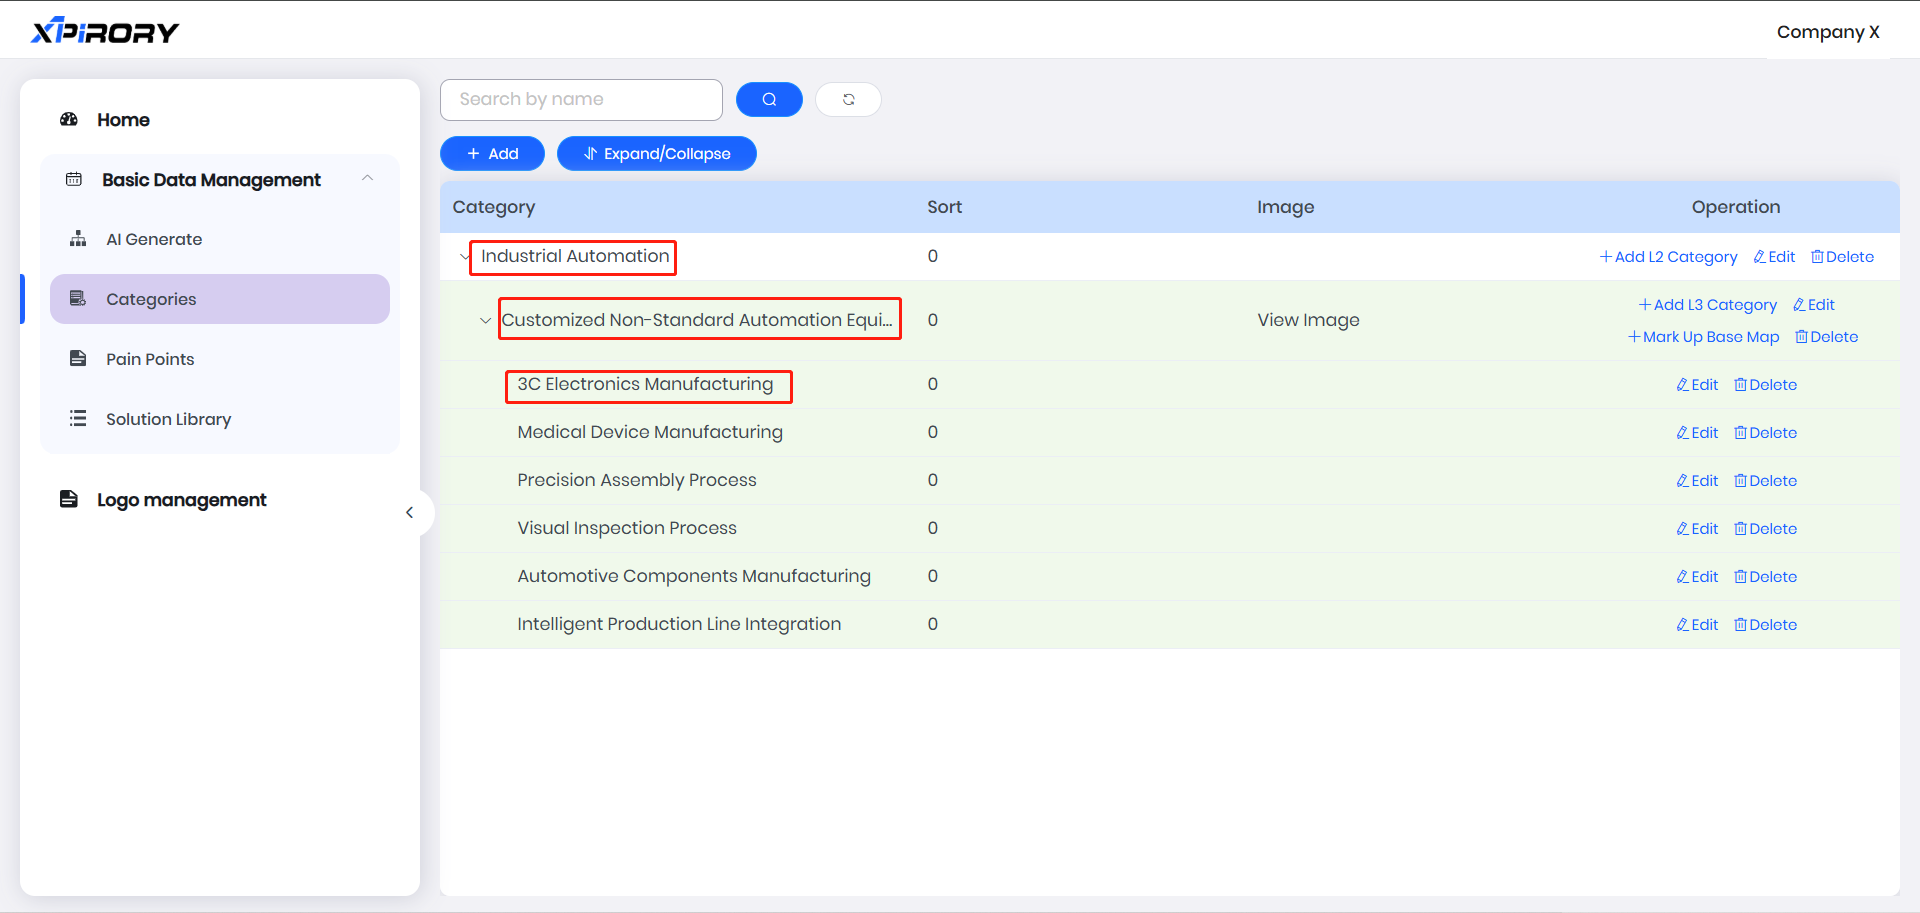
(6) After all L3 Categories are drawn, close the base map editing window, and the three-tiered Categories classification is complete.
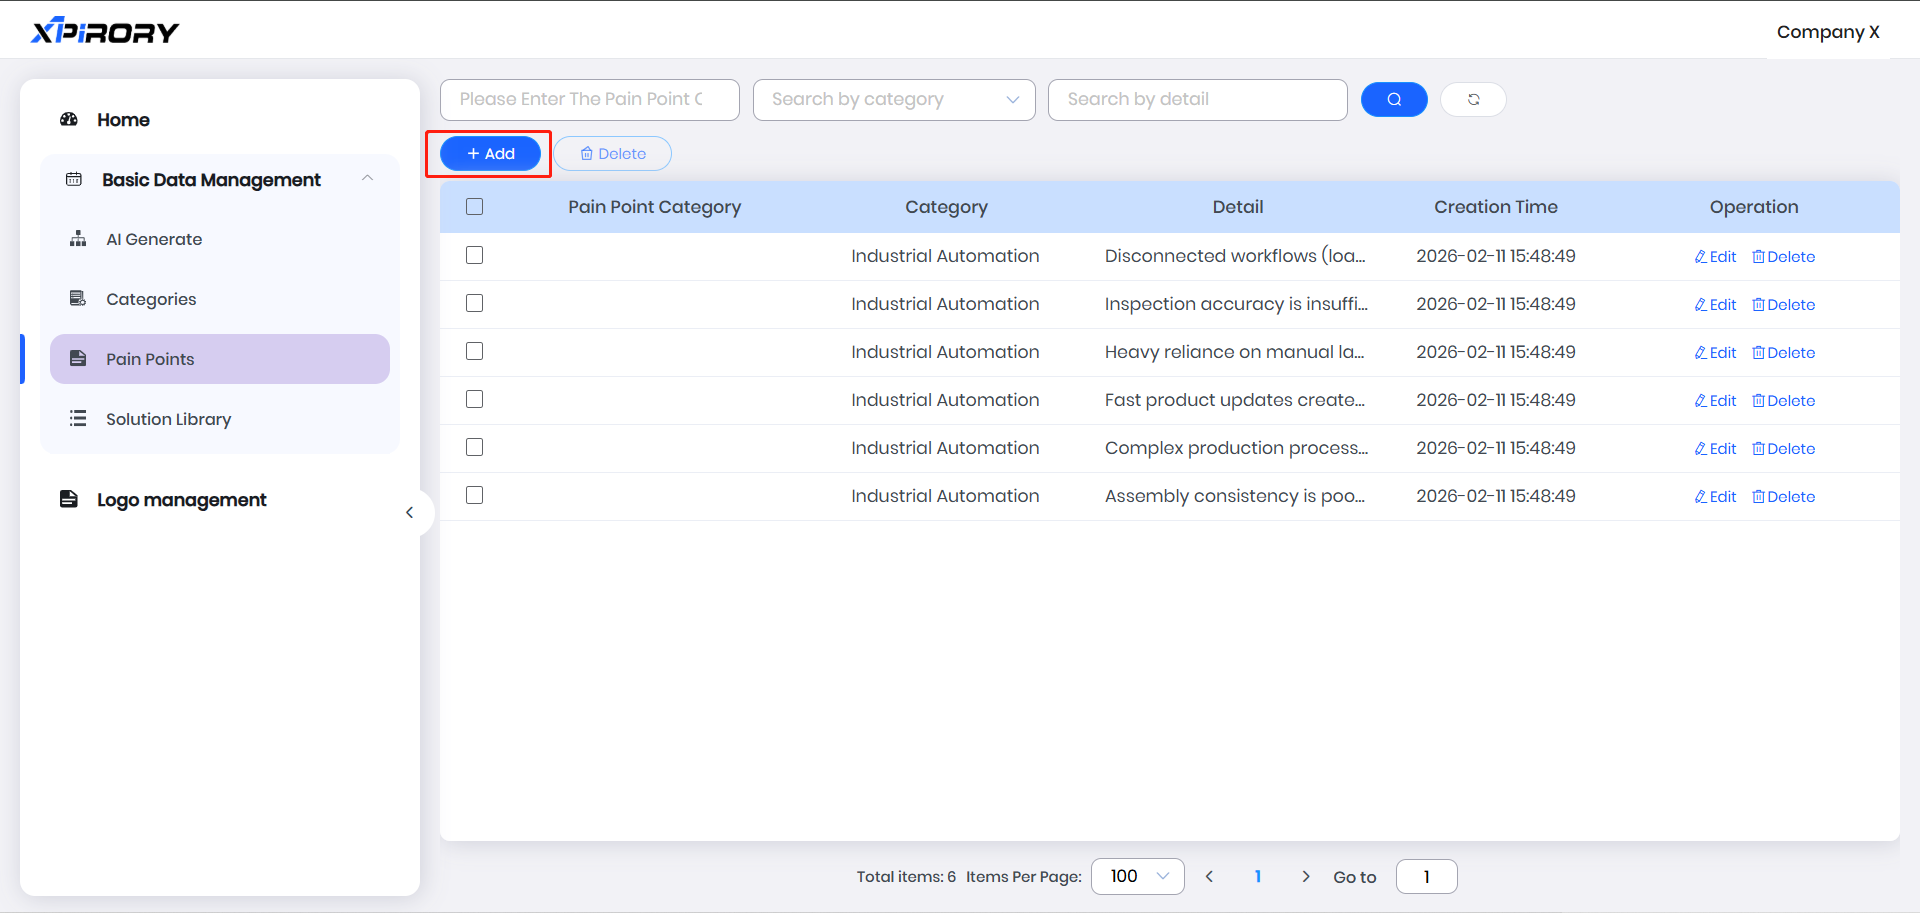
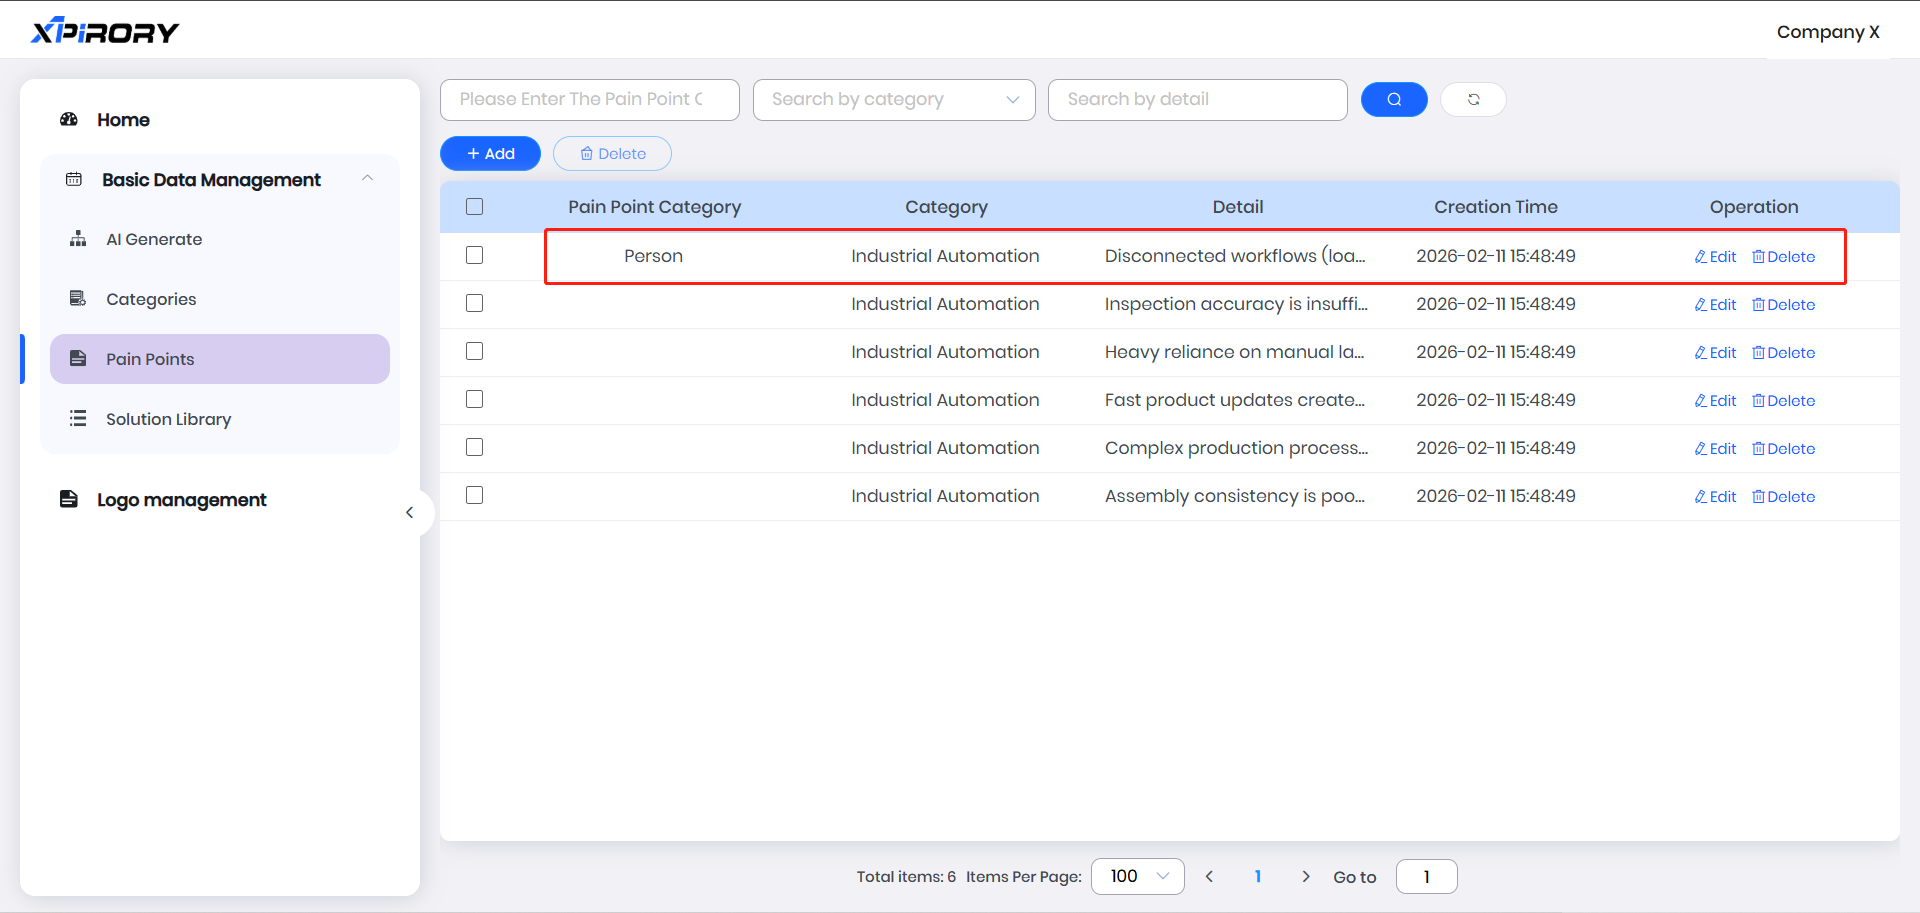
3.6.1.3 Pain Points
Pain Points set in Basic Data Management are mainly used for subsequent binding with solutions and categories.
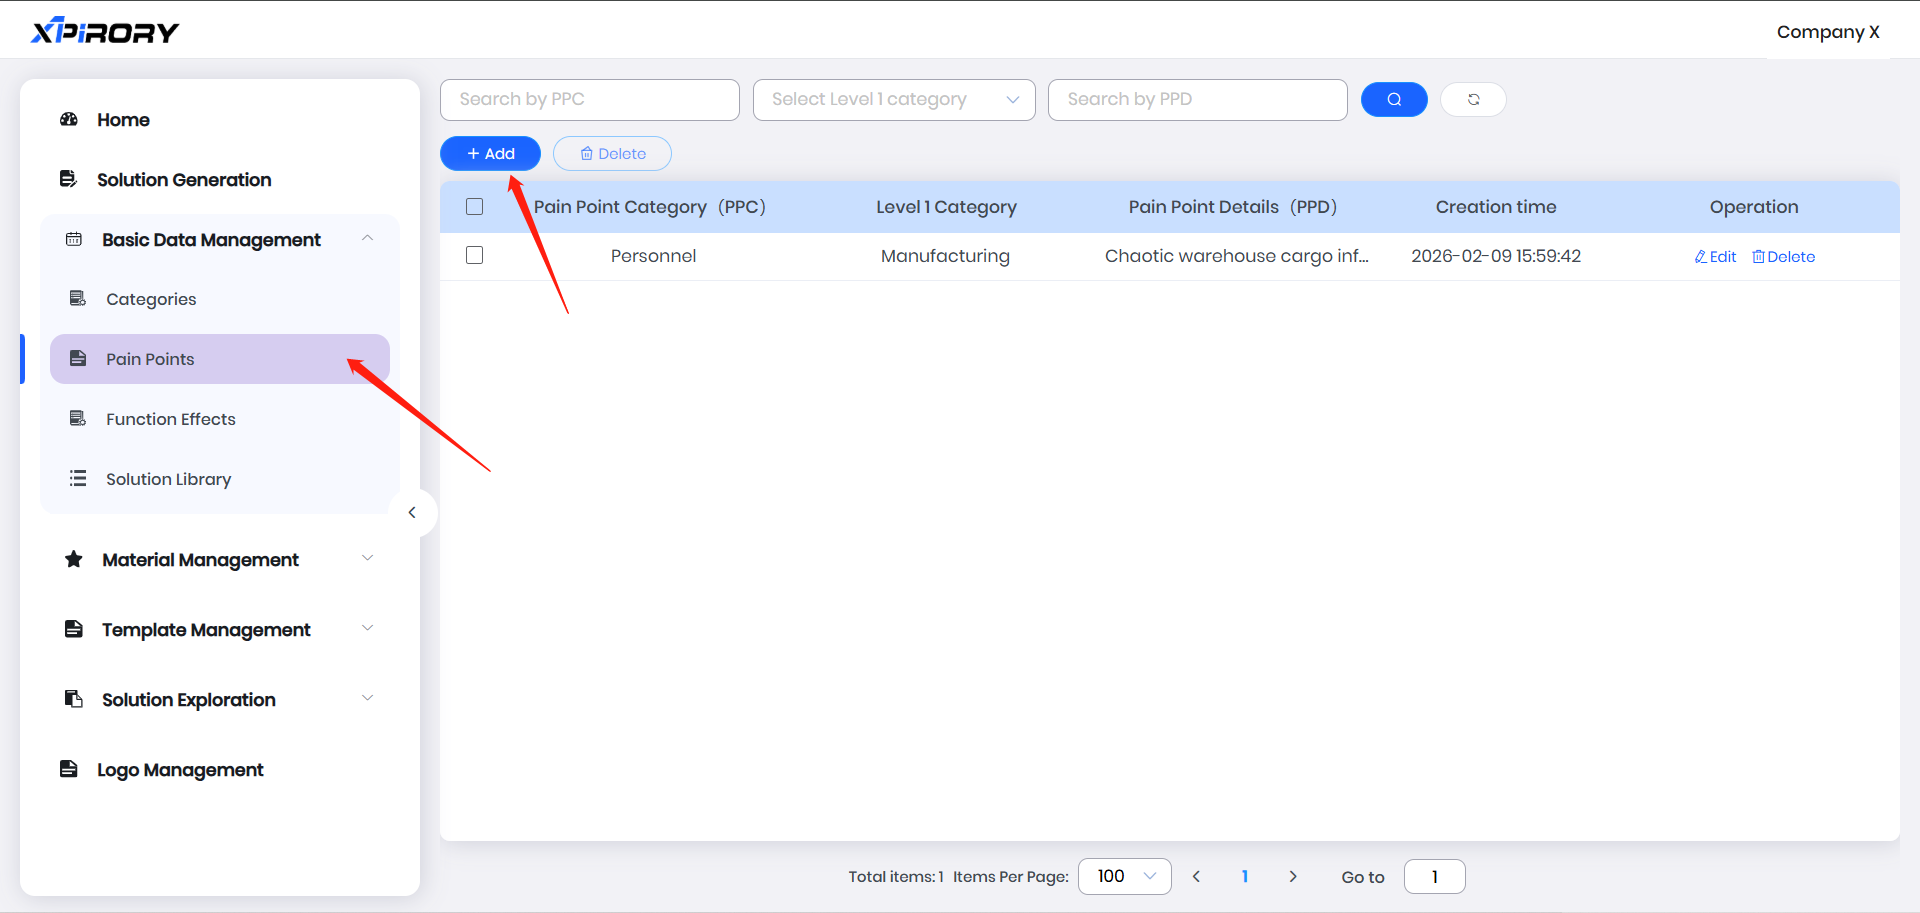
(1) Click the "Add" button and enter corresponding information according to prompts in the pop-up window to complete the setting of a pain point.
(2) Filling Instructions:
L1 Category: Since pain points in similar industries have a certain degree of generality, pain points are classified by L1 Category.
Pain Point Category: This category can be self-defined, such as setting by resource object categories like personnel, vehicles, equipment, facilities, goods, and venues.
Pain Point Details: Describe an objective fact in one sentence. To facilitate subsequent display and selection, it is not recommended to be too long.
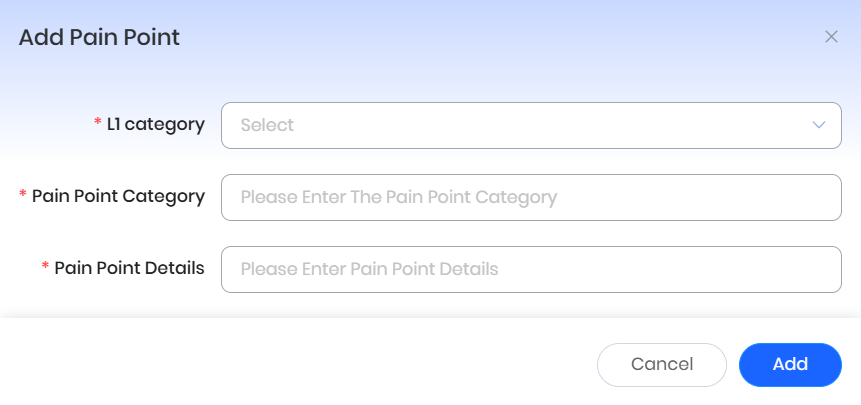
(3) After clicking "Add," a pain point will be successfully set.
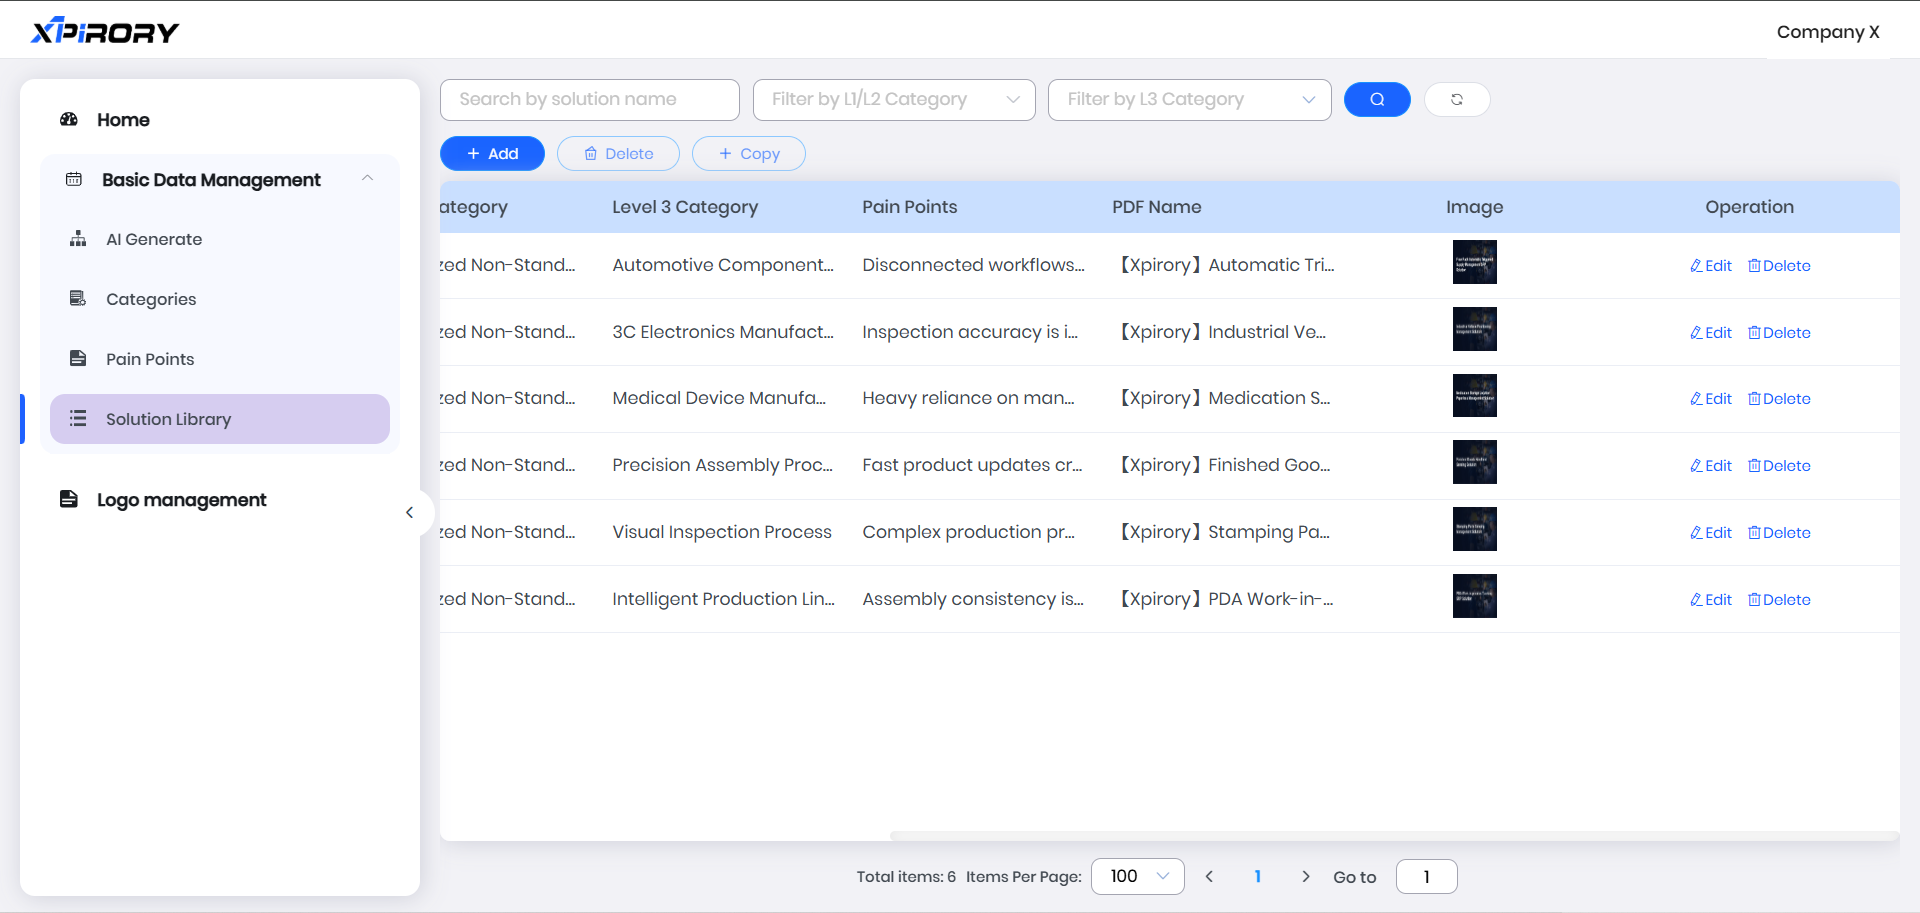
3.6.1.4 Solution Library
After information in Categories and Pain Points is set, association and binding of basic solutions can be carried out.
(1) Click "Add" to set solution content via a pop-up window.
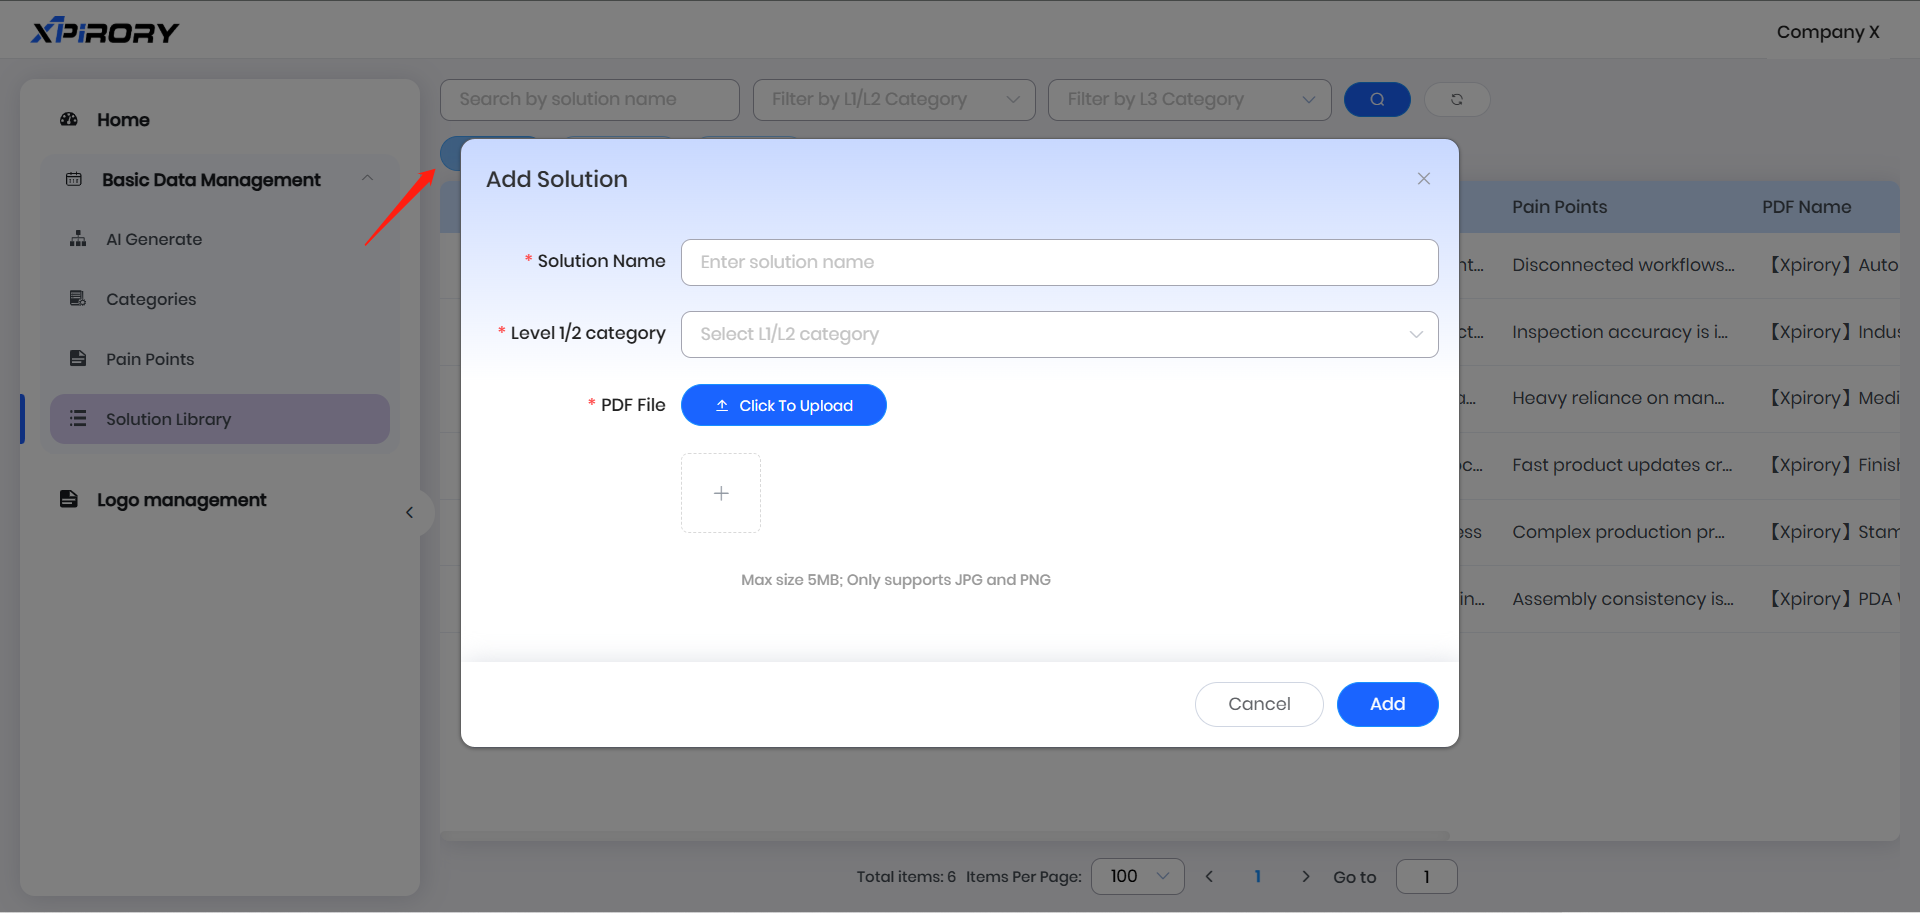
(2) Select the Level 1/2 category and Level 3 category to which the solution belongs as prompted.
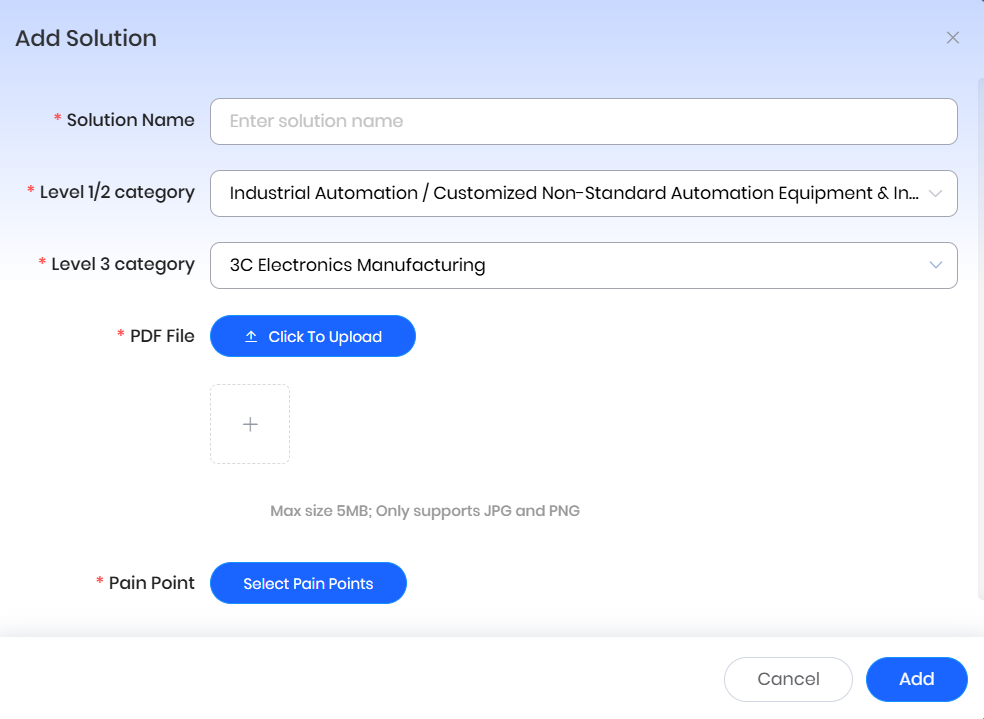
(3) Upload the corresponding PDF file and solution cover screenshot of the solution.
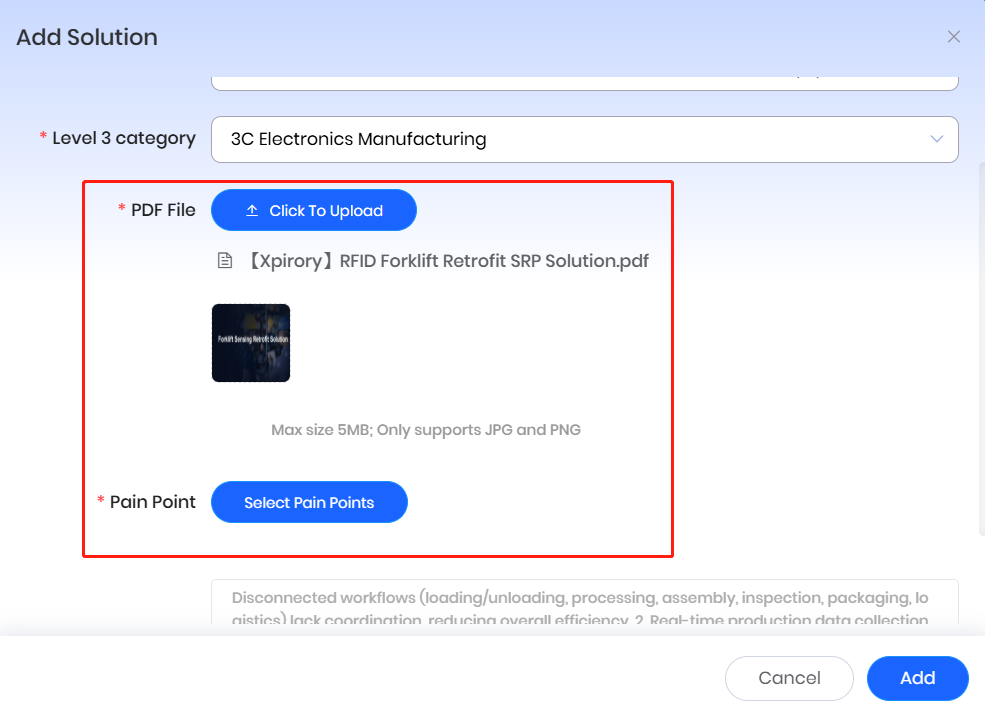
(4) Select the pain points that the solution can address and click "Add" to complete the association and binding of solutions, pain points, and categories.
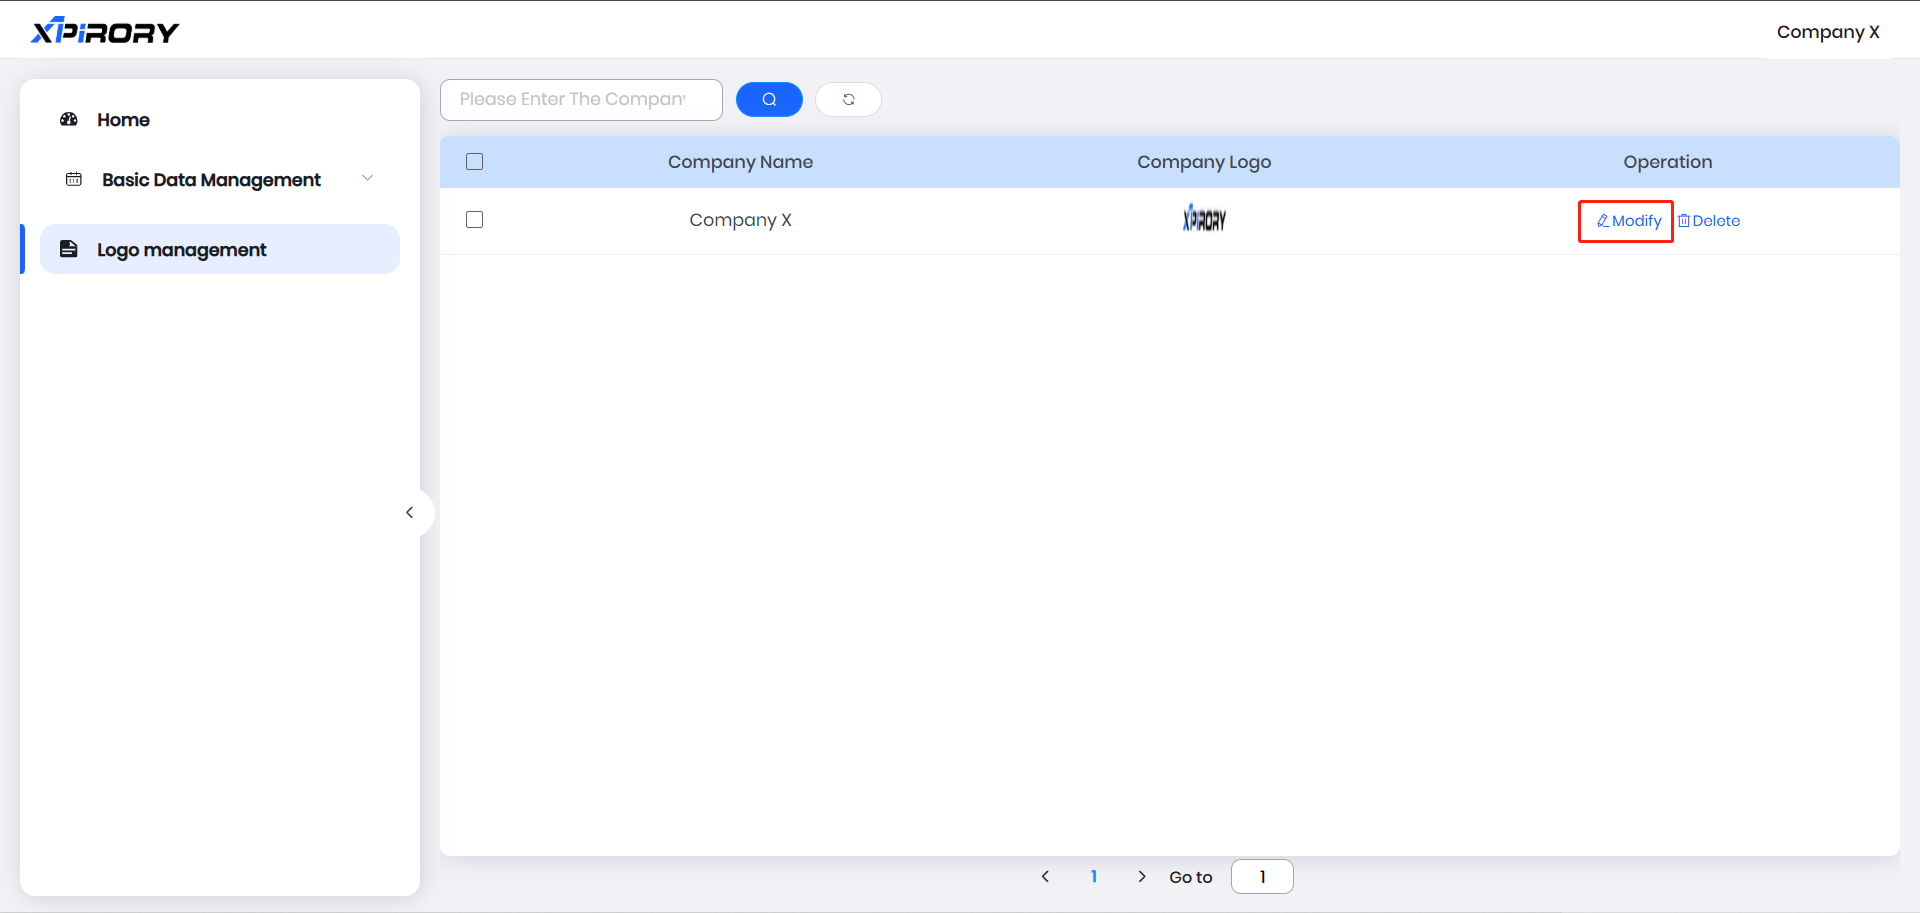
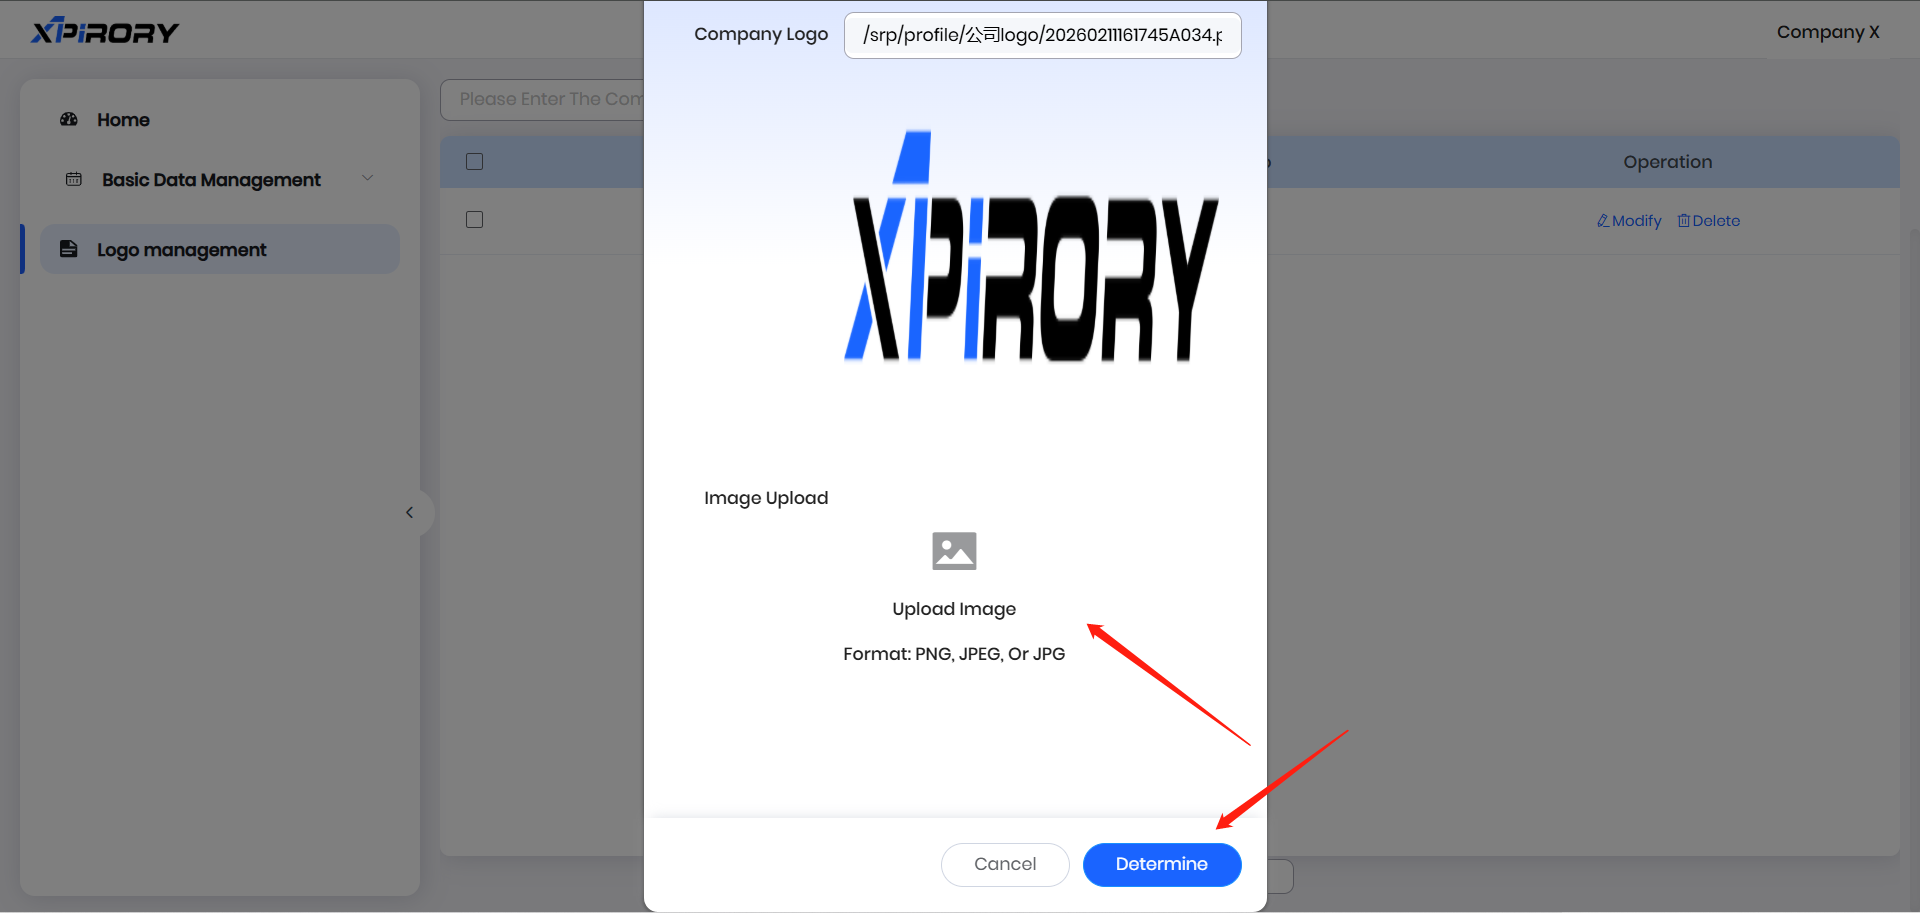
3.6.1.5 Logo Management
In Logo Management, users can replace their company logo. Click "Modify," upload a custom logo image in the pop-up window, and click [Determine].
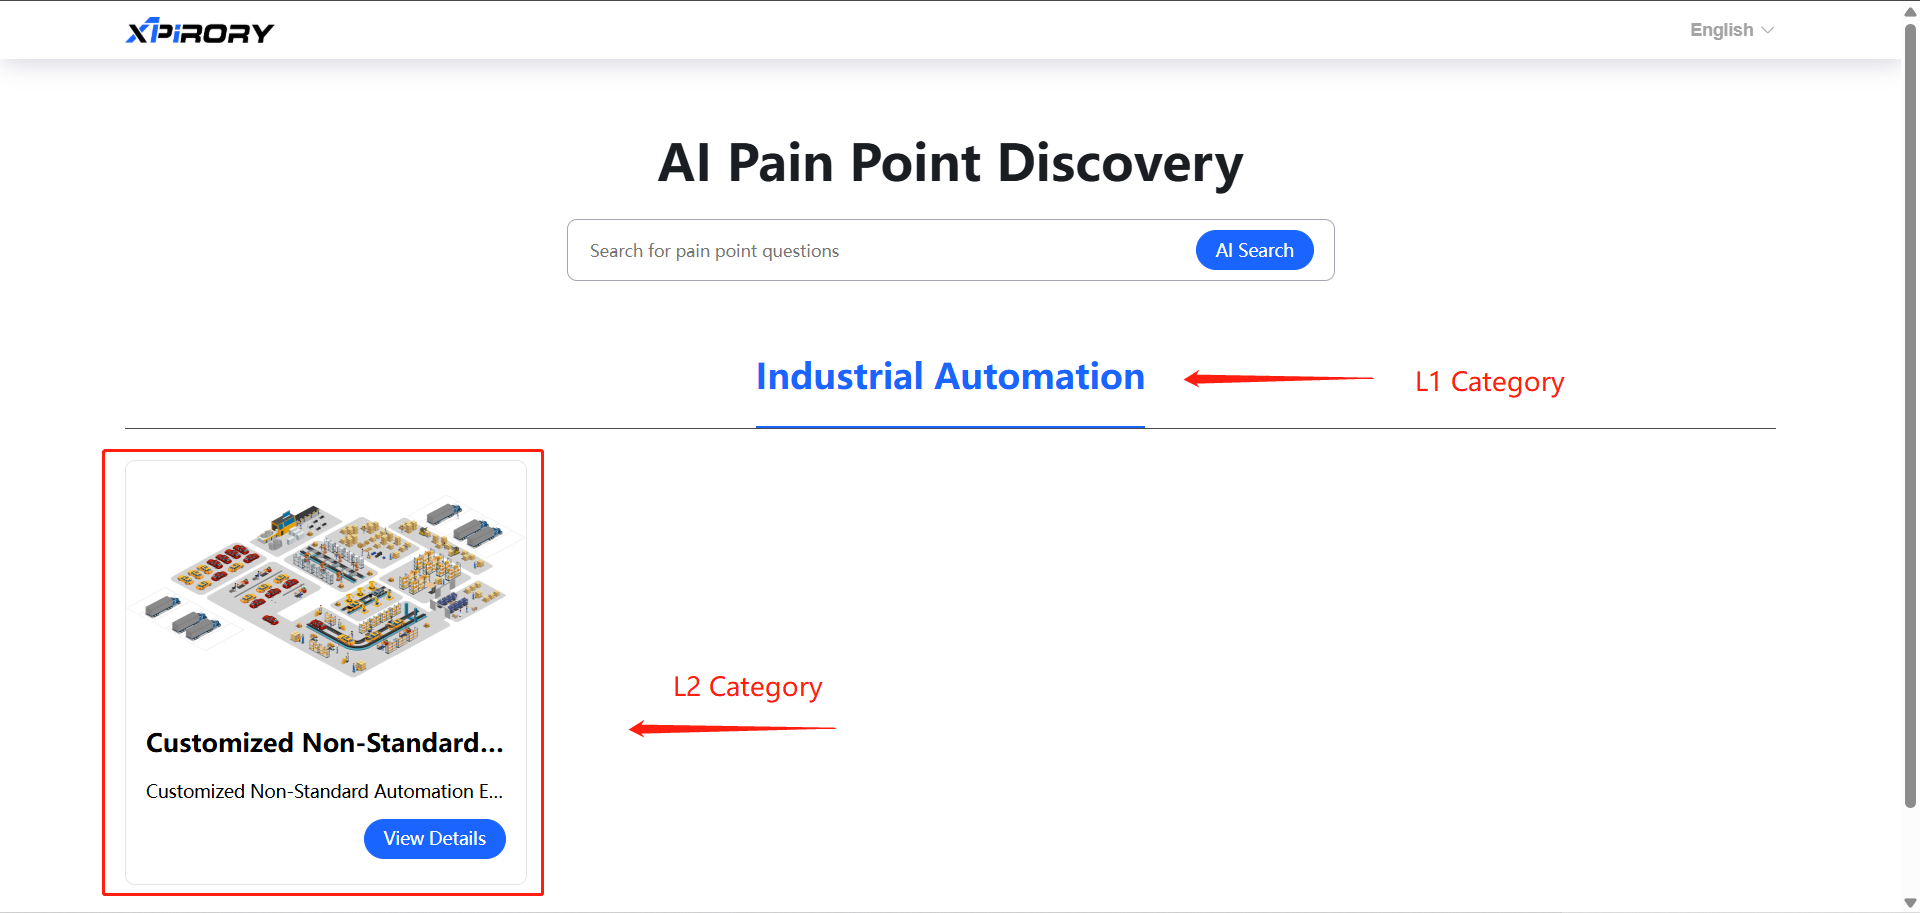
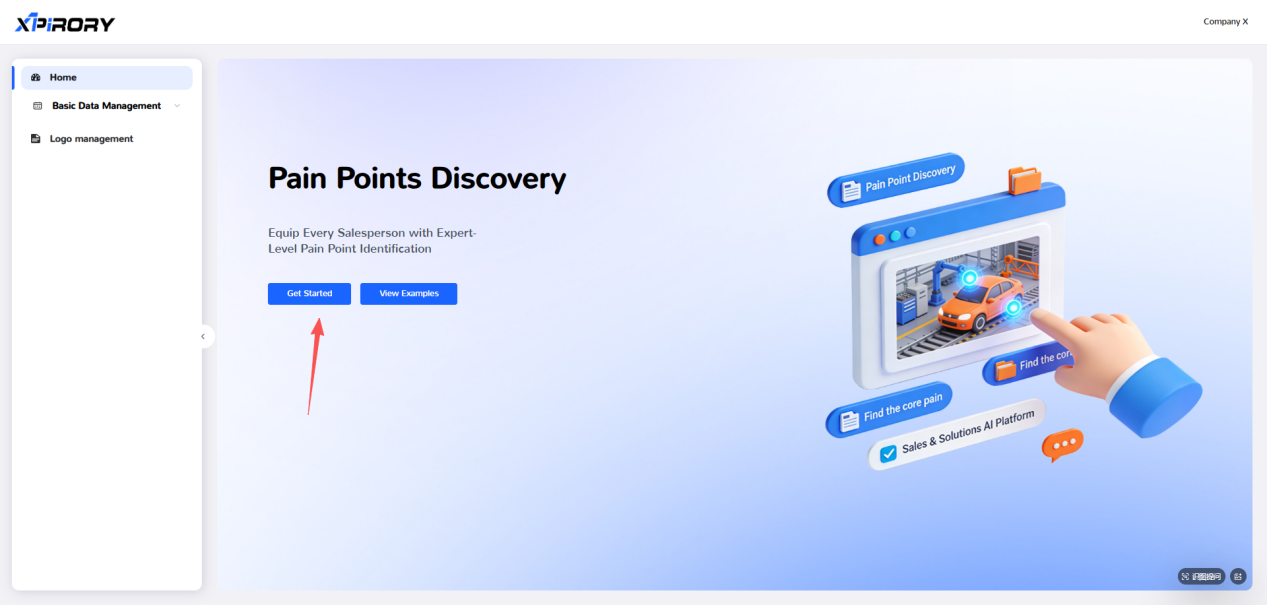
3.6.2 Pain Points Discovery
Click the "Get Started" button on the homepage to directly jump to the homepage of the Pain Points Discovery. Users can share the homepage link of their Pain Points Discovery with corresponding customers for solution exploration and viewing.
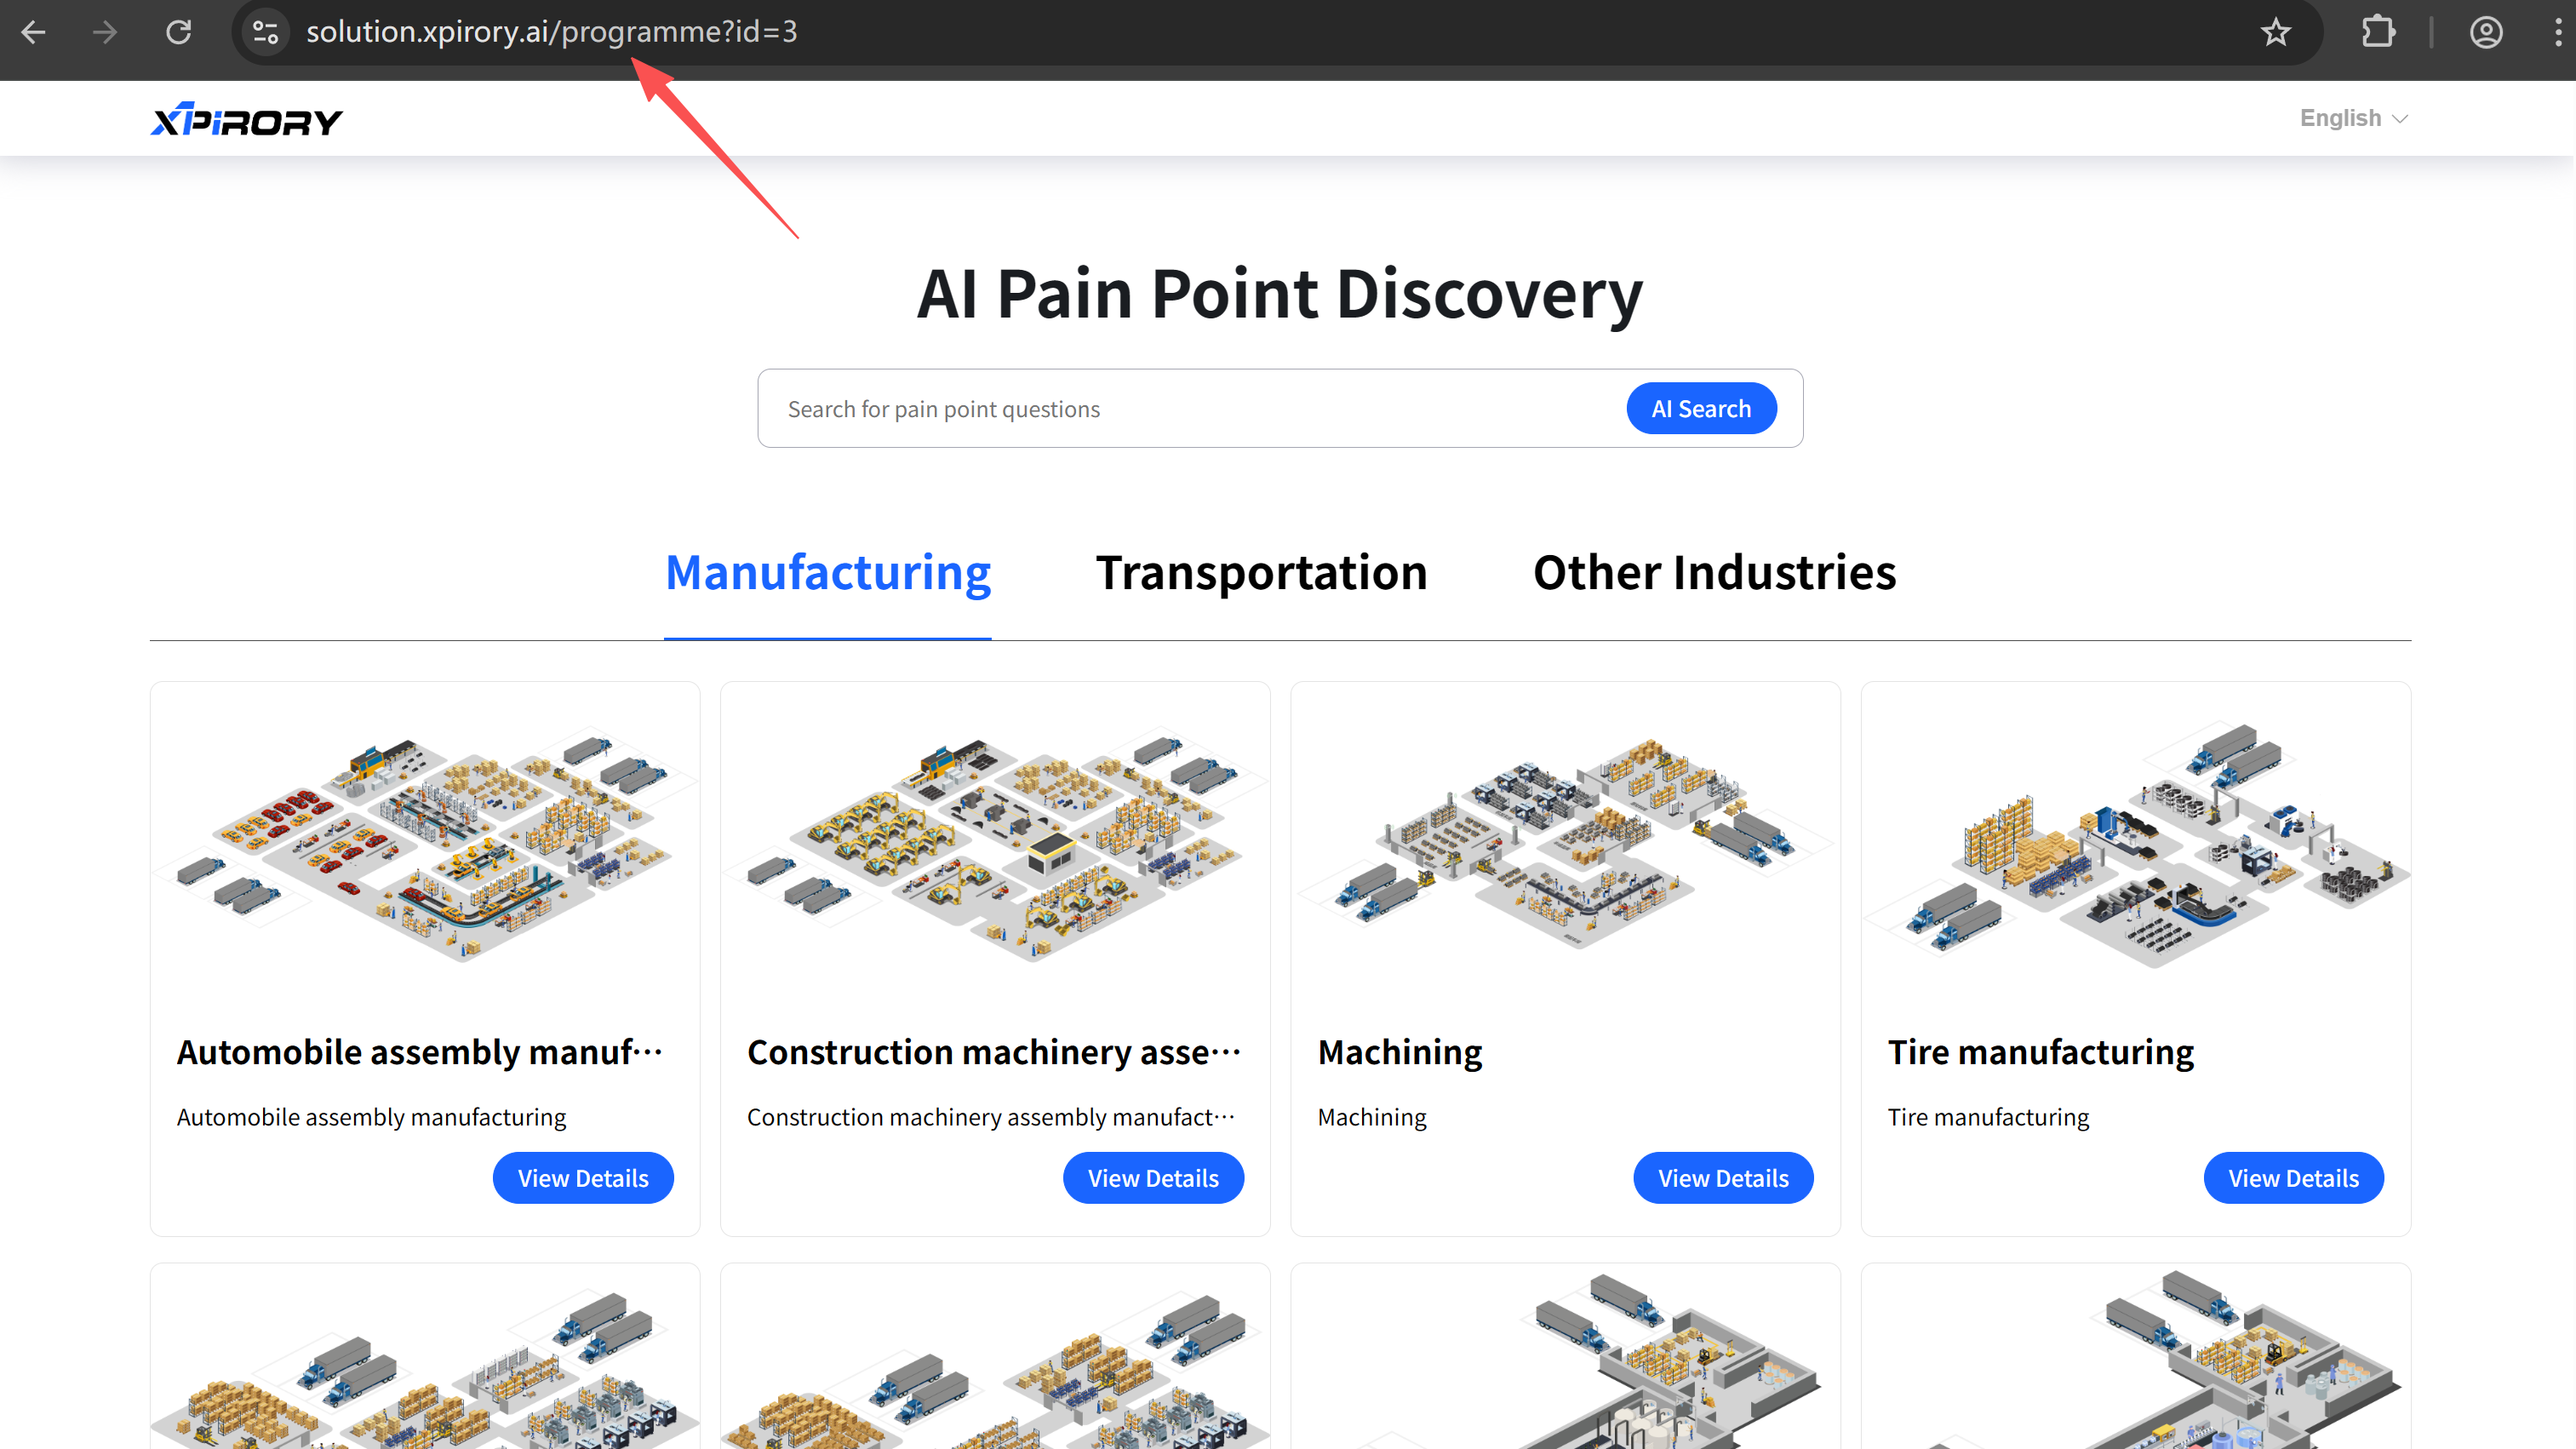
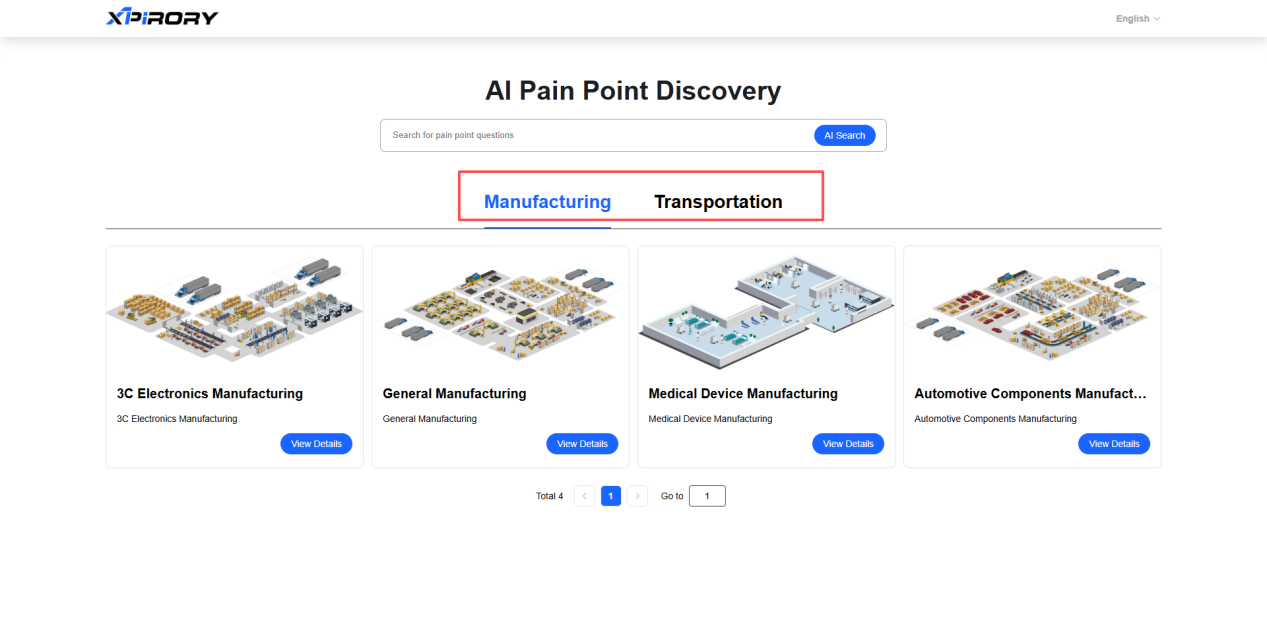
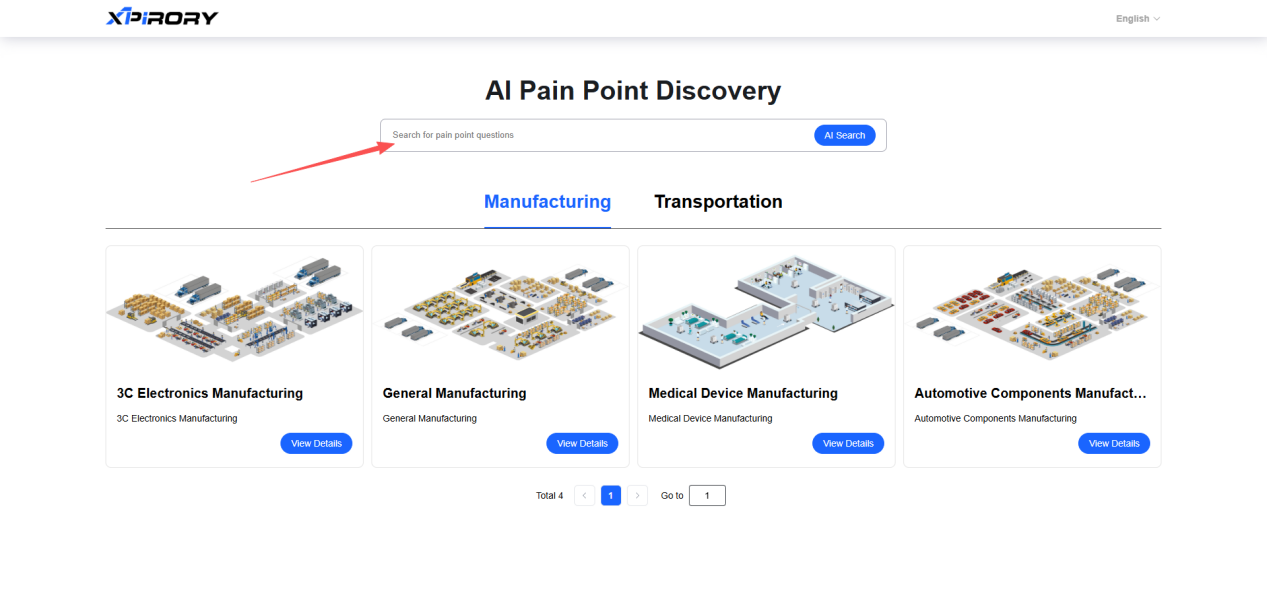
(1) Switch between different L1 Categories at the top.
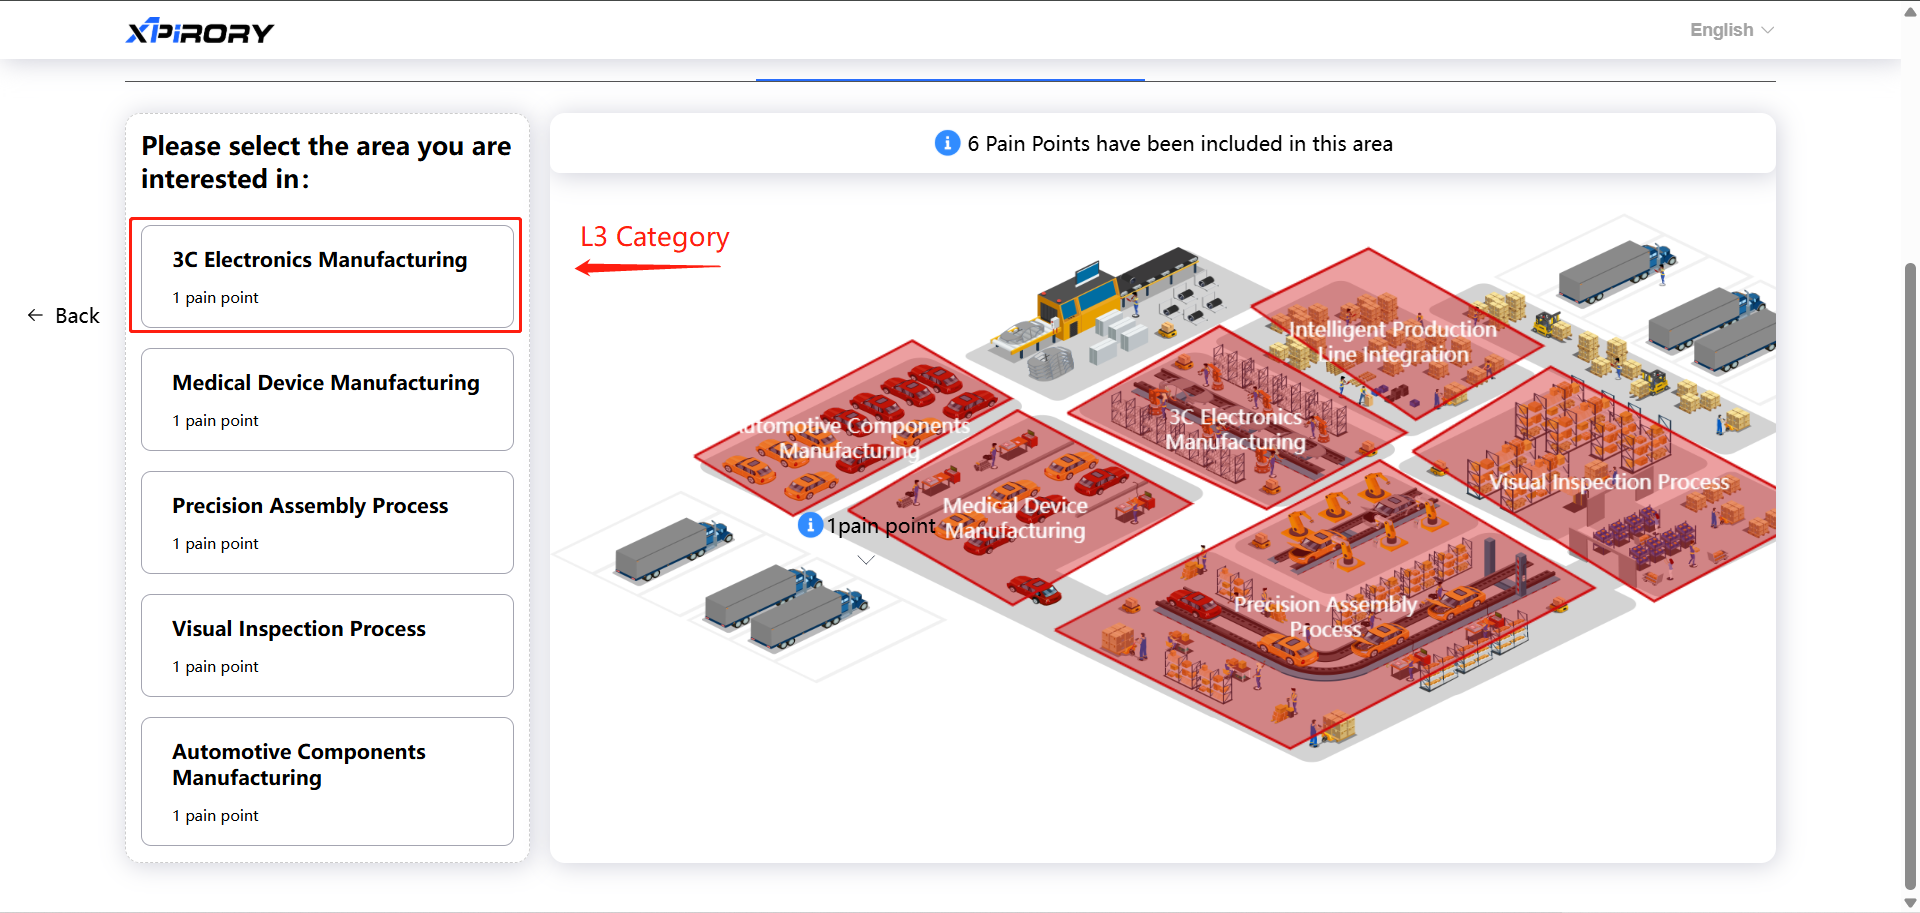
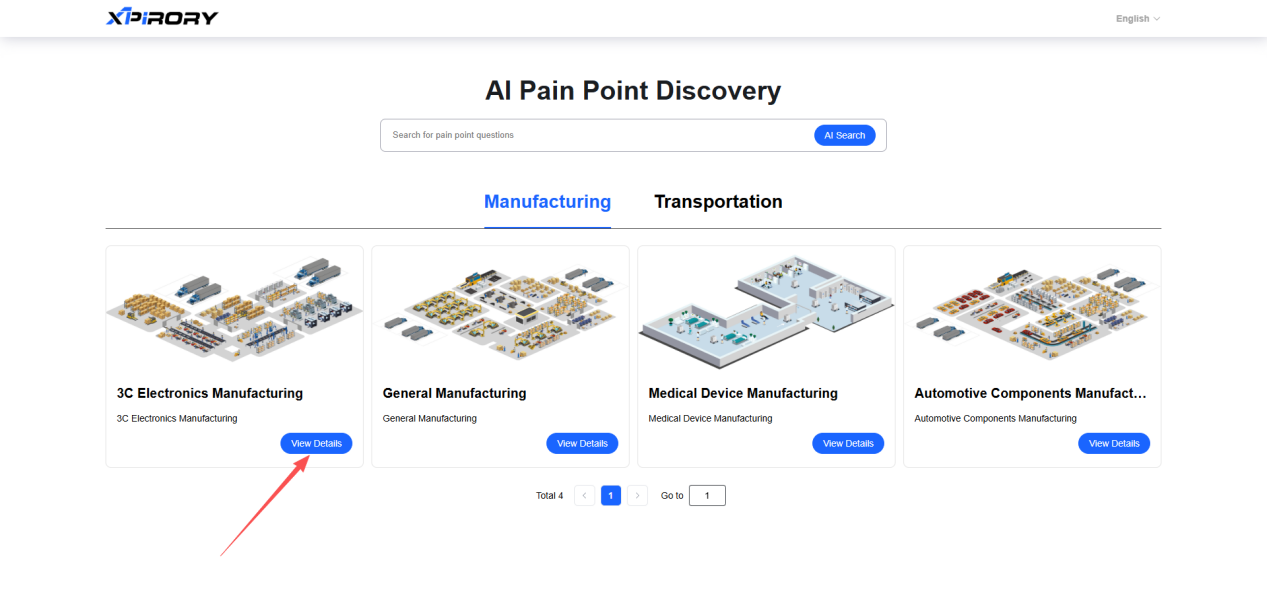
(2) Click "View Details" of a L2 Category to enter the L3 Categories map interface.
(3) To view the corresponding pain points, simply select the desired L3 category from either the left-hand list or the map interface.
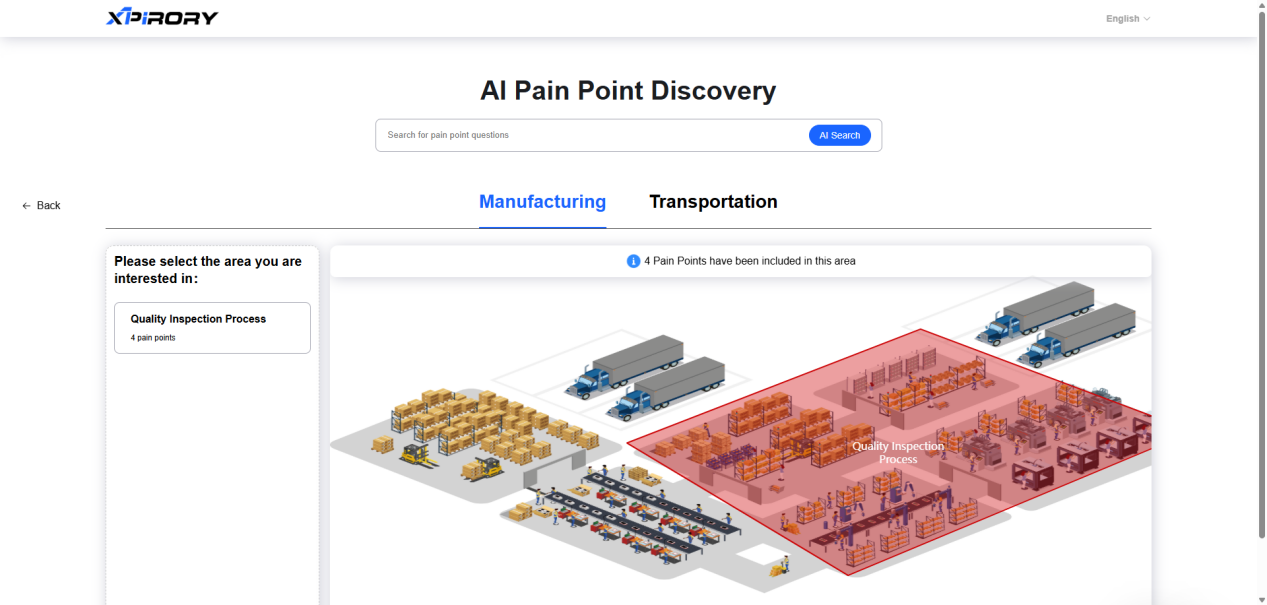
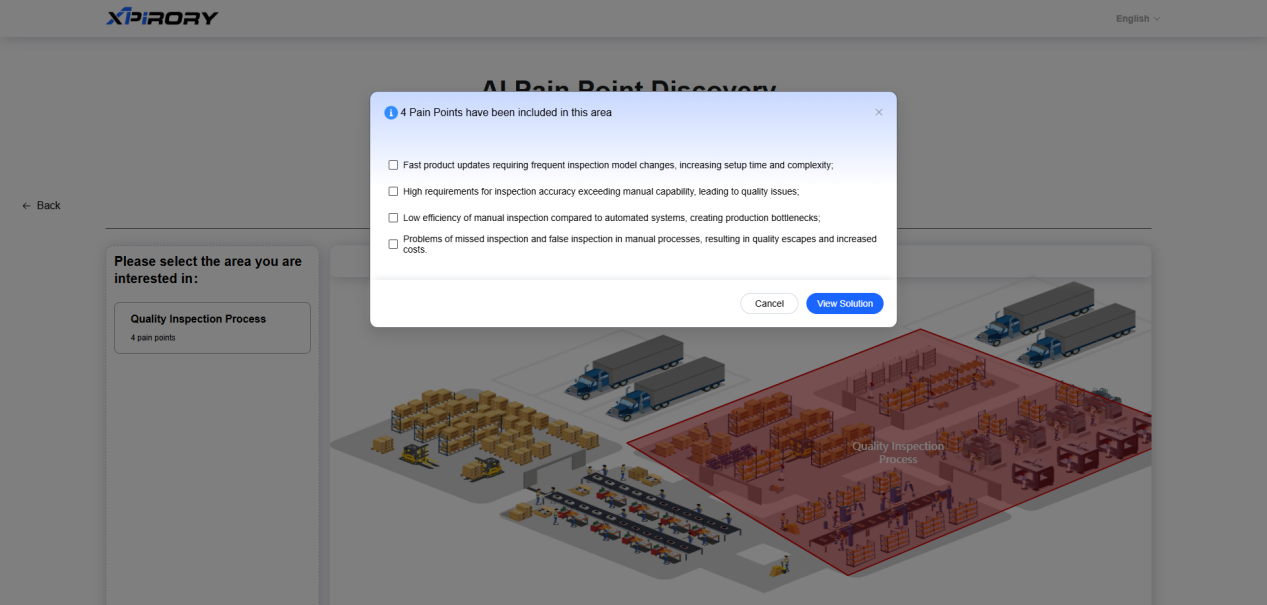
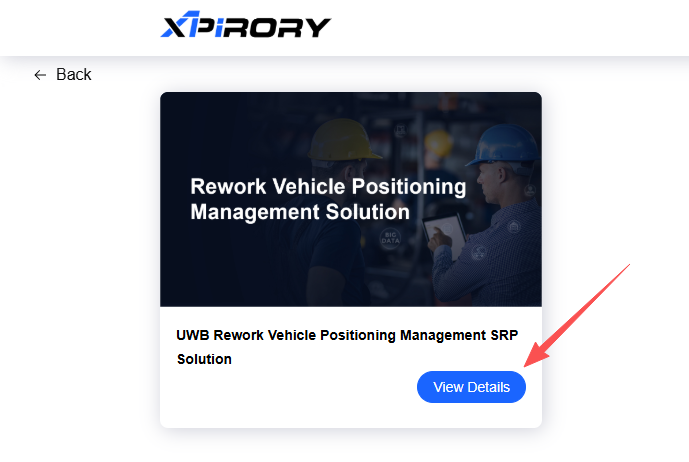
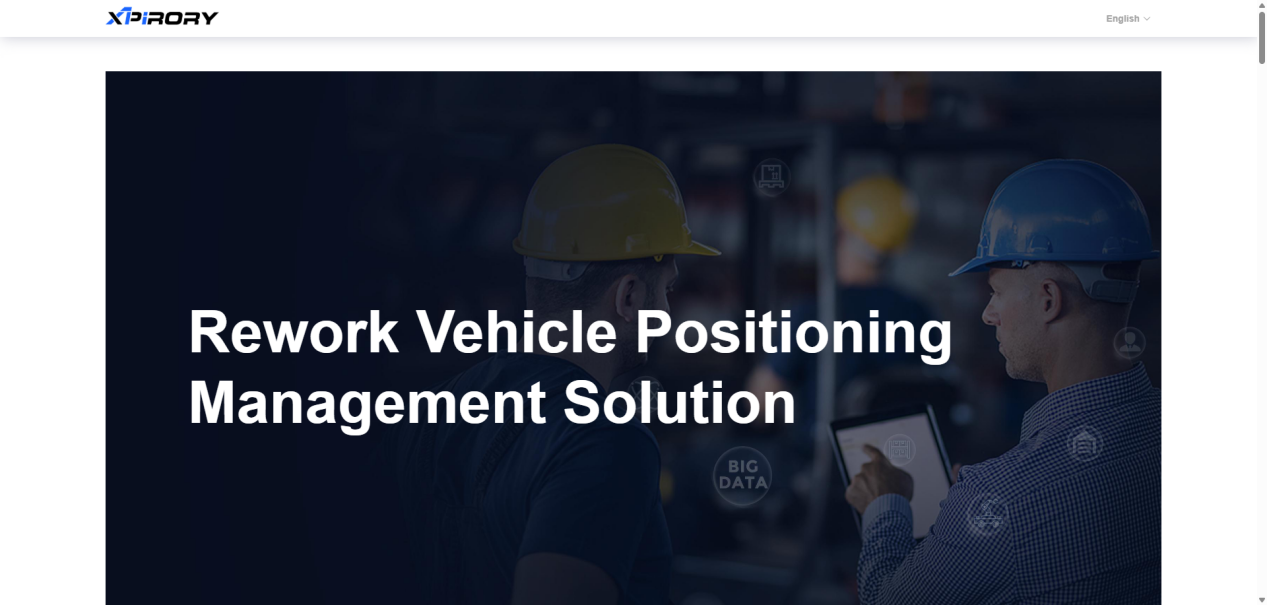
(4) After selecting a pain point in the pop-up window, click "View Details" to browse solution details.
(5) If there are specific pain points for solution retrieval, you can also directly search by asking questions in the AI intelligent search bar.
3.7 Operation Sim & Analysis
Function Overview:
The Operation Sim & Analysis quickly constructs a visualized operational simulation site by integrating behavioral data of various resource elements such as personnel, vehicles, and equipment entered by users with maps uploaded by users. Leveraging the powerful analytical capabilities of AI large models, the platform conducts in-depth diagnostic analysis of potential optimization points for various resources in enterprise operations and provides corresponding solution recommendations and estimated optimization effects. Users can conduct comparative analyses of indicators for these optimization solutions to quickly identify current operational optimization directions, significantly shorten the cycle of lean improvement, and pre-obtain benefits from operational improvements.
Operation Steps:
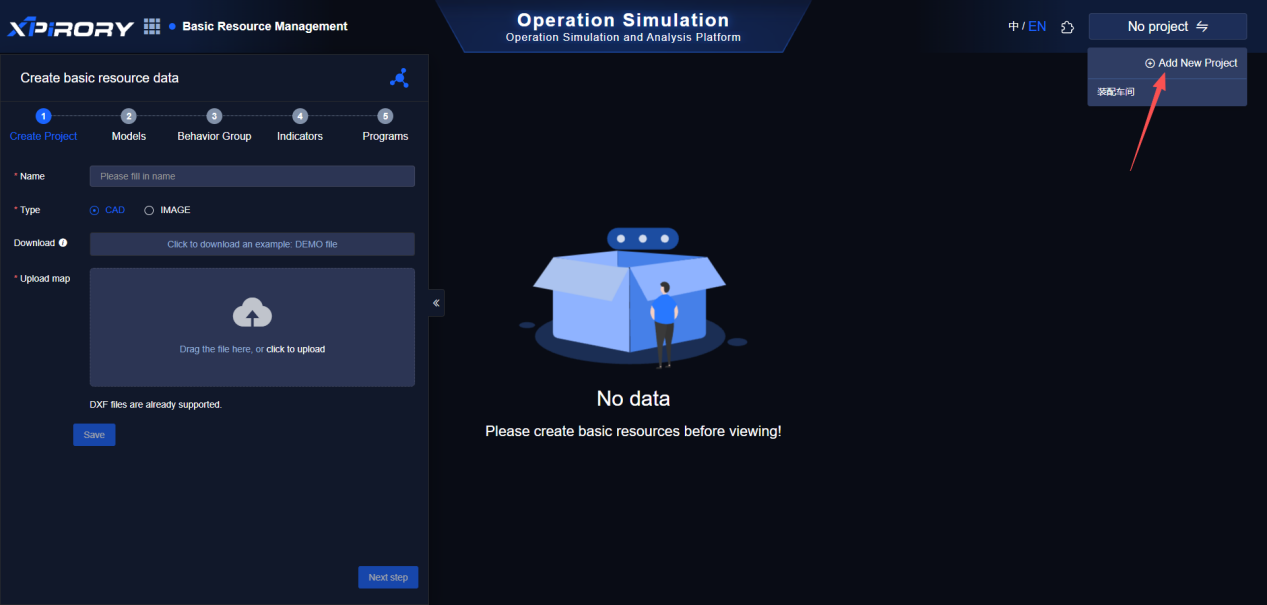
3.7.1 Create New Project
Click the button on the upper right corner, and then select "Add New Project" from the drop-down menu.
3.7.2 Basic Resource Data Entry
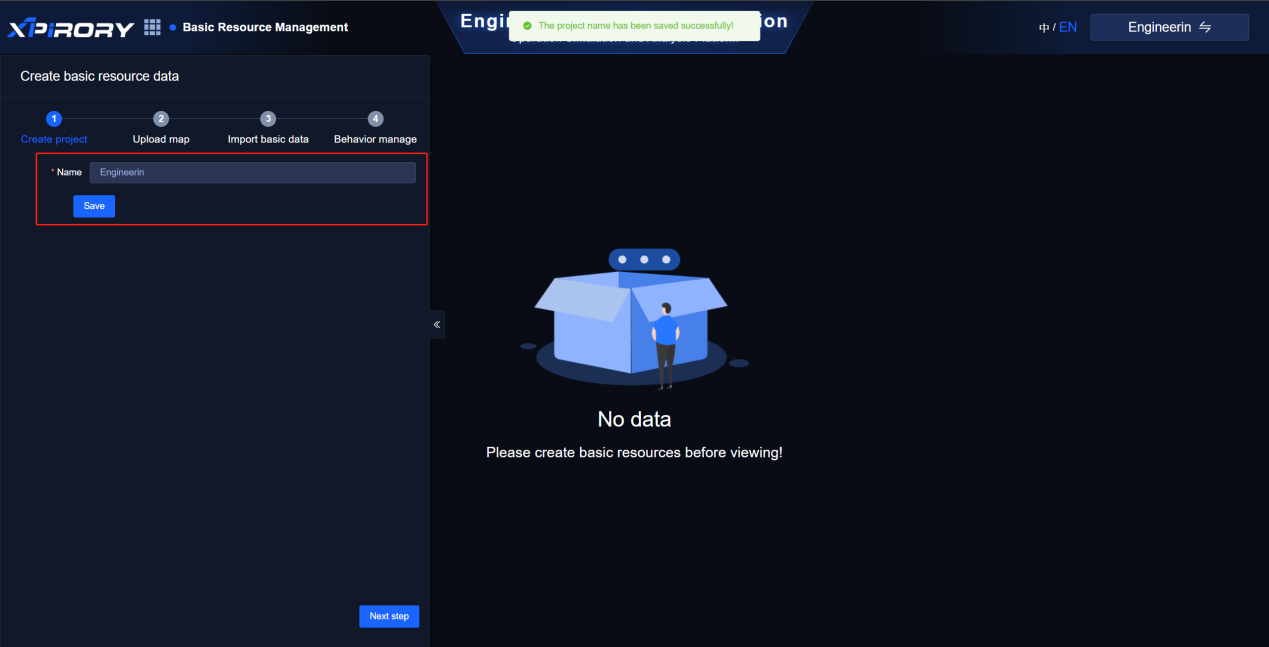
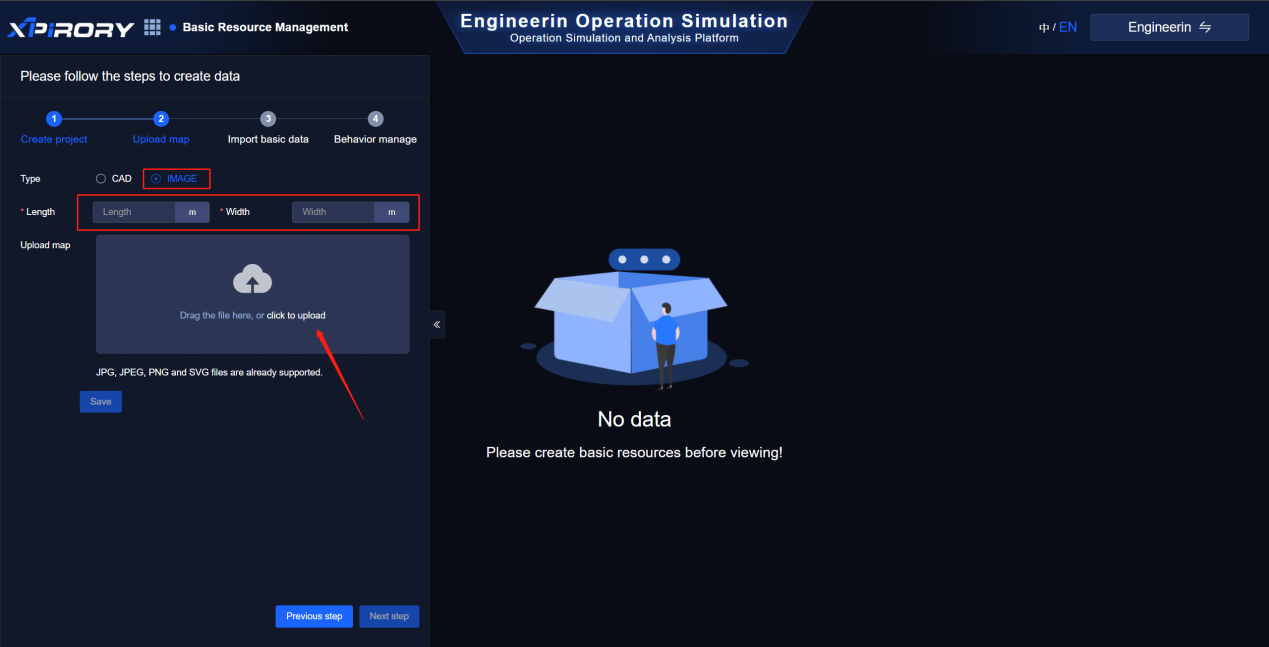
(1) Create Project: Users can customize the name of the new project. After "Save" the project name, click "Next step".
(2) Upload CAD Map: Users need to upload a CAD drawing file as the simulation analysis map. Click "Download Template" to download a demo file for drawing. Requirements for uploaded CAD drawing files are as follows:
a. The length unit in CAD drawings is meters.
b. The DXF file must be in AutoCad 2000 version.
c. Walls and road networks are drawn with lines in their respective layers; production lines, storage areas, storage locations, and workstations are drawn as closed rectangular layers.
d. Layer names are separated by "-", for example:
Wall layer: named with "-qt" suffix
Road network layer: named with "-lw" suffix
Production line layer: named with "-cx" suffix
Storage area layer: named with "-kq" suffix
Storage location layer: named with "-kw" suffix
Workstation layer: named with "-gw" suffix.
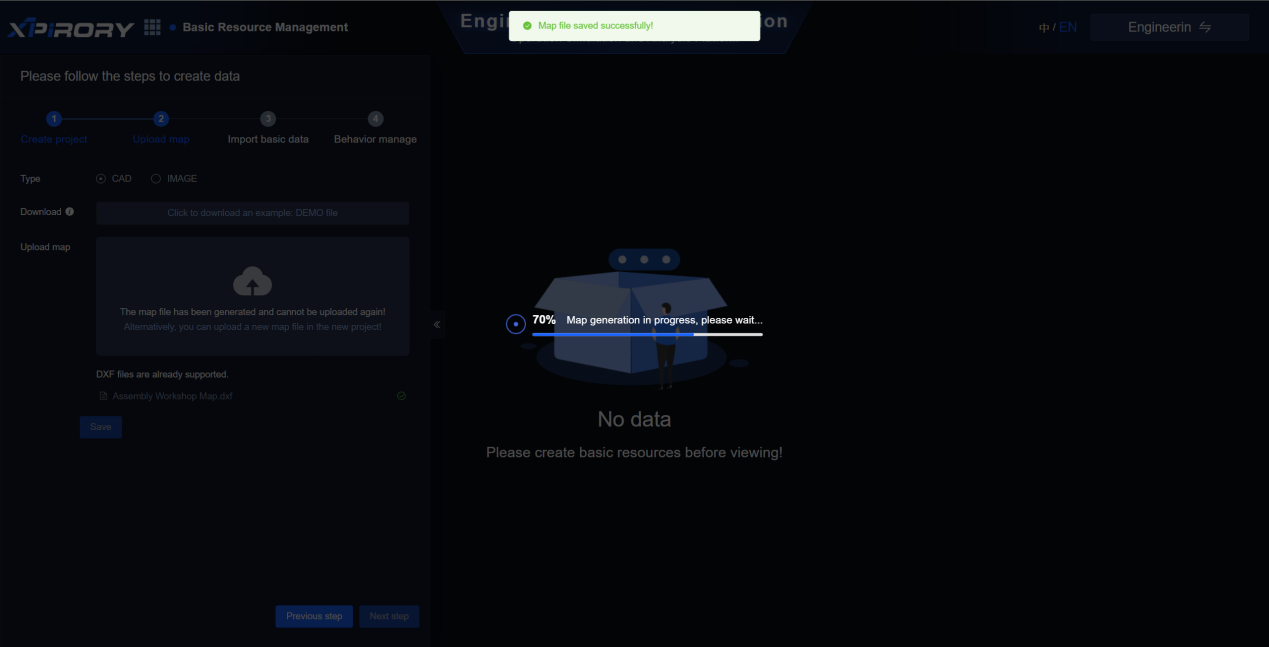
Click "Upload" to upload the CAD drawing file. After uploading, click "Save" to generate the behavior map.

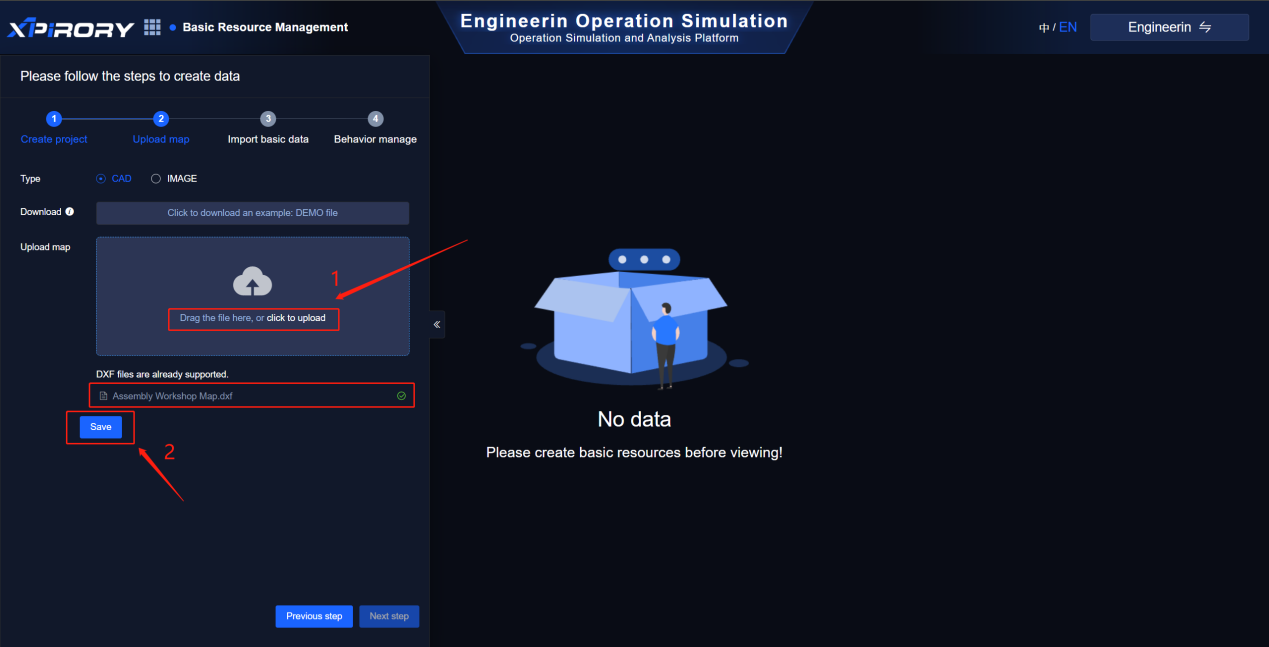
Additionally, users can upload images as simulation analysis maps. After uploading, users need to enter the corresponding length and width dimensions of the real-world site represented by the map to ensure that the movement paths of various resource objects in subsequent simulations approximate real-world conditions.
(1) Resource type: Users can add data of resource types including "person", "vehicle", "apparatus", "equipment", etc., and they can also add sub-resource types under existing types.
Click on "Add" and fill in "Resource Type Name"
Select "Parent Resource"
"Customizable" Upload Avatar
Click "Confirm"
Perform maintenance and management operations on the attribute model of the resource type. Click "Model"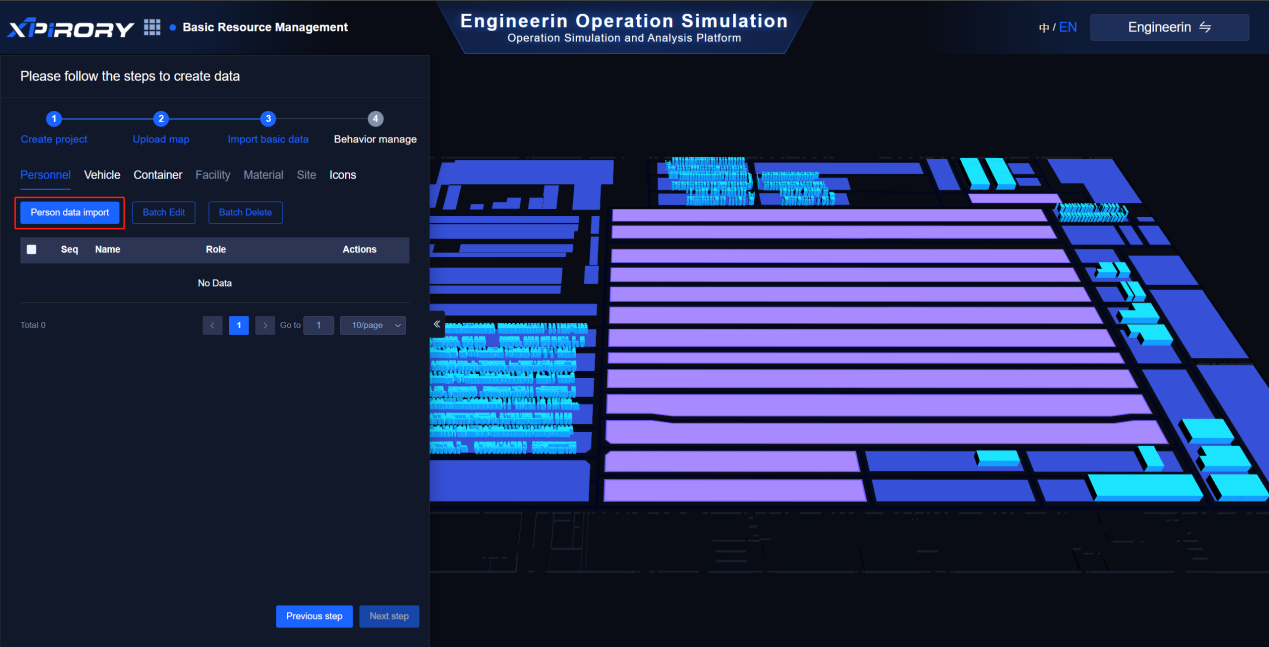
You can "add" the "property definition" for the model. Fill in the code, name, select the data type (for example, integer type), and specify the value range. Click "Confirm".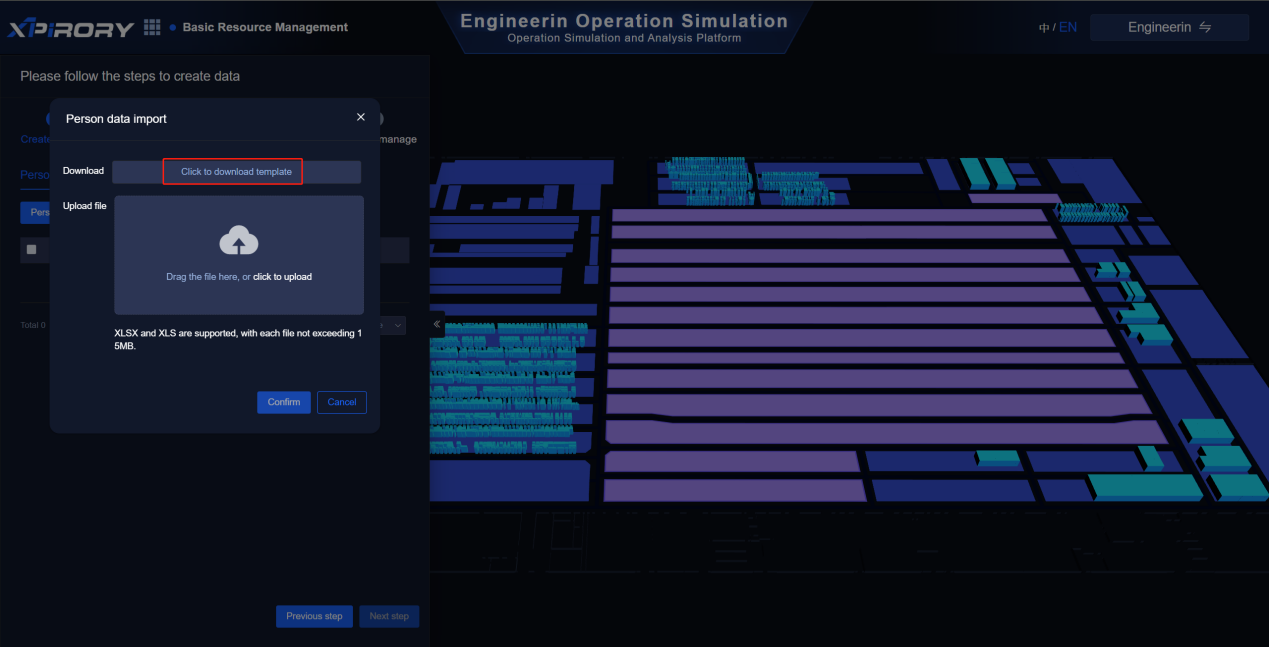
"Status definition" add (defines the switching of different working states of management resources in the job and the changes in the process)
Fill in the status number, status name and status avatar.
State flow definition: Drag the established resource states from the left side to the canvas on the right. In the canvas, establish the flow relationships between the resource states through arrows.
Action definition performs "add" (managing the action changes of defined management resources in the job)
Fill in the "Name" and "Description" fields for the new action.
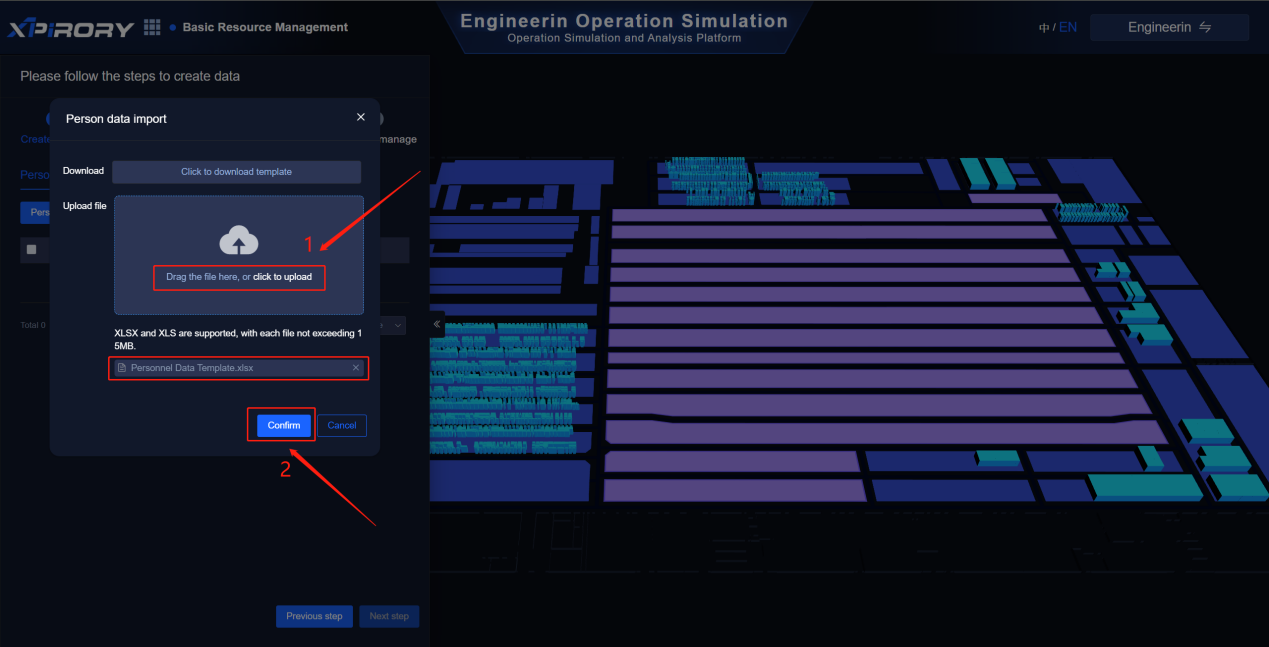
(2)Resource Data Import: Users can import basic data including "personnel", "Forklift", "instrument", "device" and other domain elements. Taking the "picking personnel" element as an example, click on "Resource Data Import".
Select "Resource Type - Person-Receiving person" from the pop-up menu.
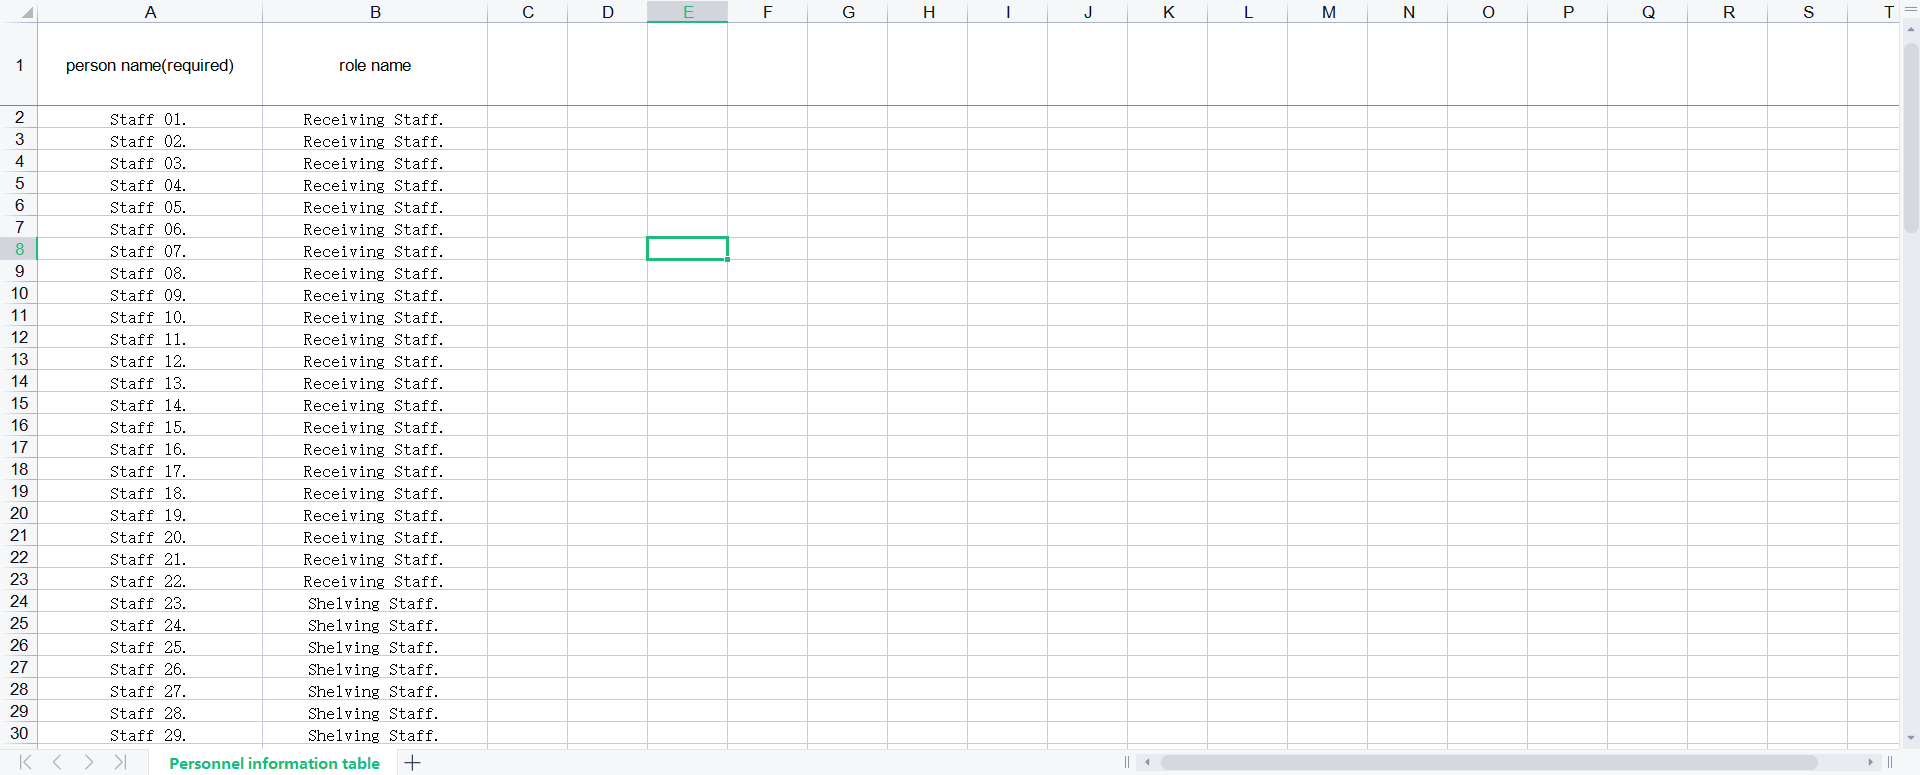
Click on "Click to Download Template" to download the Excel template file for importing basic data.
Users fill in the basic data according to the template content and customize the "data code" and "data name".
After filling in, click "Upload File" to import the completed basic data template.
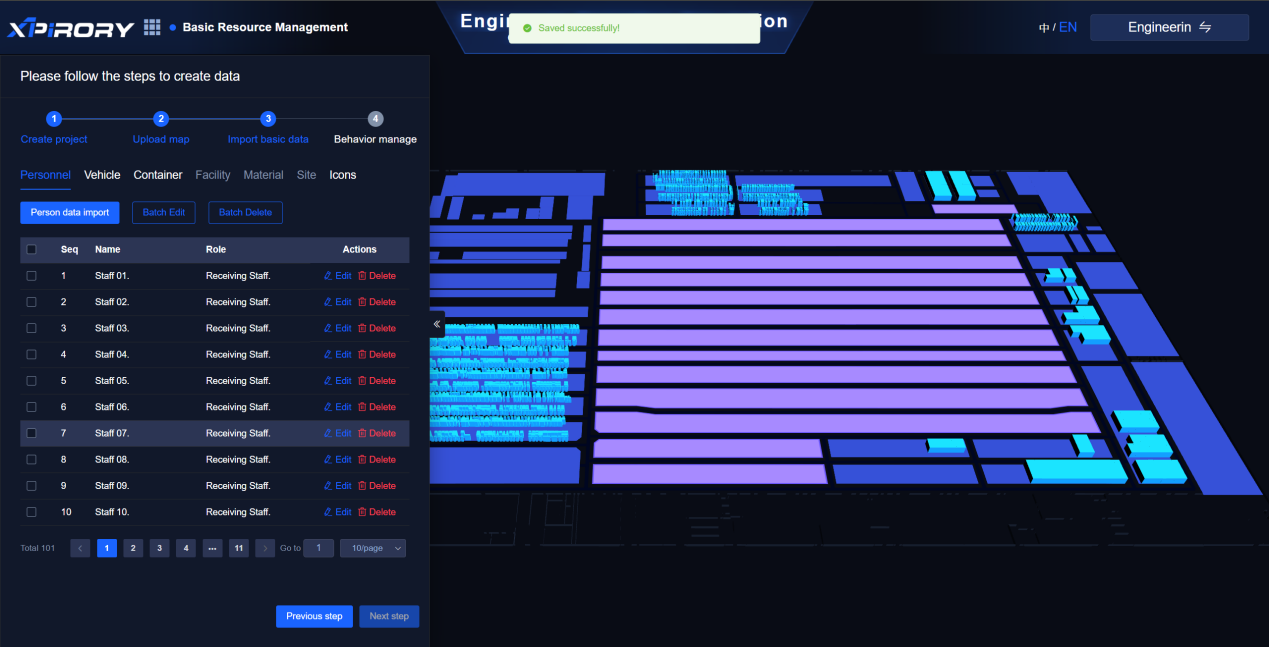
After importing, you can see the basic data that the user has defined. Similarly, you can follow the same steps to import the basic data of other domain elements.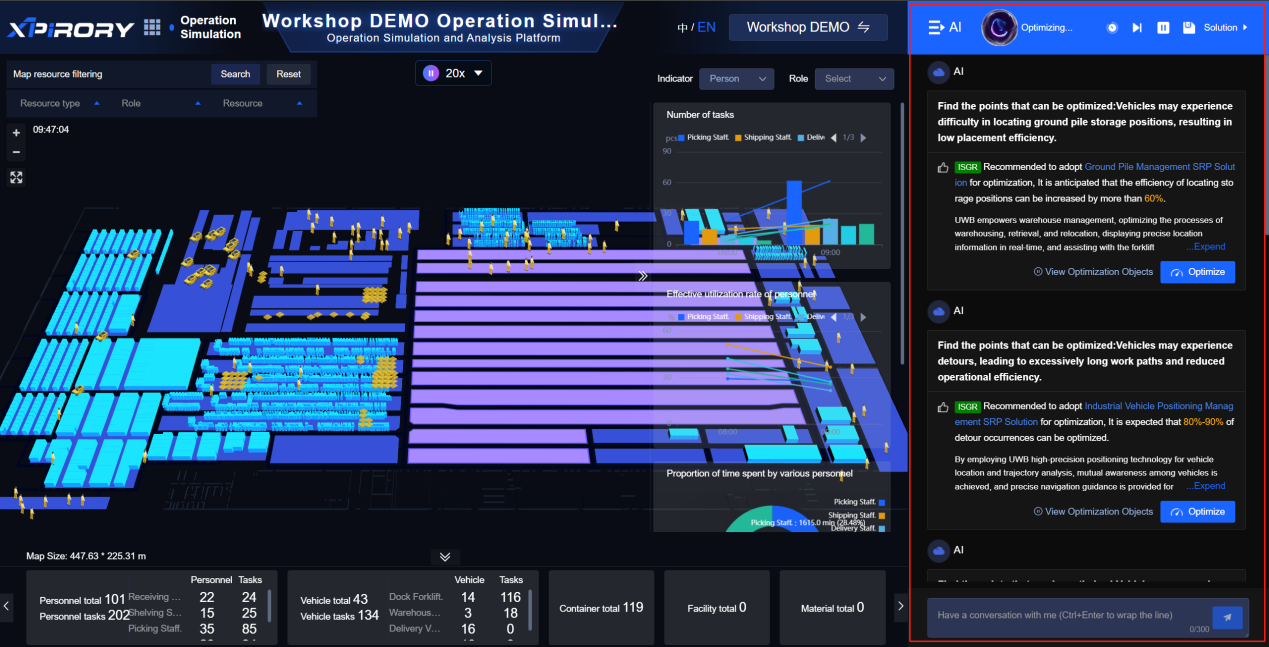
Batch modification of resource data status. Click "Batch Modify status". Resource type: Person - Receiving person Resource status: Idle (There is no default status for resource data import, so it needs to be manually modified). Click "Confirm".
- Task Type - Add Click "Add"
Enter the task type name and click "Confirm"
Task Type Model Definition (Defines the job attributes for managing task types) Click "Model"
Click on "Add" and fill in: Encoding, Name, Data type, numerical range. Then click "Confirm".
(4) Add task data - Select task type (The attributes under the task type are defined in the task type - model)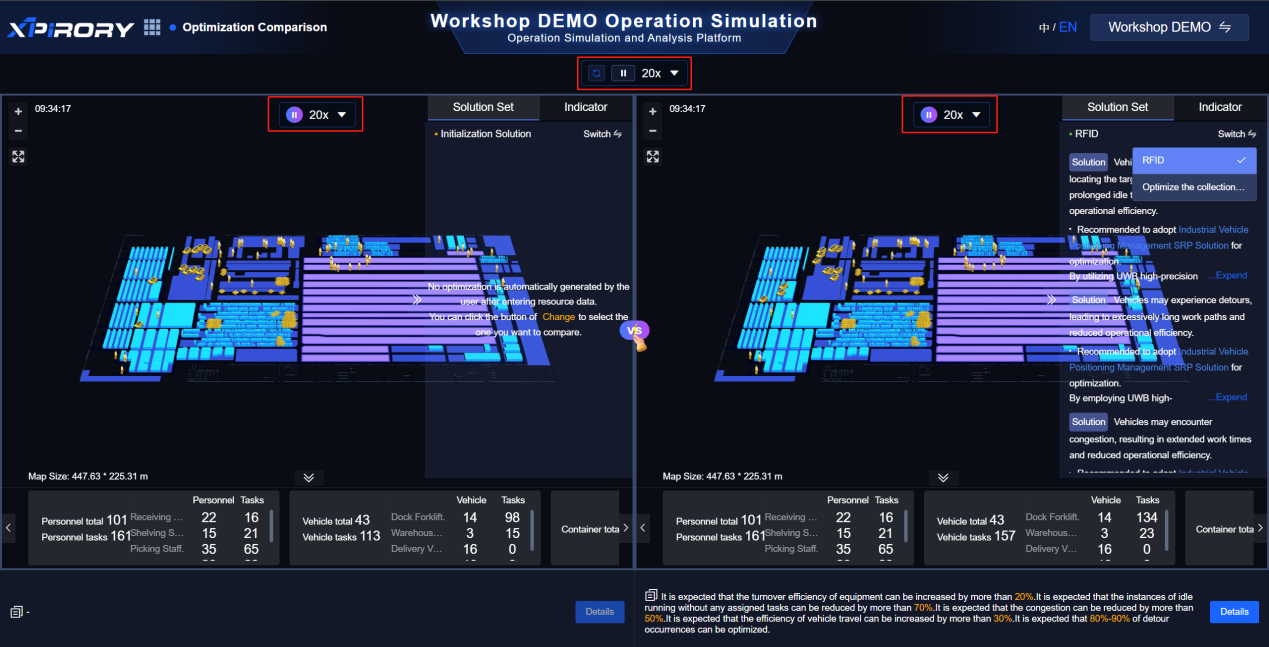
Fill in: Task name, task code, select task status, task quantity, click "Confirm", click "Next step" to create a new behavior simulator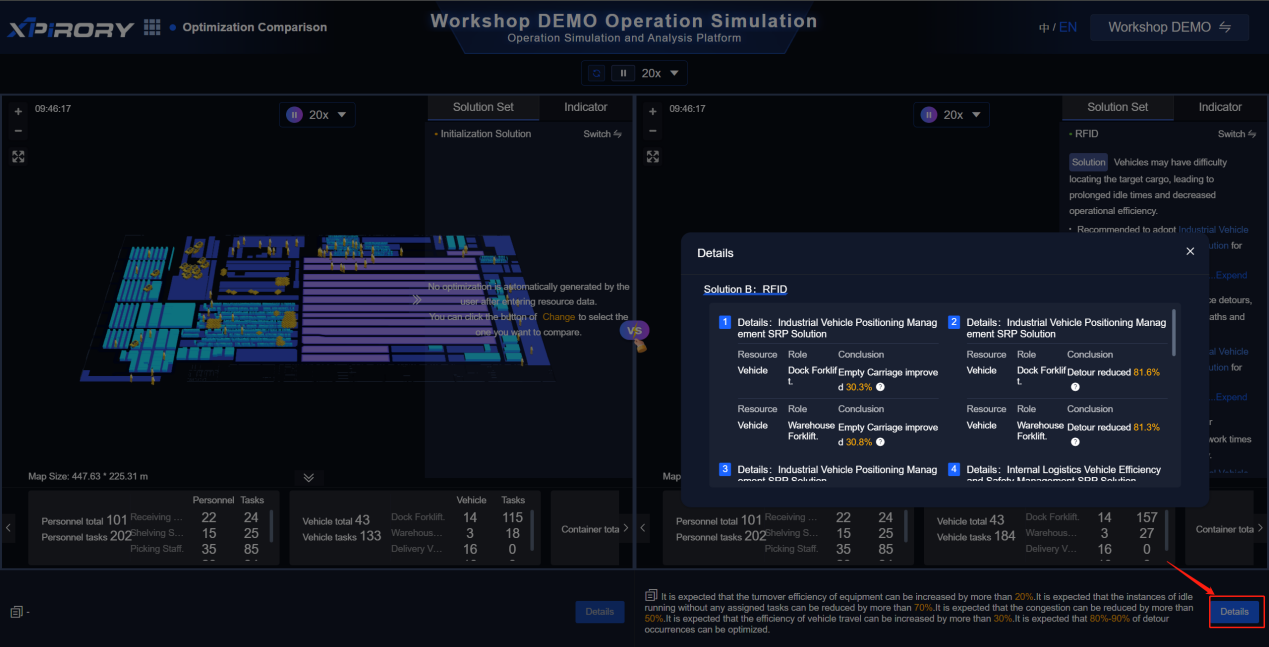
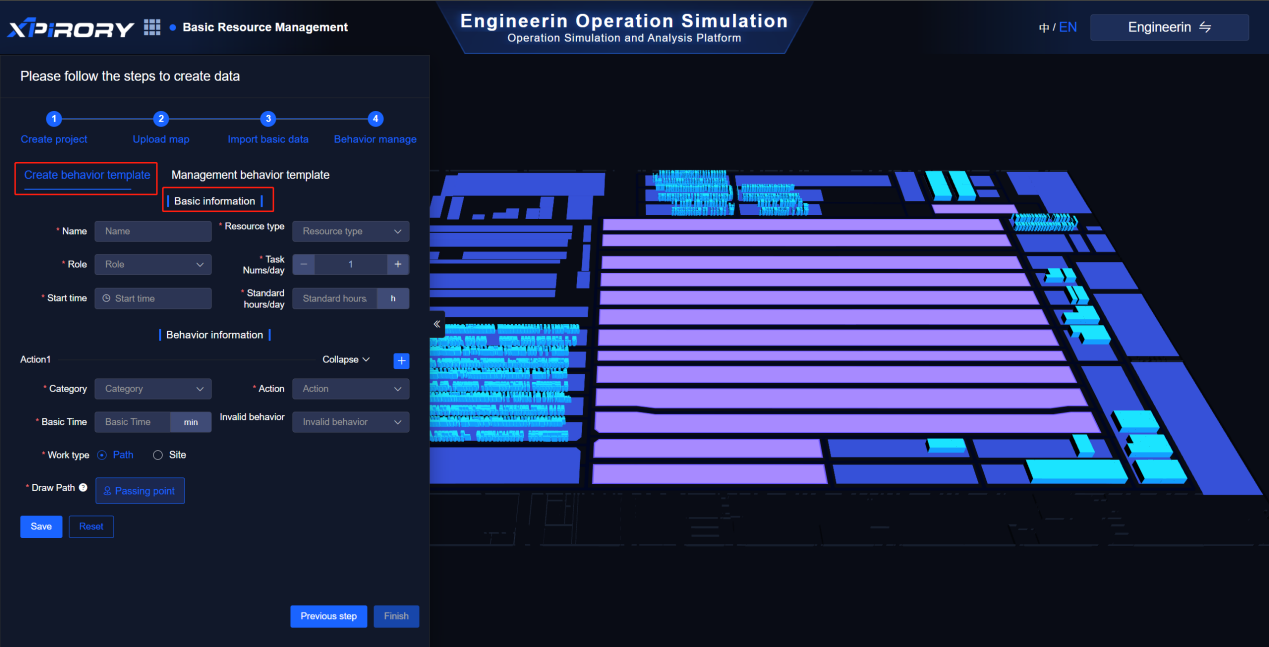
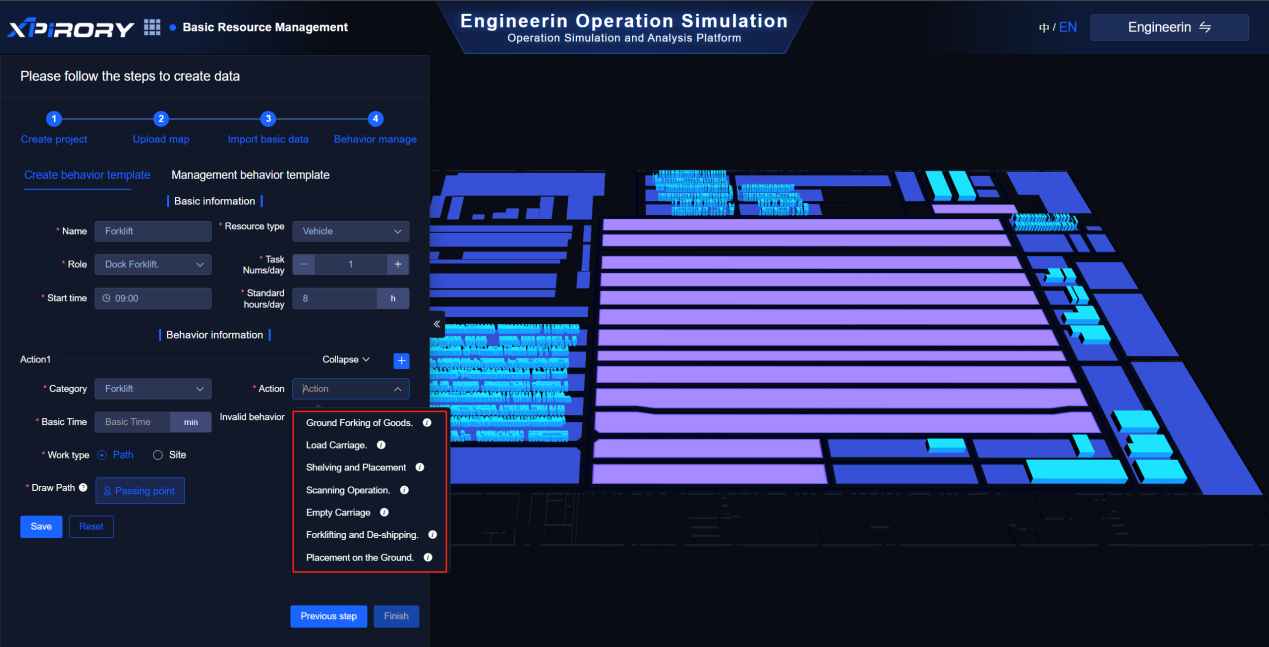
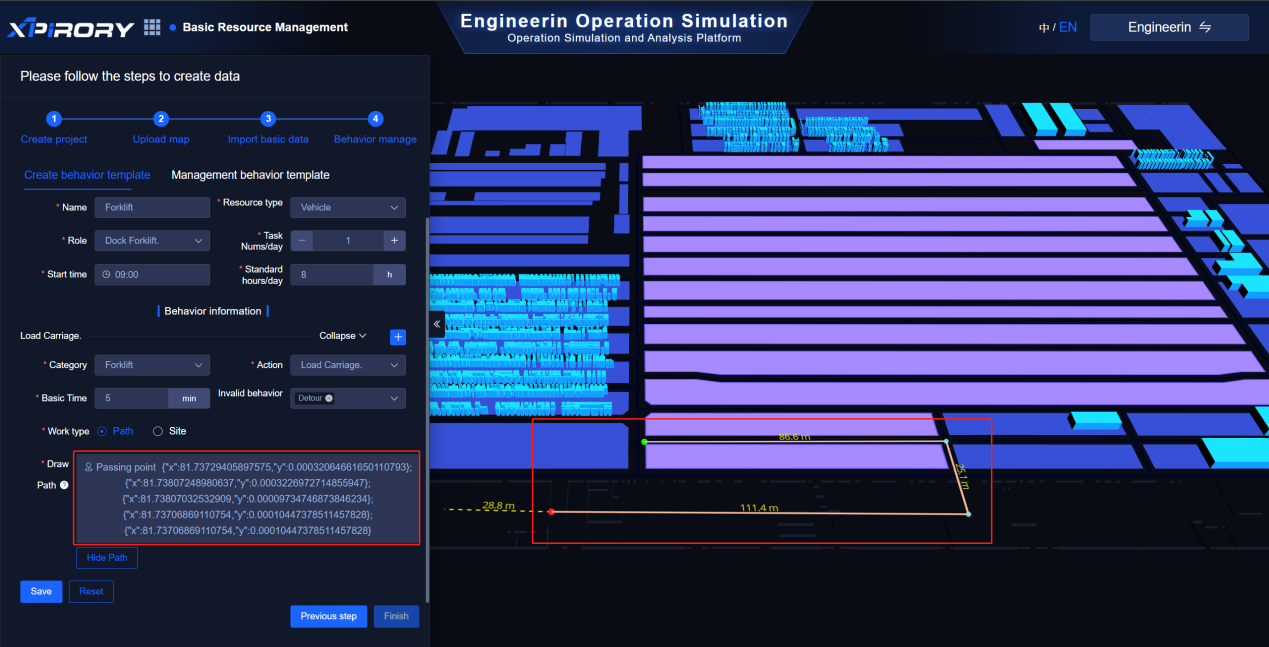
(5) Behavior group: This step requires defining the behavior template for the imported resource elements. Users can split or merge the job standard working hours for each position in the enterprise and fill them into this behavior template as the basis for visual simulation analysis.
When creating the behavior template, first define the operation rules, including "Simulator Name", "Task Type", and "Resource Type". Rules can be added by checking the "Rules" option: including "Task Model" and "Resource Status". By checking the "Filter", filter conditions can be added for the task model and resource model (click "Add" to add multiple models for rule condition restrictions), and then click "Temporary storage".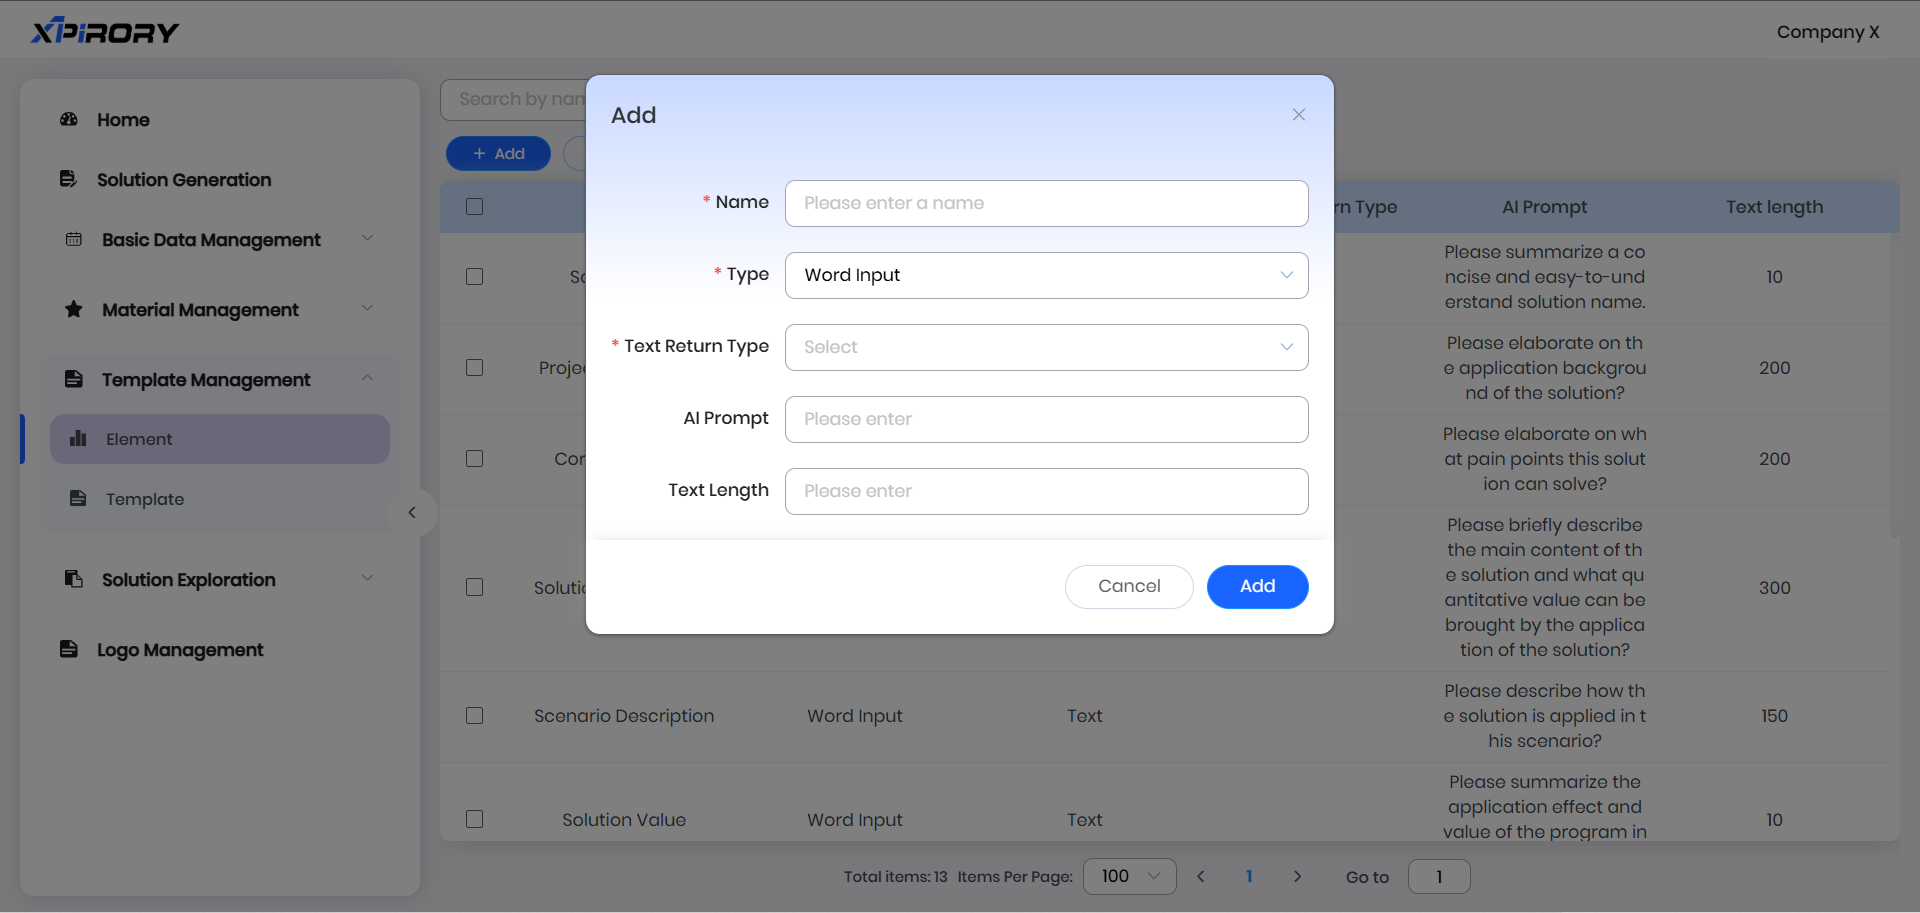 Mission start: Including filling in the initial rules and writing down the rule content (in the figure, filling in the task time as 8 o'clock indicates that the behavior simulation will start at 8 o'clock) Click "Temporary storage"
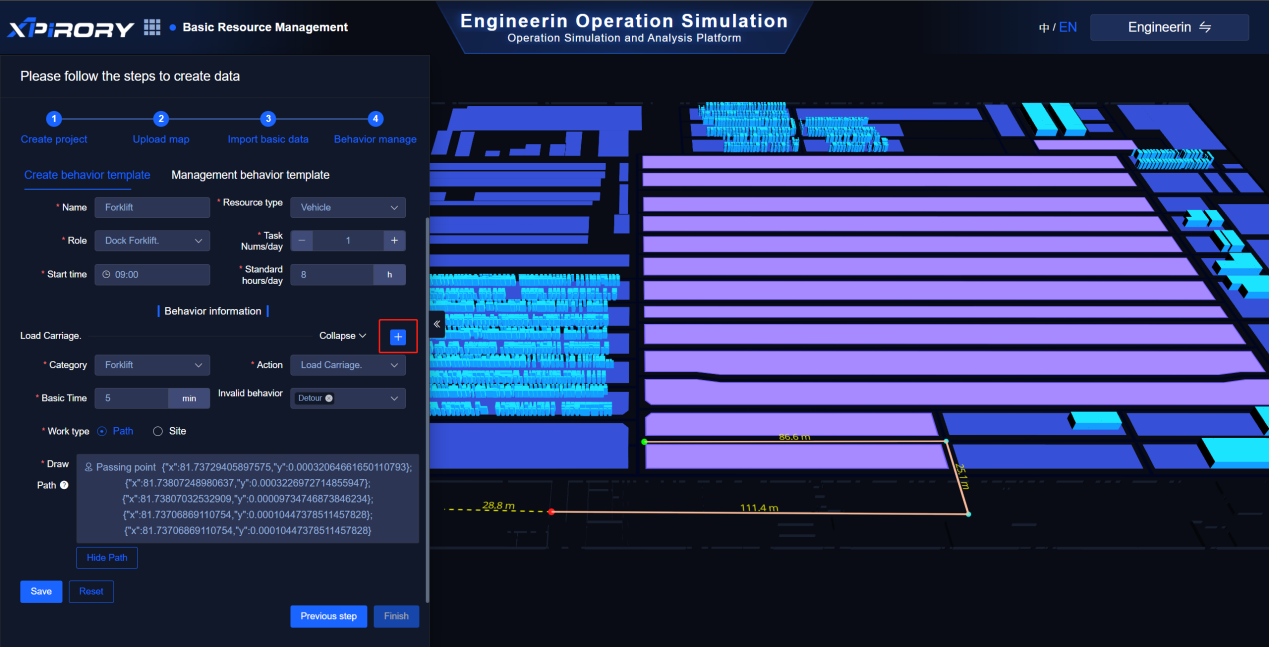
Start linkage: Attribute changes can link one of the attributes of a task or resource. You can also click "Add Attribute" to link multiple attributes. Check "Behavior" to define the behavior information of the resource type. You can draw each behavior action change on the map and describe the activity. Click "Generate" to generate the activity method based on the generated description. Click "Test" to test and view the generated method. If there are errors in the generated method, you can click "Clear" to remove the generated method and modify the activity description to regenerate it. Here, each behavior template is composed of multiple behavior actions. This group of behavior templates represents the combination of actions required for a certain role to complete a task. Click "Temporary storage".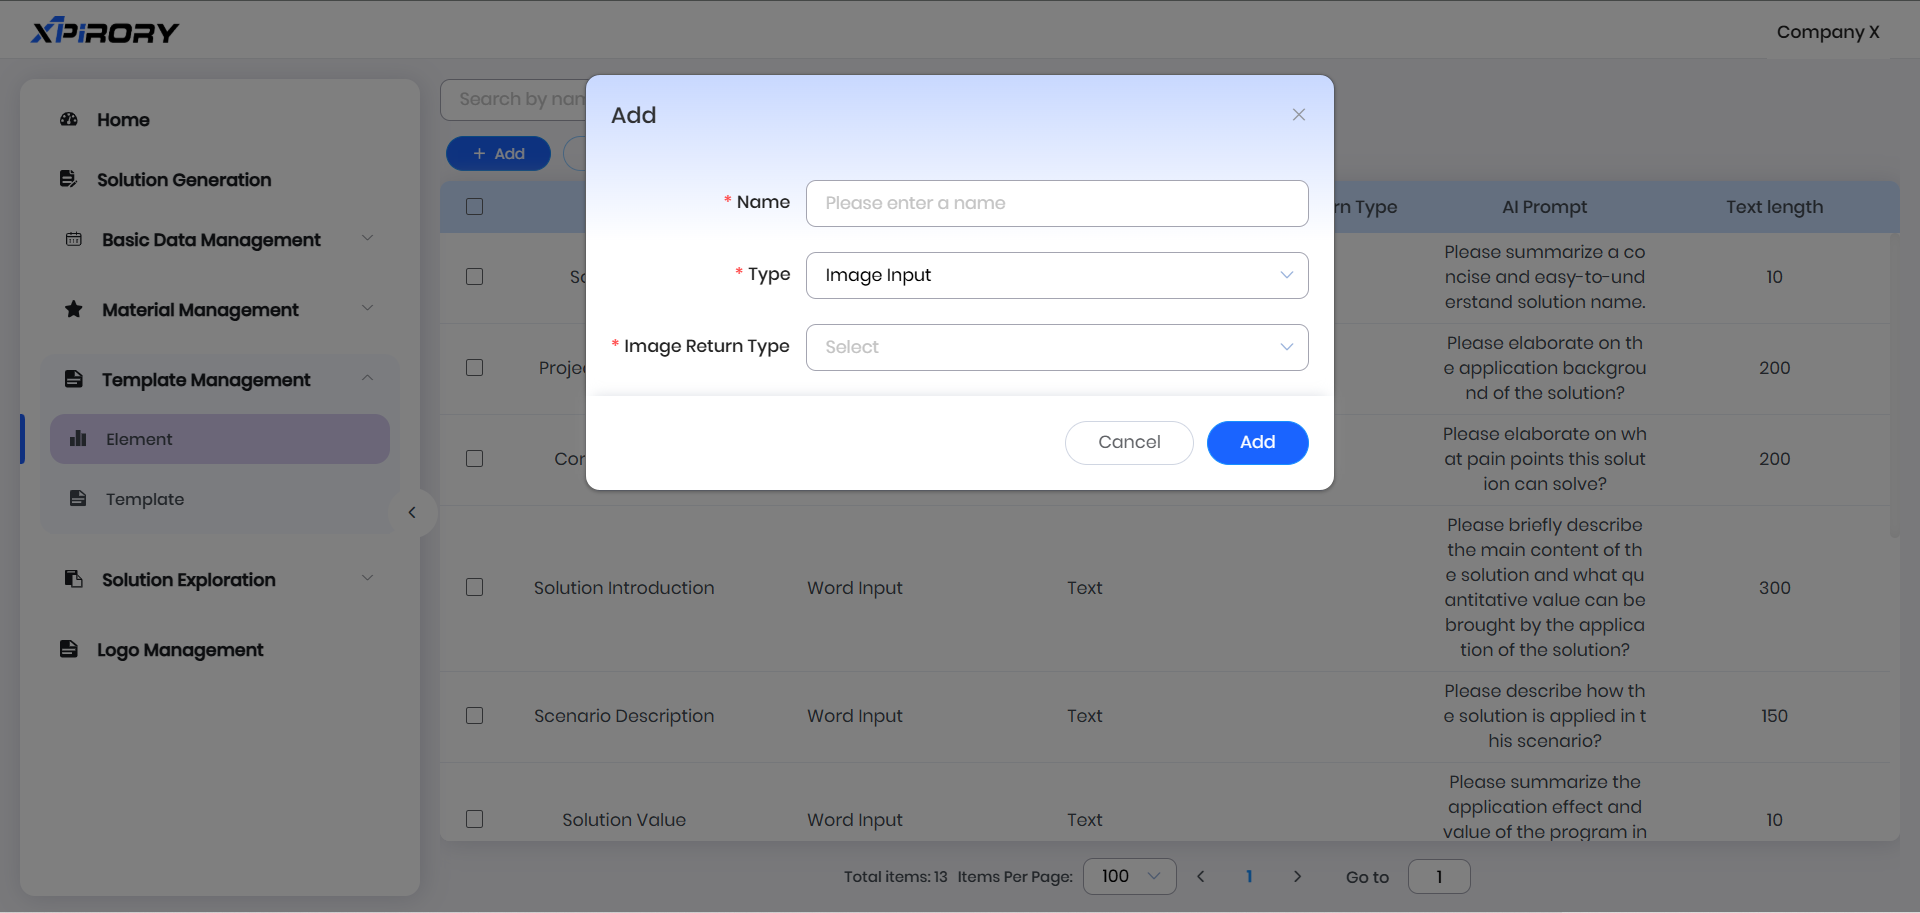
Mission end: Fill in the task completion rules (the rules here should be different from those in the initial task). The current task duration is 12 minutes. Click "Temporary storage".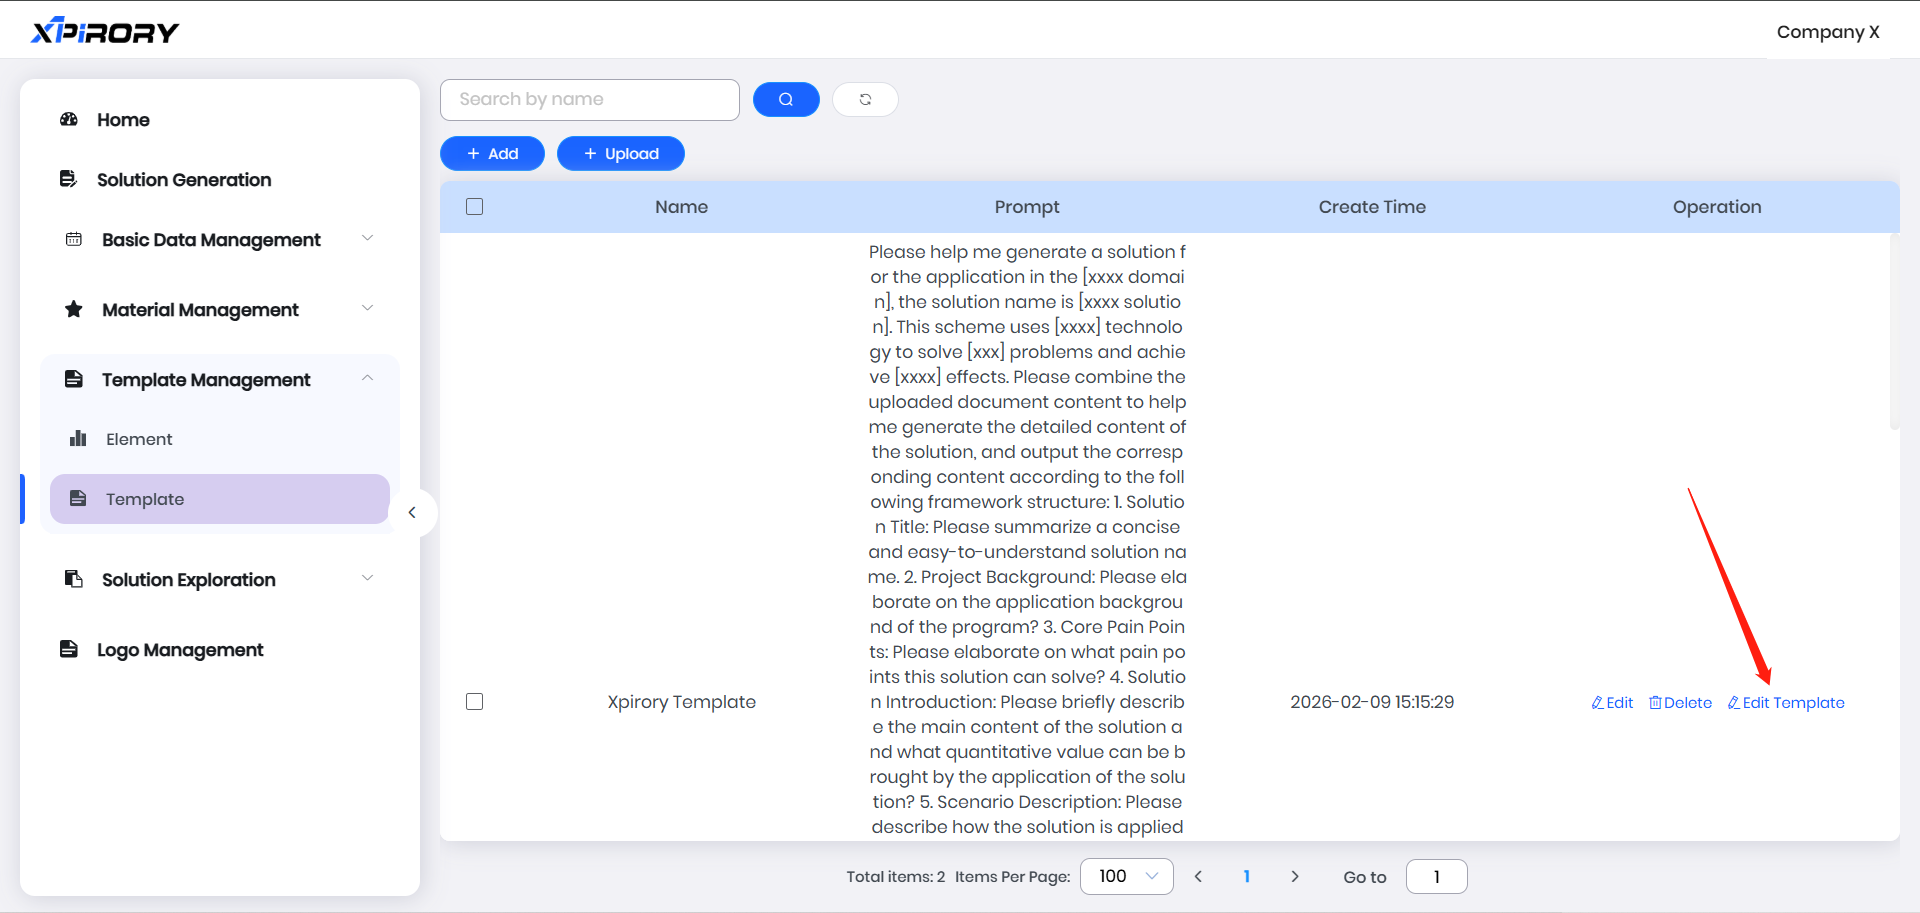
End linkage: Fill in the attribute changes (the attribute changes here should be different from the attributes in the Start linkage) Click "Temporary storage" after clicking "Save"
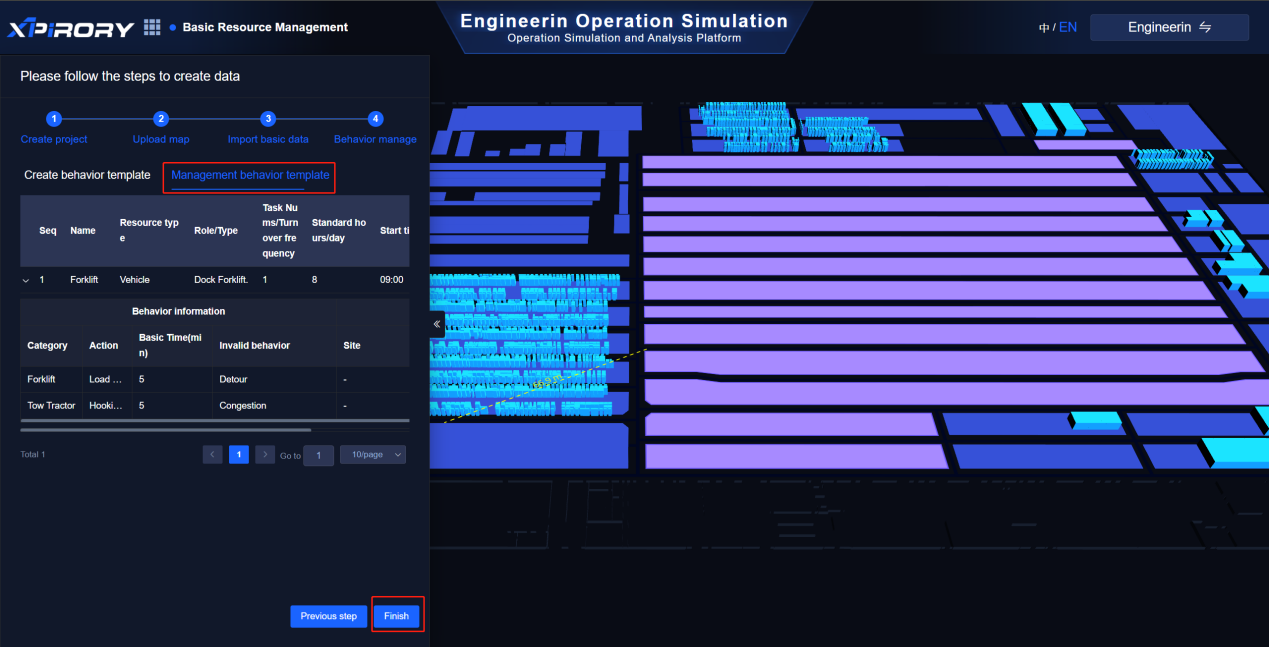
 Clicking on "Manage Behavior Simulator" allows you to view or edit the saved behavior simulators.
 Click on "Check" to verify whether the task data and resource data in the simulator are consistent. Then click on "Next step".
(6) Indicators click “Add”
Fill in: Basic information such as indicator name, Resource type, time dimension, calculation description, calculation method, etc. for the current indicator's calculation description. Click "Generate" to generate the calculation method.
Click "Test" to test the generated calculation method.
Click "Run the Code" to check if the code is effective.
Click "Confirm" to complete the calculation for the test. Save the newly added indicator.
(7) Programs click “Add”

Fill in: Program name, Program code, optimization points, detailed plan, etc. Basic information. Click "Confirm".

Programs binding indicators: Select the indicator information for optimizing the execution of the scheme, and click "Bind"

Click on "Add", select the Resource type, choose the indicators (you can bind multiple indicators by clicking "+"), select the trigger rules, and fill in the rule values. Then click "Confirm".
Optimization action: Click "Add"

Fill in: Resource type, action, optimization ratio, formula explanation. Click "Confirm"
At this point, all the basic resource allocation has been completed. Click the "Finish" button at the bottom right corner, and you can directly enter the simulation interface.
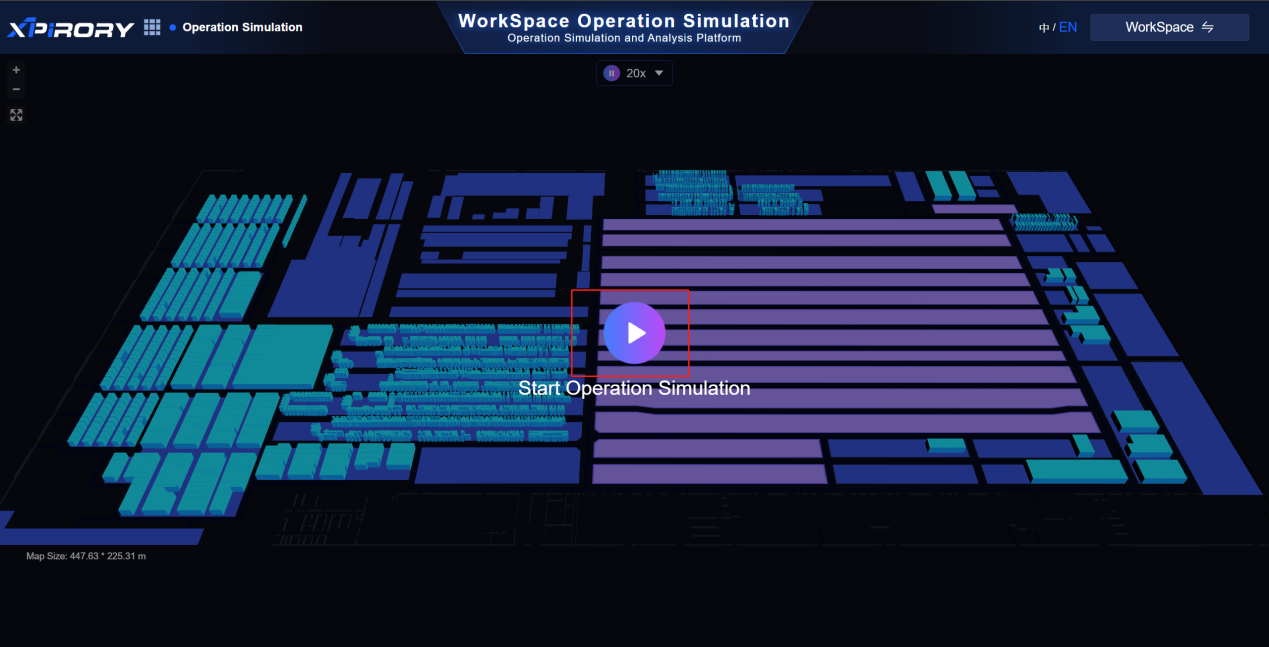
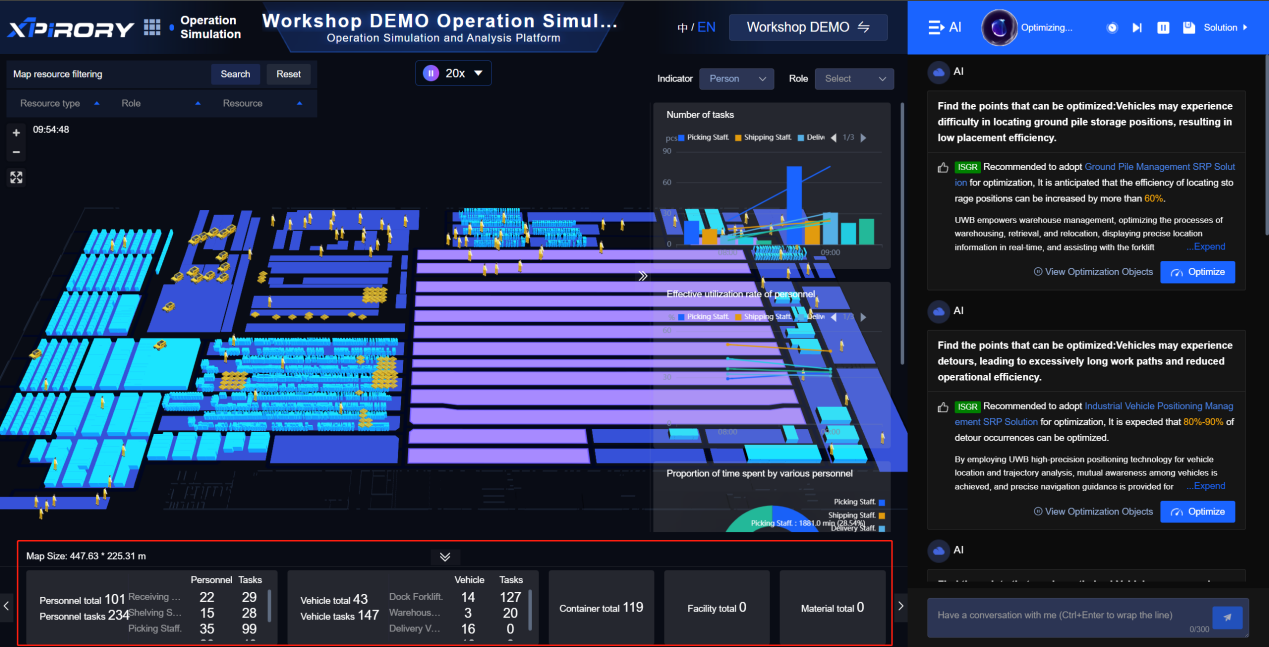
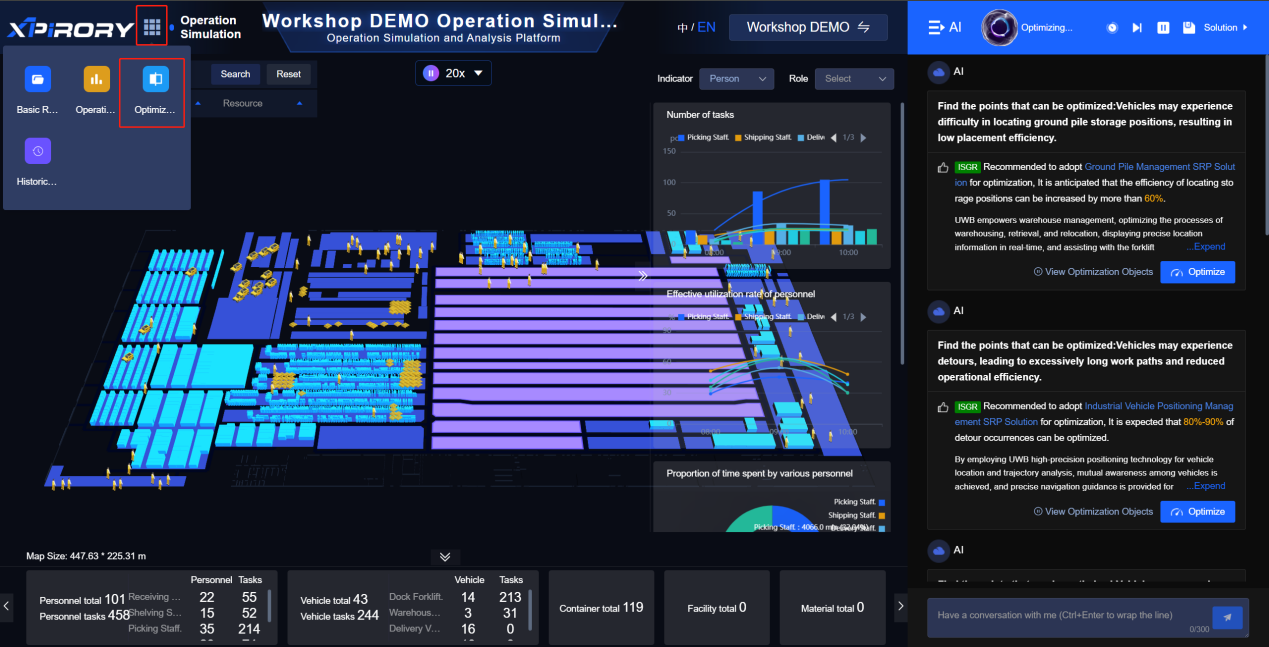
3.7.3 Simulation Optimization Analysis
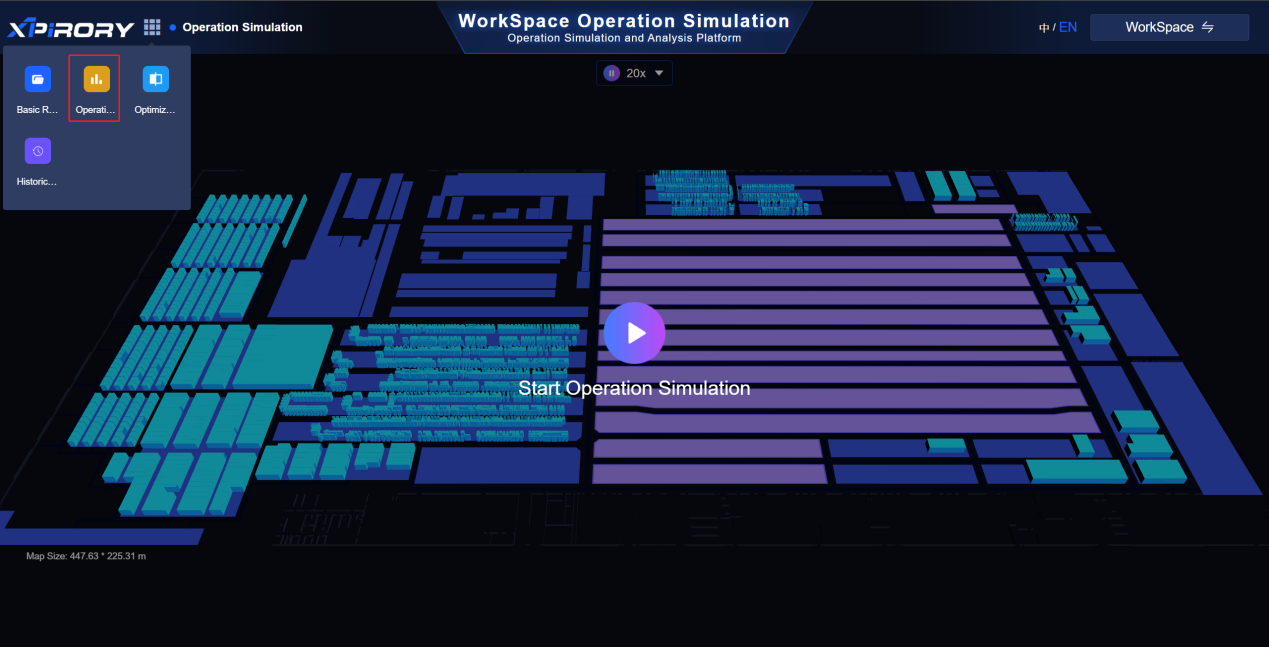
Click the button in the upper left corner and select "Simulation Optimization" from the pop-up menu to switch to the operation simulation analysis page.
Click the "Play" button in the middle to start the simulation analysis.
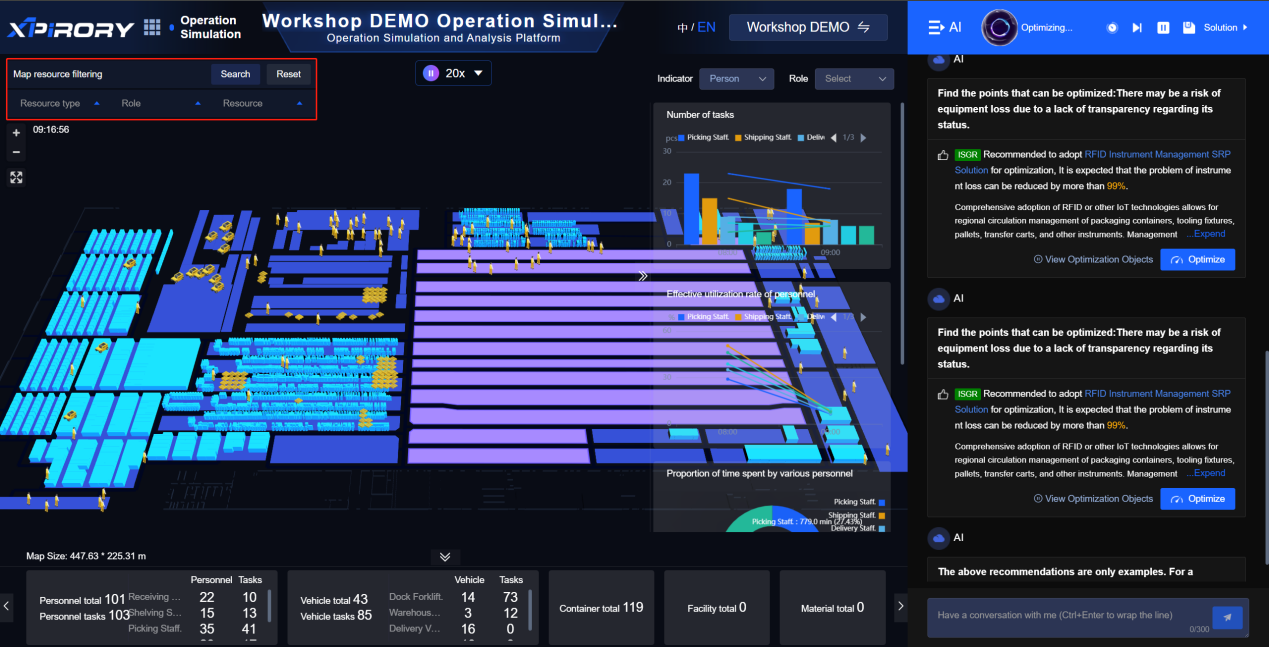
The simulation analysis interface is divided into five sections:
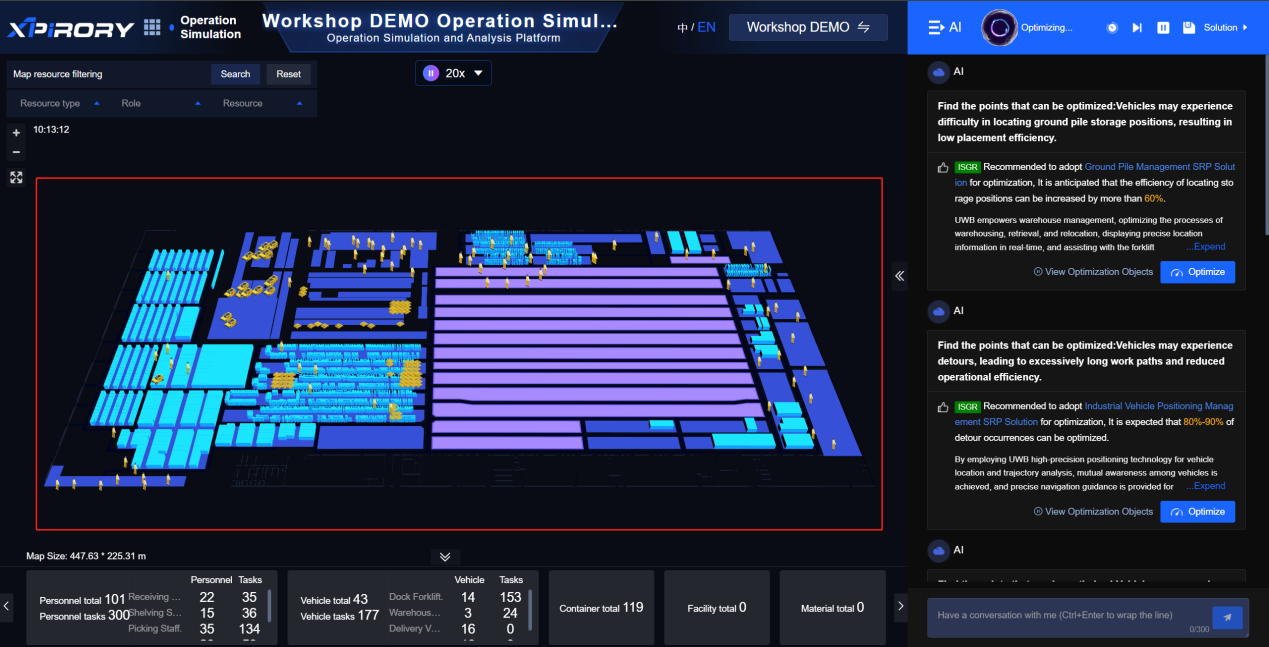
a. Map Resource Filter Module (upper left): Filters and displays field elements on the behavior map; by default, all imported resource elements are displayed and analyzed.

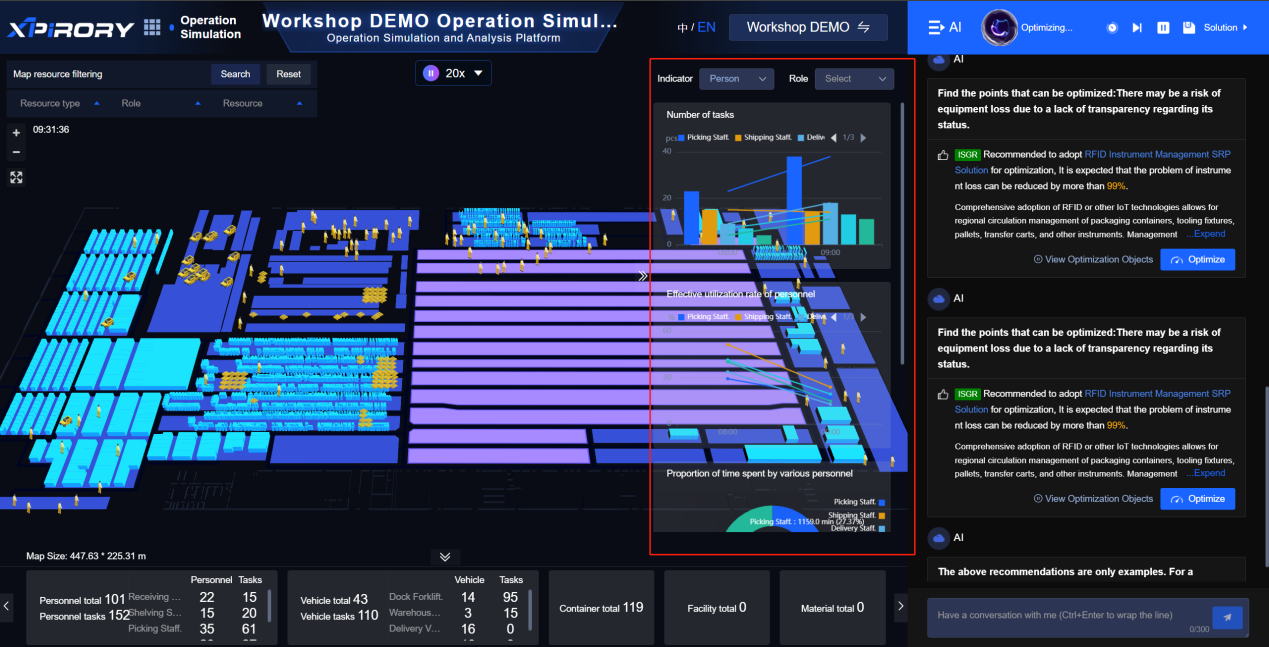
b. Indicator Dashboard Module (upper right): Displays various indicators of field elements during task execution; users can filter by element and role to view specific indicators.
c. AI Expert Module (far right): The AI large model continuously analyzes identified optimization points and displays them one by one. For proposed solutions to optimization points, users can click the "Optimize Now" button to apply solutions to target resource elements, with optimized effects reflected in the behavior map and indicator dashboard. Users can also directly ask the AI expert questions via the dialog box at the bottom, such as technical terms, application scenarios, and value propositions.

d. Resource Data Display Module (bottom): Shows imported basic data and task simulation execution status.

e. Visual Simulation Module (middle): Visually displays the activities of all resource elements on the map.
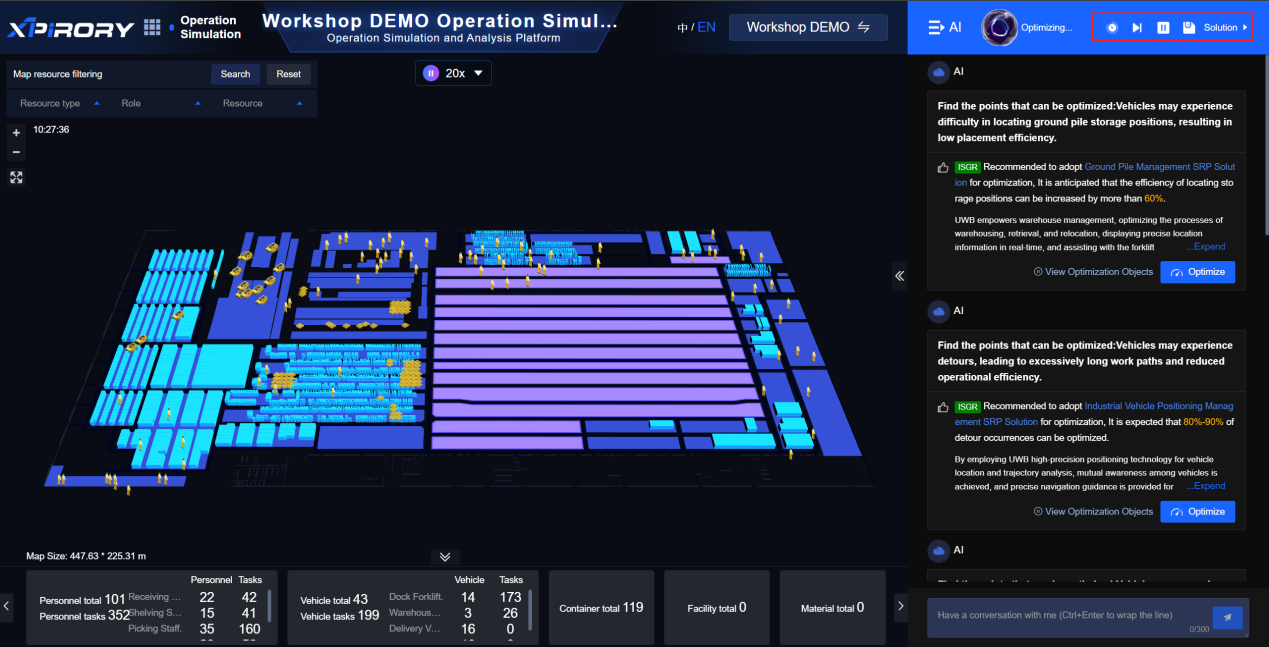
Function buttons in the upper right corner of the AI expert module:
One-click Full Optimization: Automatically applies all identified optimization points to reduce manual clicks.
Skip All Optimizations: Bypasses all optimization points without applying changes.
Pause Recommendation: Suspends the AI model from recommending new optimization points.
Solution Set Save: Allows users to select interested optimization points to form a solution set for subsequent comparative analysis.
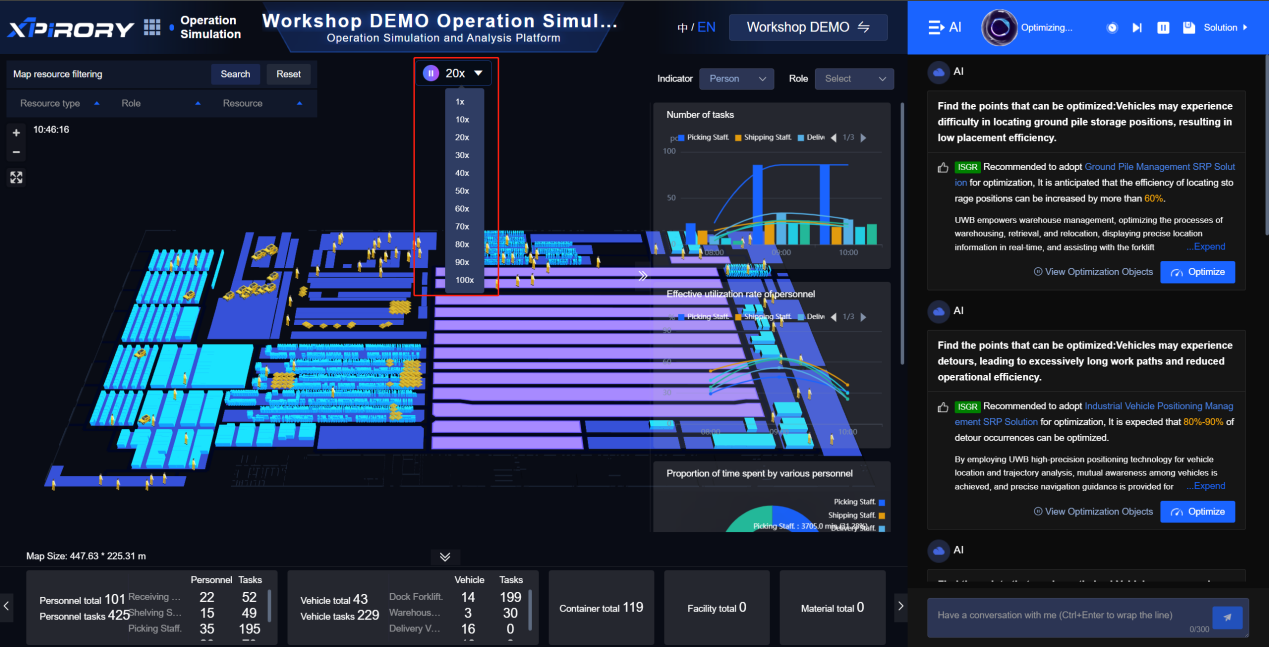
Click the "Play" button in the middle to pause/resume the simulation or adjust the simulation speed using different playback rates.

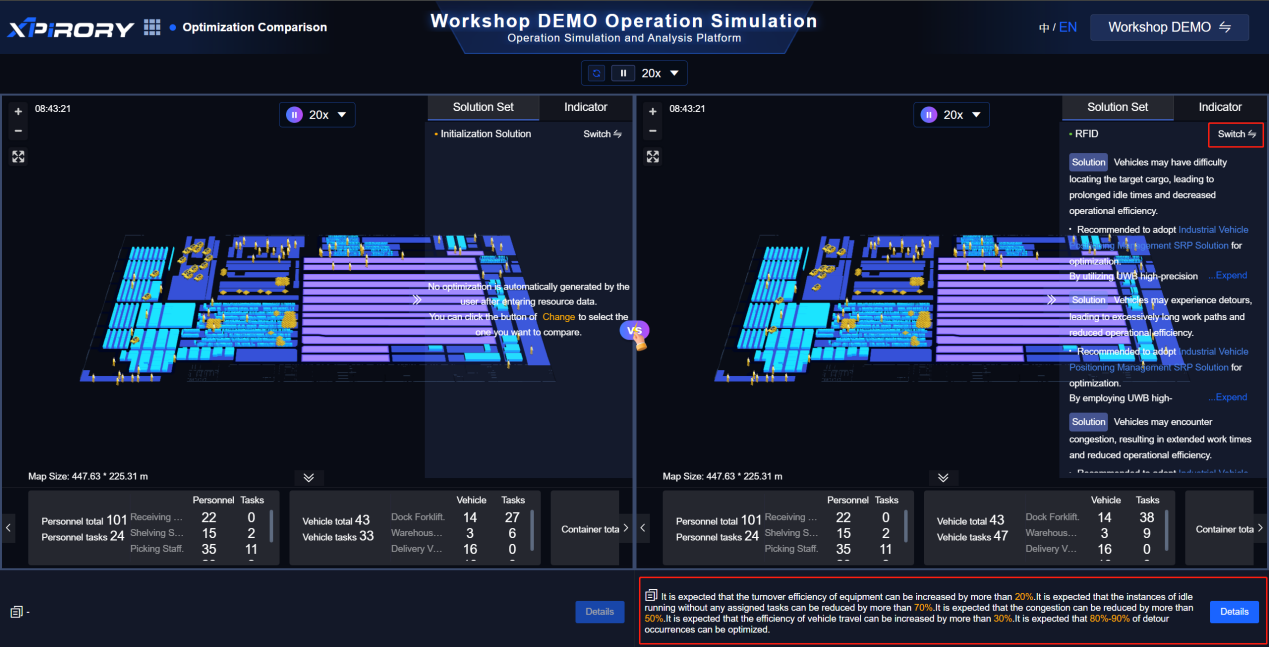
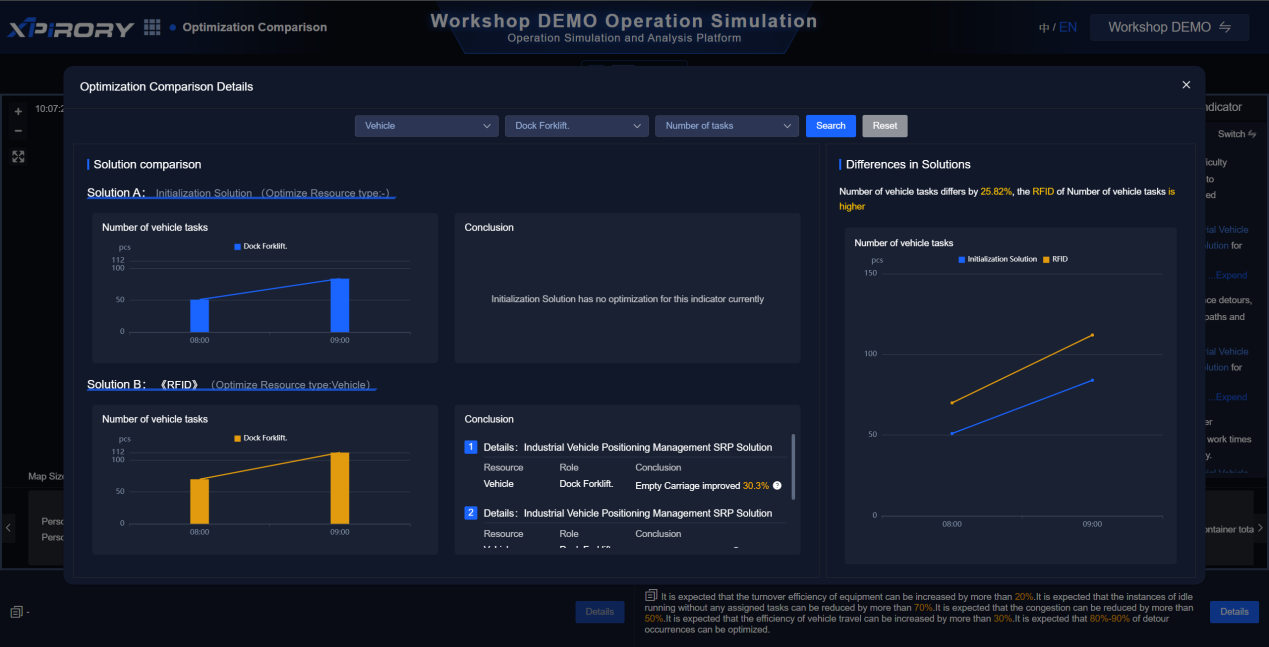
3.7.4 Optimization Solution Comparison
Click the button in the upper left corner and select "Optimization Comparison" from the pop-up menu to switch to the optimization solution comparison page.

On the optimization solution comparison page, users can independently compare simulation effects before and after optimization or contrast different solution combinations to better select suitable improvement points for further development.
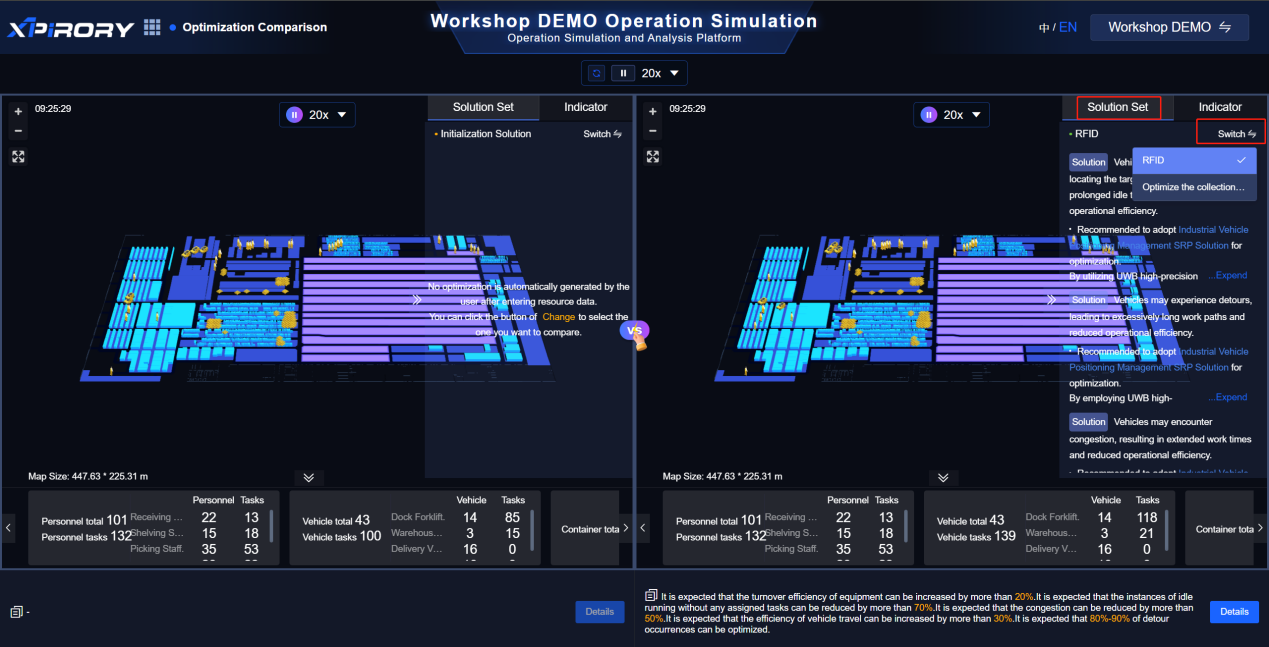
The "Solution Set" on the right displays actionable improvement points for the current solution and allows switching between different solution sets via the "Switch Solution" button.

Users can click the "Play" button in the middle to simultaneously run simulations for two solution sets or select the "Play" button on one side for single-set simulation analysis. Adjust simulation speed using different playback rates.

Click the "Optimization Details" button in the lower right corner of each simulation screen to view the expected effects of individual optimization solutions within the set.

Click the "VS" button in the middle to compare by resource type, role type, and indicator type, detailing metric differences between solution combinations to help users intuitively evaluate optimal options.

3.7.5 Proposal Report
Carry out digital simulation of the operation process in the workshop. By setting different operation plans and comparing their efficiency indicators (such as person/Forklift efficiency, task completion rate, etc.), it provides data support and optimization suggestions for actual production. The main functions include plan simulation, problem discovery, plan comparison, and best plan recommendation.
Simulated Conditions: Display the basic parameters of this simulation, including the total number of tasks, the number and classification details of the personnel and Forklift involved. The data in this area serves as the foundation for the simulation operation. It is automatically filled by the system based on the currently loaded scenario or plan. Users usually confirm here whether the input is in line with expectations.
Identify problems: List out the inefficient behaviors or bottlenecks of people, Forklift and device identified during the simulation process, to help users quickly locate the sections that need optimization.
Solution Comparison: Present multiple preset solution sets in a tabular form, and simultaneously display the index optimization for different basic data resources in the workshop.
Summary of the Plan: After a comprehensive assessment based on various indicators, the system recommends one or more optimal solutions, including the names of the recommended solutions, the core optimization strategies, and the reasons for the recommendation (such as the percentage of efficiency improvement, ROI, etc.). Through different data analysis charts, it conducts multi-dimensional analysis to provide specific analyses and suggestions for different dimensions such as Forklift efficiency and personnel efficiency.

3.8 Solution Generation
Function Overview:
The Solution Generation is a powerful tool that leverages AI large model capabilities to assist pre-sales users in To B enterprises in quickly generating PPT solutions. The platform supports user-defined PPT solution templates, preset PPT pages, customizable solution outlines, and can rapidly and controllably generate PPT solutions for enterprise customers based on uploaded exclusive reference documents. Meanwhile, solution content supports multi-language output, helping users easily meet the reading needs of global customers. Additionally, the platform serves as a robust solution management tool, allowing users to centrally file generated standard solutions into corresponding industry and scenario maps with one click, bind them to specific pain points, and facilitate knowledge sharing across teams, reducing repetitive work internally.
Operation Steps:
3.8.1 Template Management
(1) Element: The text and image elements set here serve as the basic carriers for AI-generated content. All variable content in PPT templates that requires automatic generation by AI must be associated with Add corresponding elements.
Text input box:
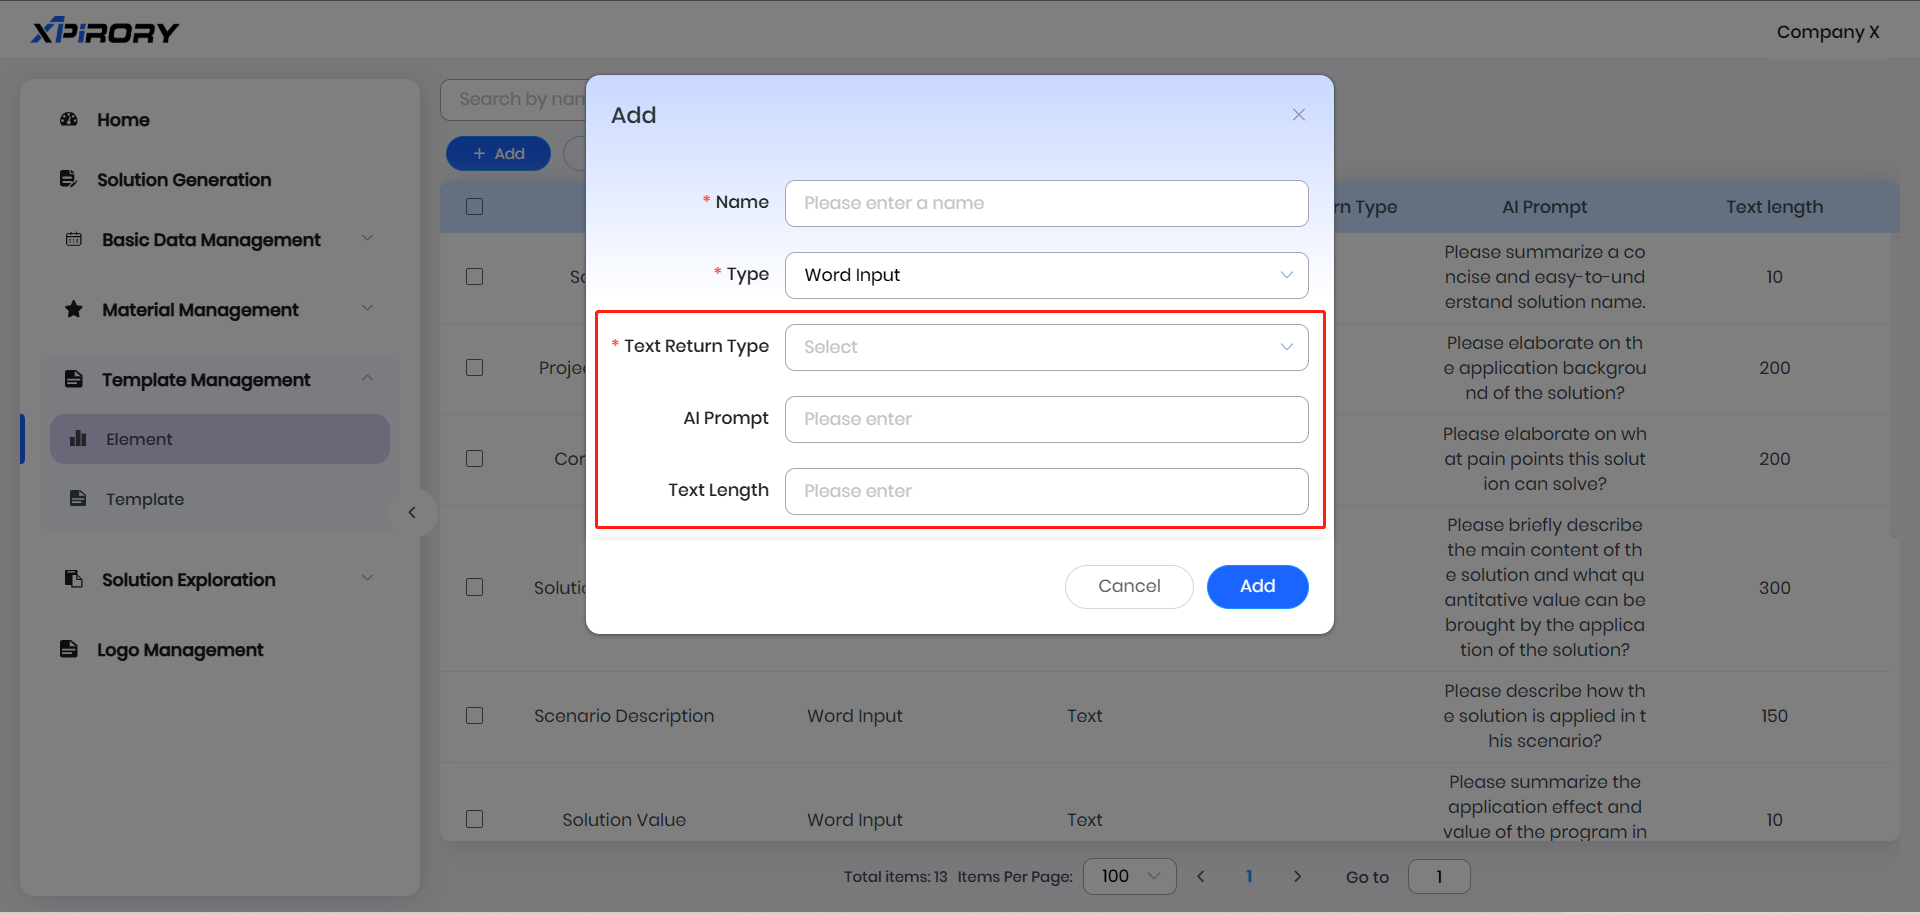
Click the "Add" button, enter the element name (e.g., solution title) in the pop-up window, and select "Text input box" as the category. Additional settings for text elements will then appear:

Text Return Type: "Paragraph" represents output as a paragraph; "Bulleted List" represents bulleted output.
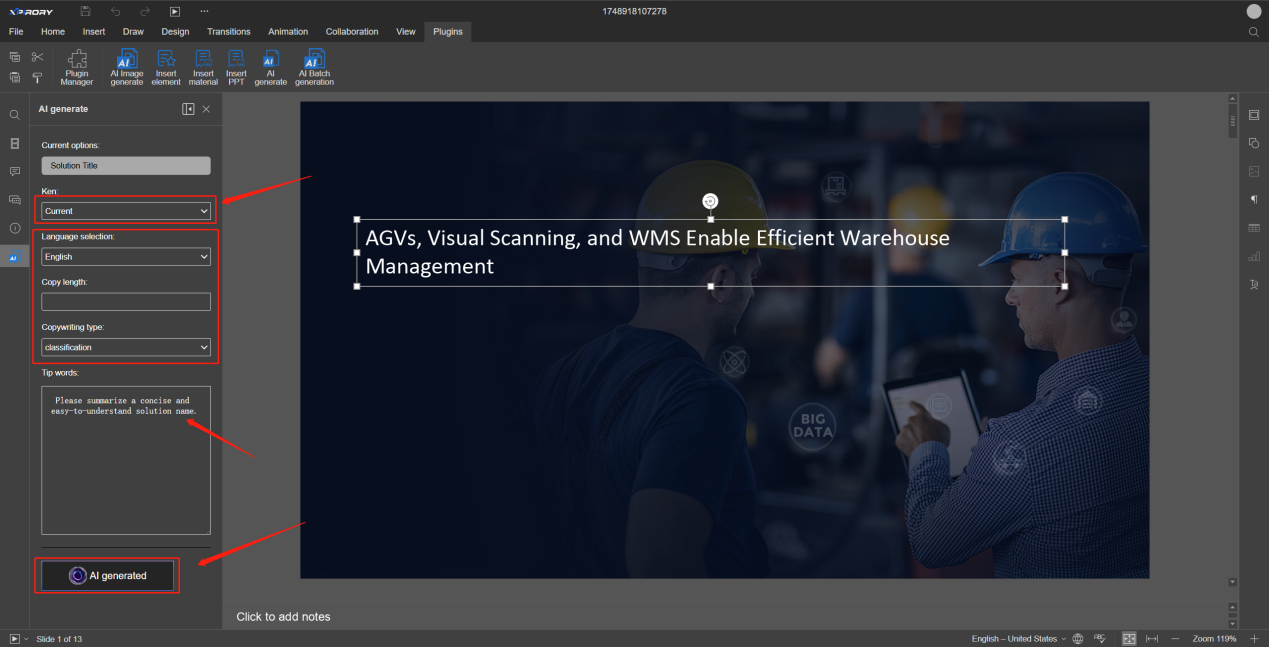
Al Prompt: This is a preset prompt used when modifying text via the "AI Generate" tool on the poster editing page. For example, for a solution title, the question could be: "Please help me summarize a concise and easy-to-understand solution name." If not preset here, prompts can also be directly entered in the poster editing interface.
Text Length: This option sets a value to limit the length of output text.
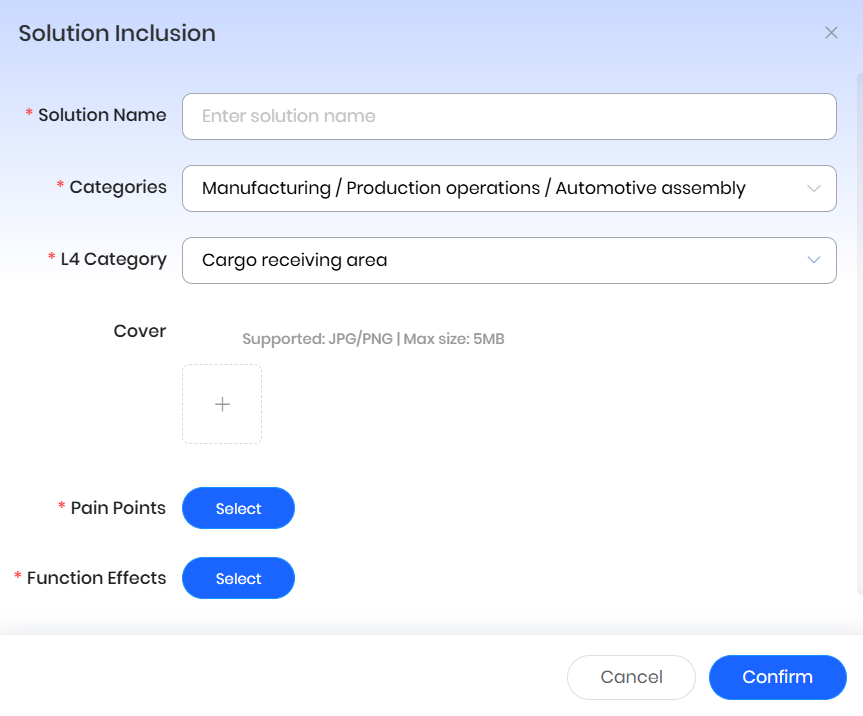
Image input box:
Click the "Add" button, enter the image element name (e.g., product image) in the pop-up window, select "Image input box" as the category, and choose the corresponding image return type from expanded options to complete image element setup.

After adding all elements, proceed to solution template setup.
(2) Template: PPT template management allows creation of PPT template styles tailored to user habits, presetting fixed pages like company introductions, and designing outline prompts for AI-generated content to enable controlled generation.
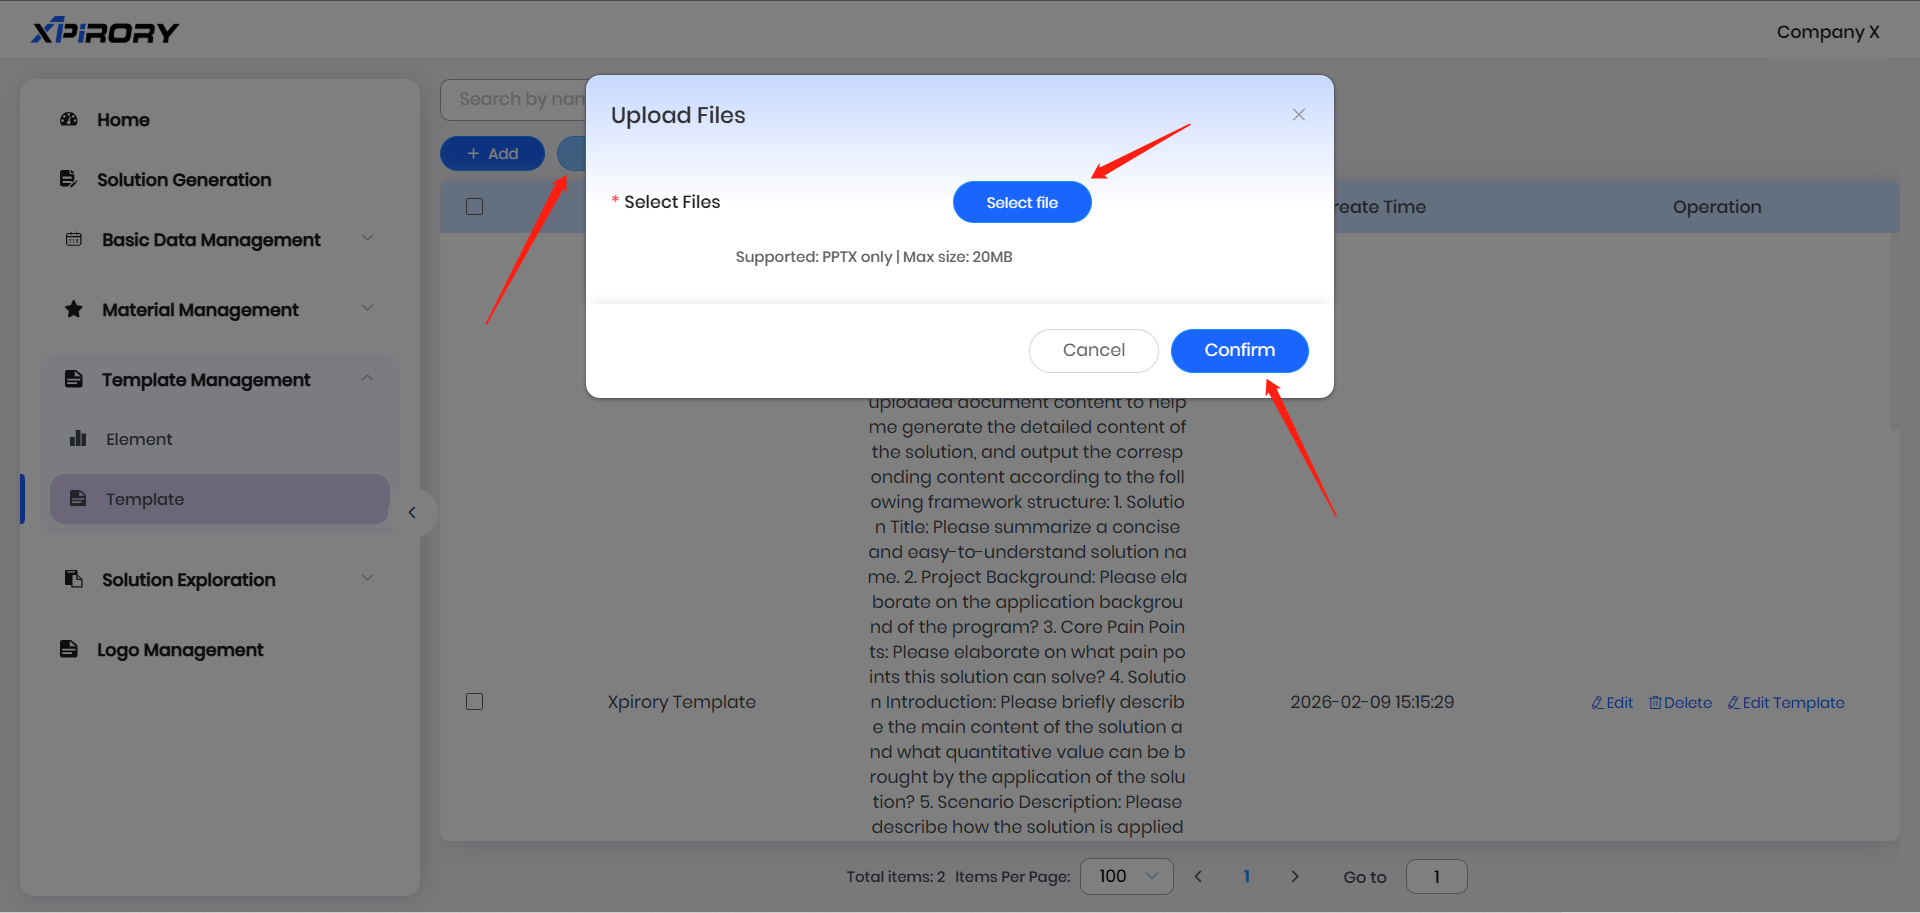
The platform supports creating and editing PPT templates via two methods: "Add" Blank Template or "Upload" Custom Template. Taking "Upload" Custom Template as an example, the editing process is as follows: Click to upload a PPT template file in the pop-up window, click "Confirm," and wait for a success prompt to indicate completion.

Locate the newly created template in the list, click "Edit Template" in the operation area to open the PPT template editing interface.

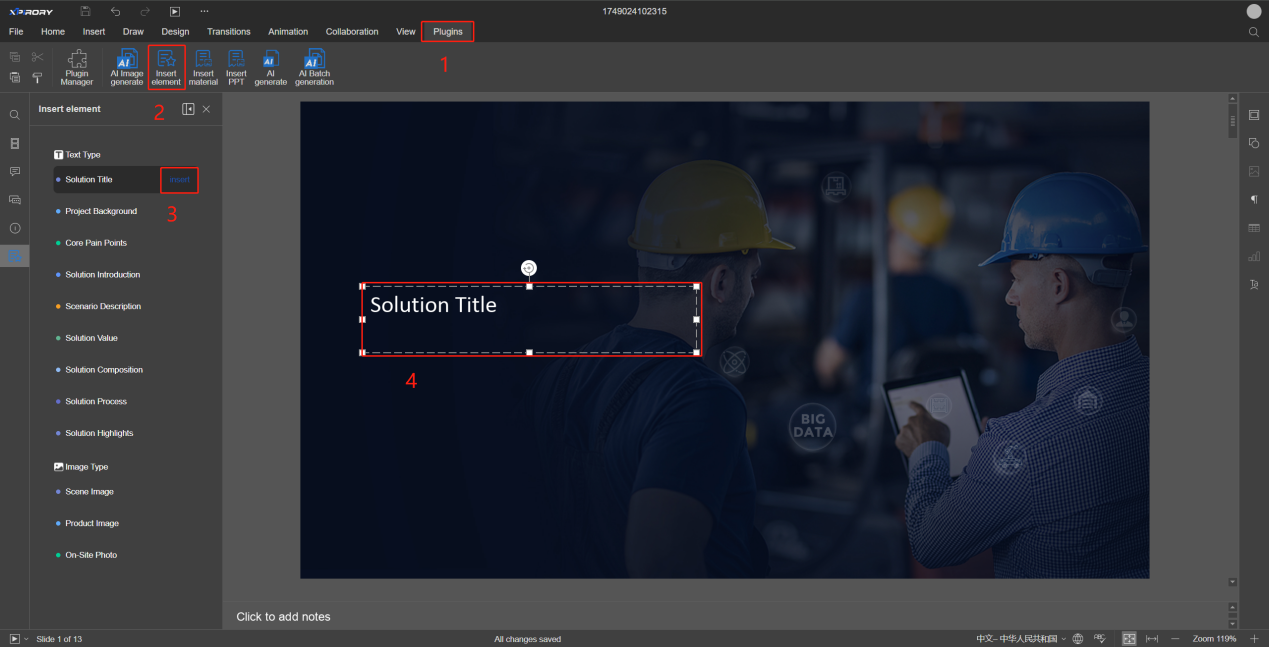
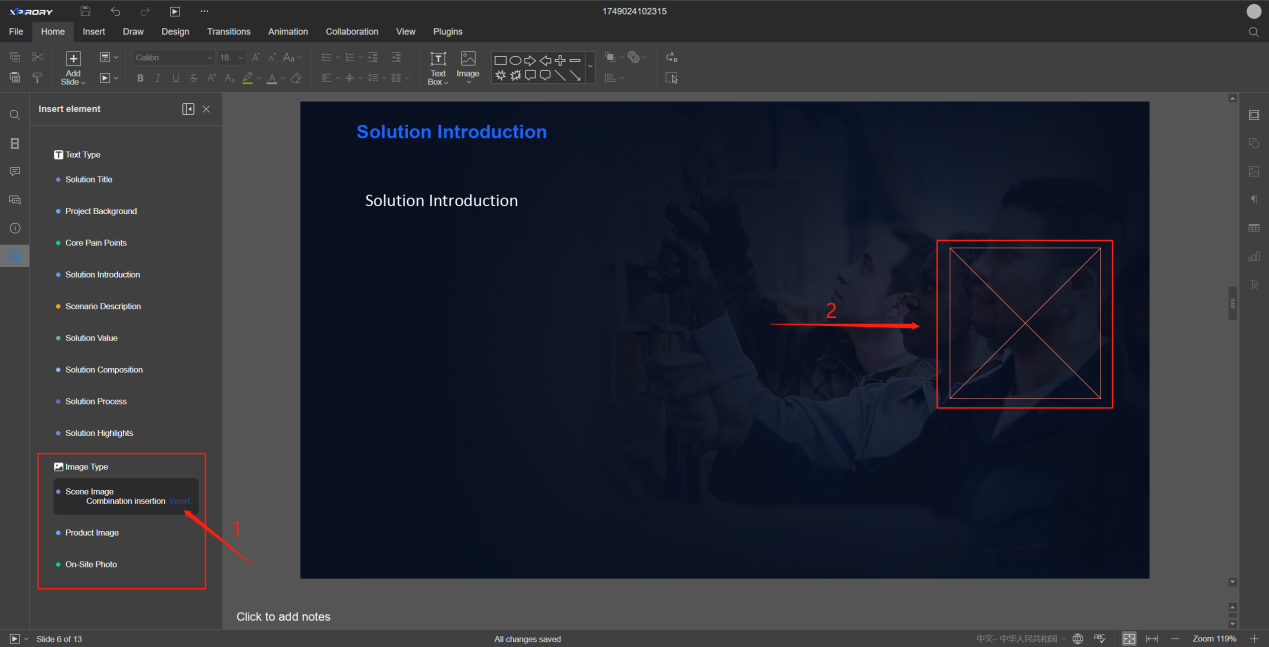
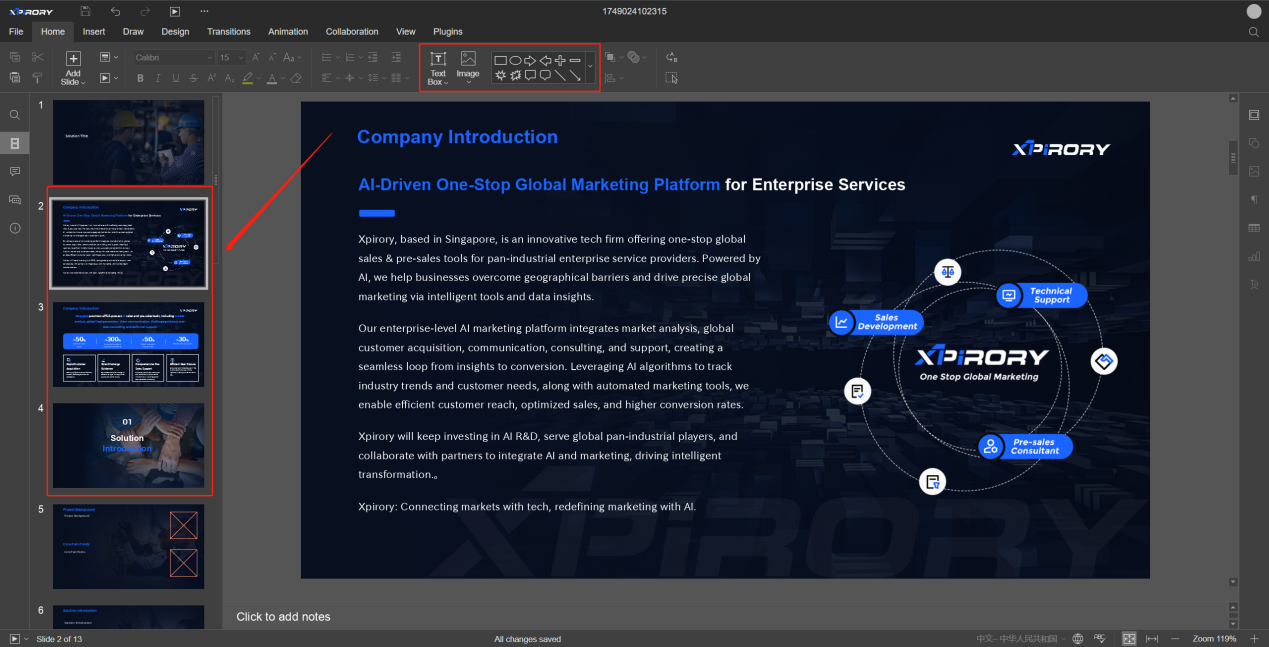
Switch to the "Plugins" tab in the editing page and click "Insert Element." The elements set in Element Management will appear in the left sidebar. These element input fields are where AI will automatically insert content later. For example, insert the solution title into the home page and adjust text box size, position, and font size so that the AI can automatically insert the generated title into this text field. Other text input fields are set similarly.
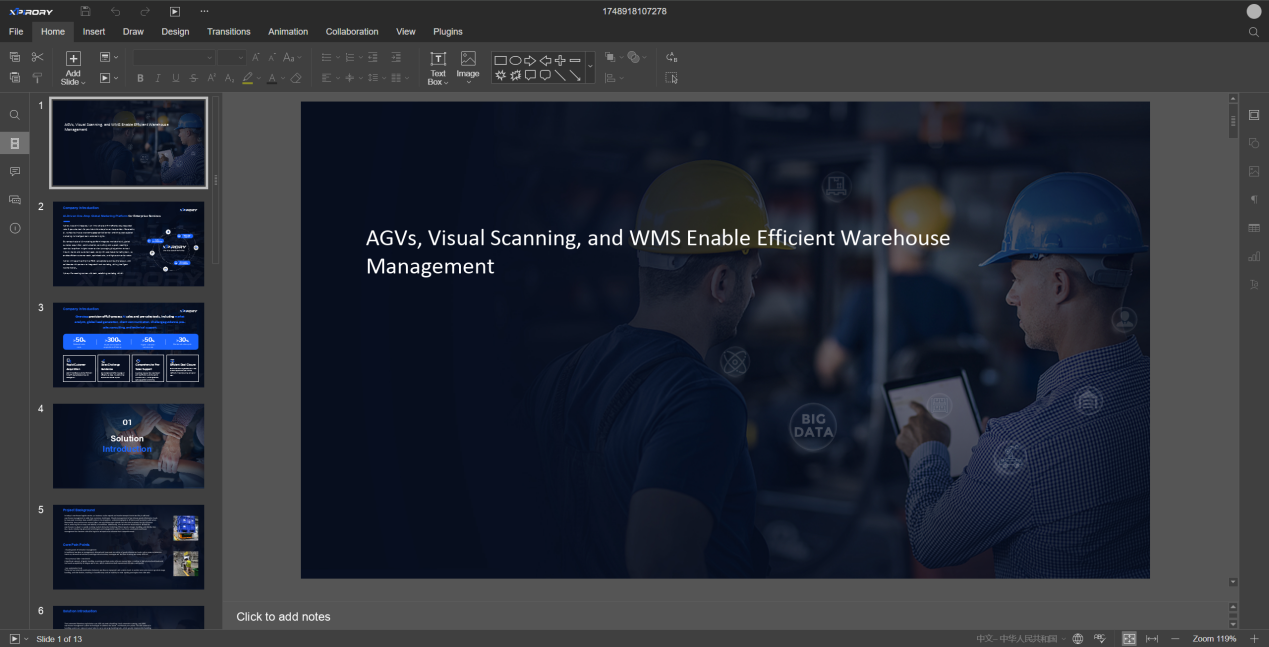
Image elements are set in a similar manner to text: select an image element, click "Insert," and a red frame will appear in the editing interface. Adjust the frame size and position to complete image input field setup. During solution generation, selecting the corresponding image type will insert the image into this frame.

For fixed pages or information, use PPT's built-in editing tools to add text and images, which will remain unchanged during generation.

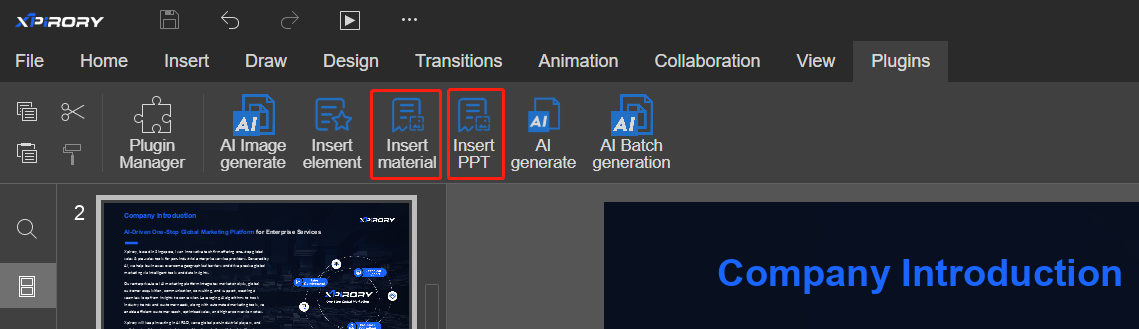
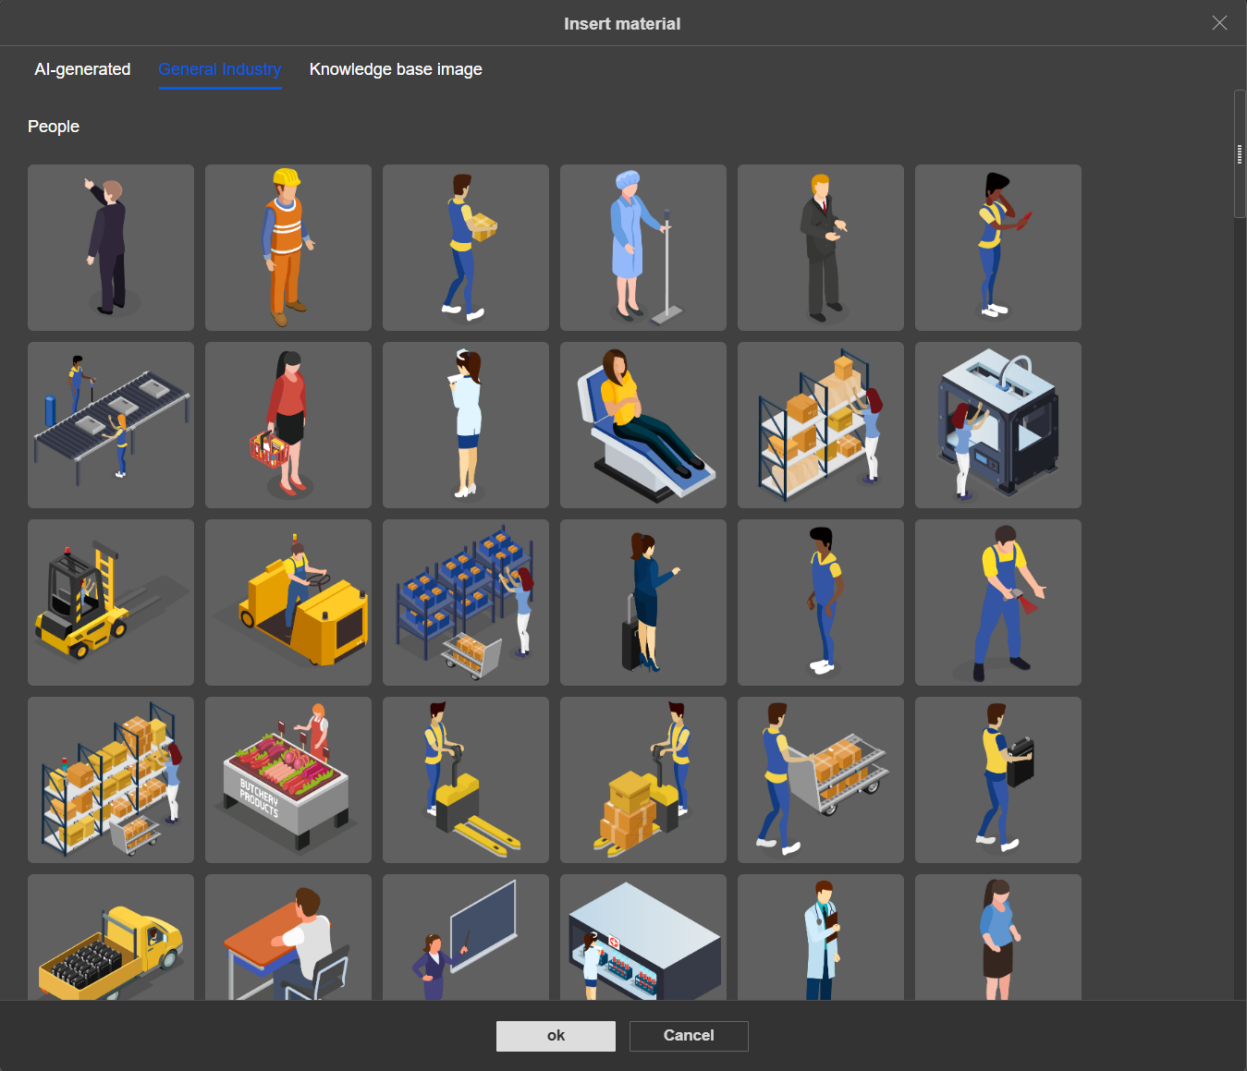
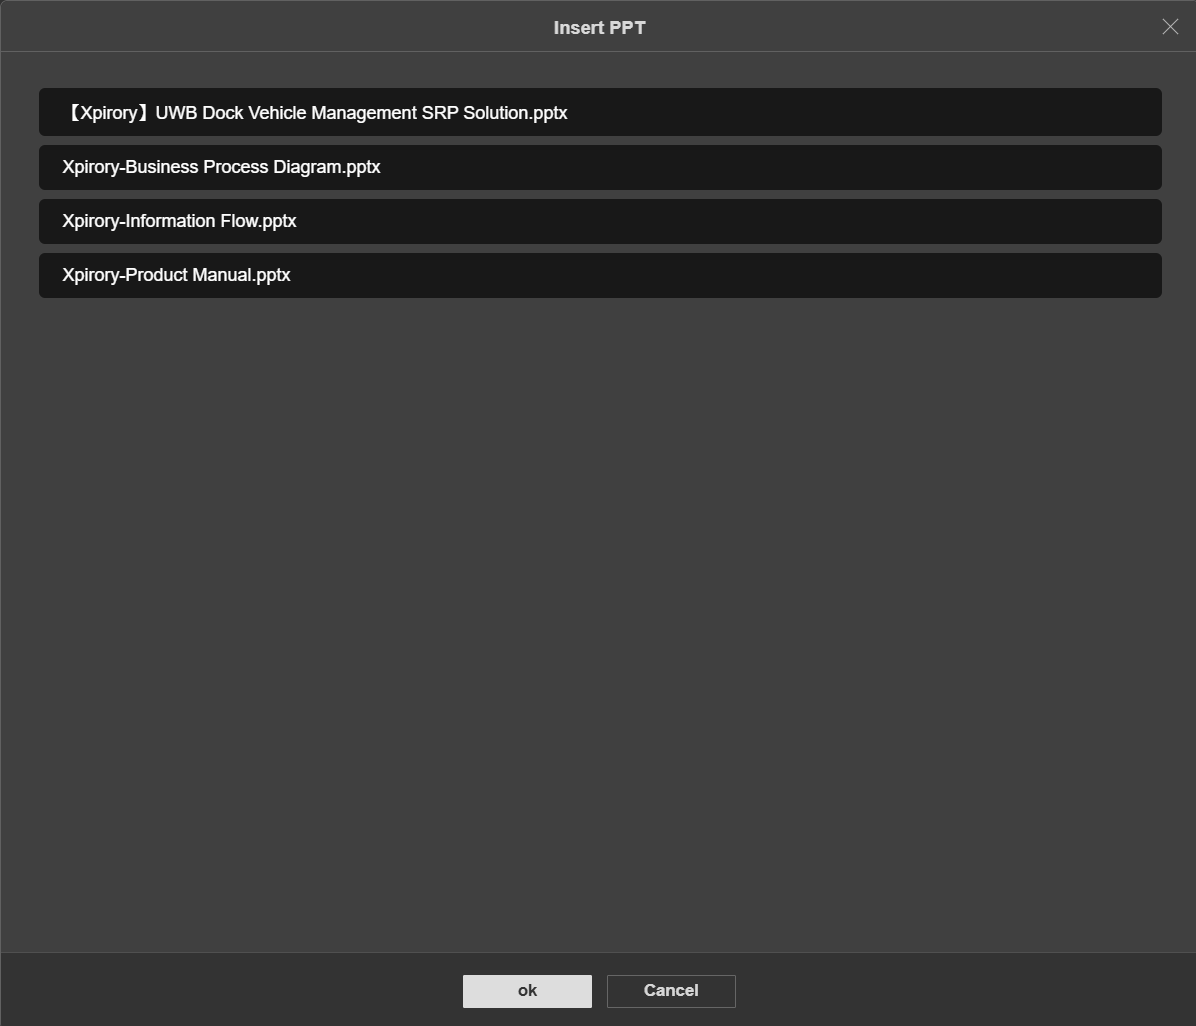
If relevant image and PPT materials have been uploaded to Material Management, they can be directly inserted as fixed content via the "Insert Material" and "Insert PPT" buttons in the plugin toolbar to assist template editing.

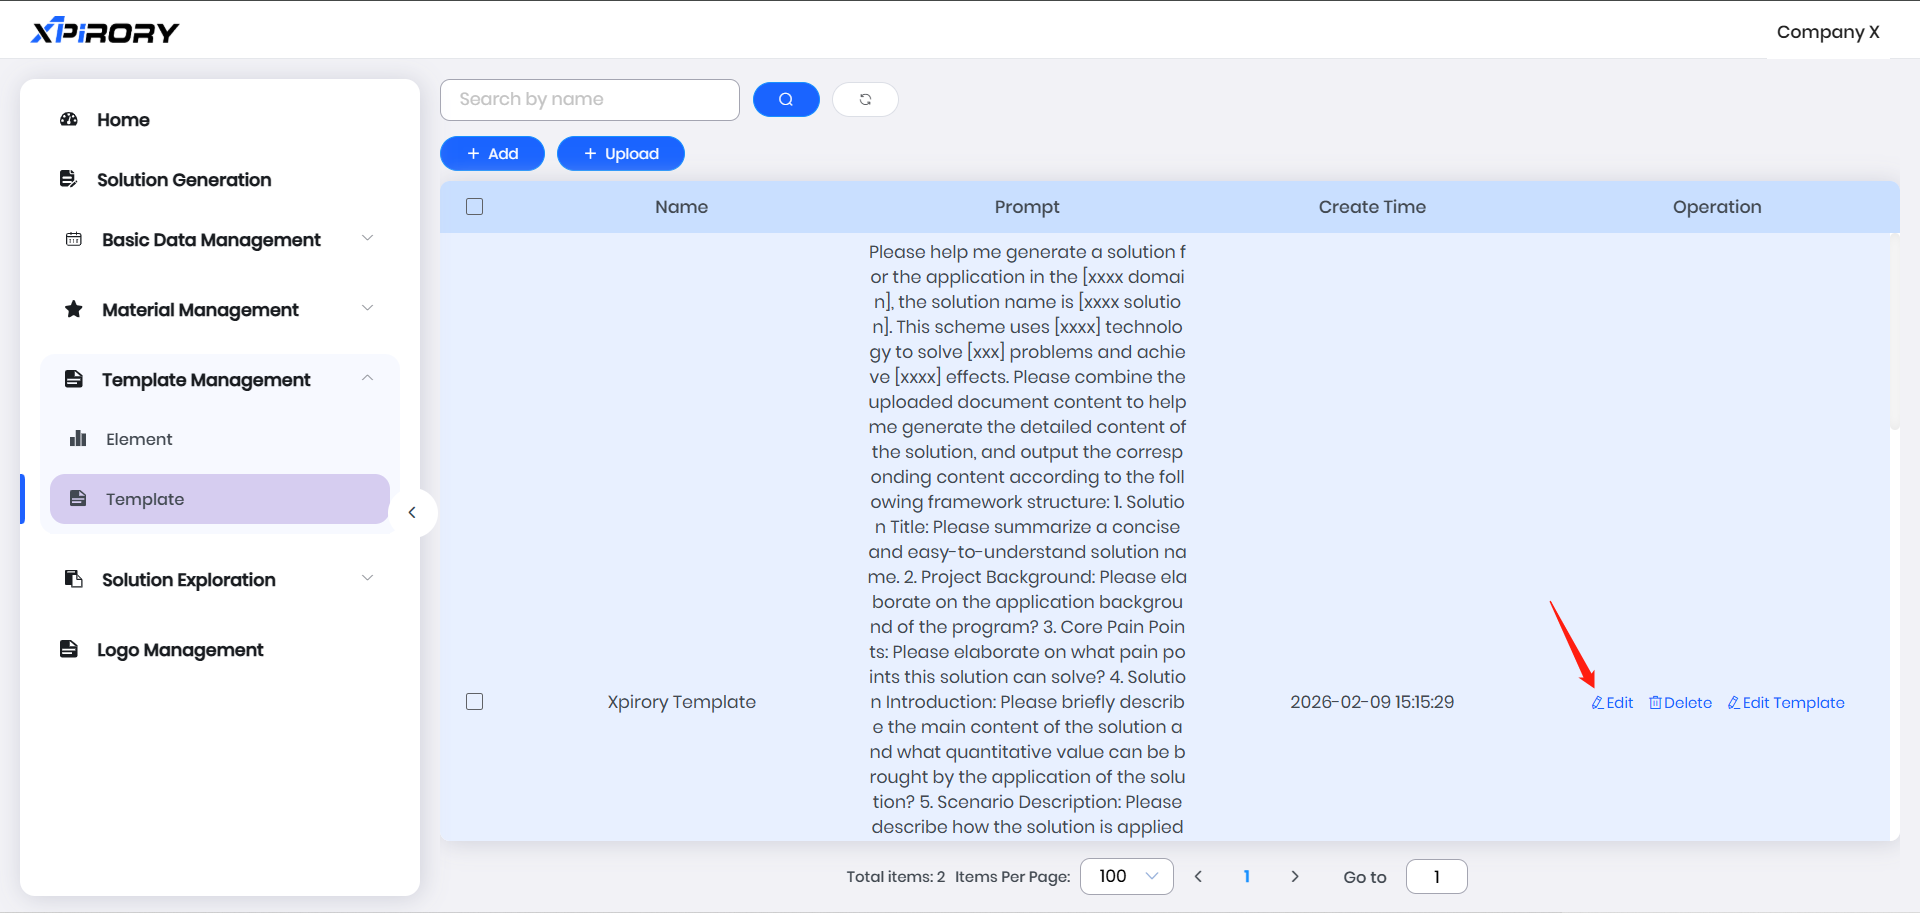
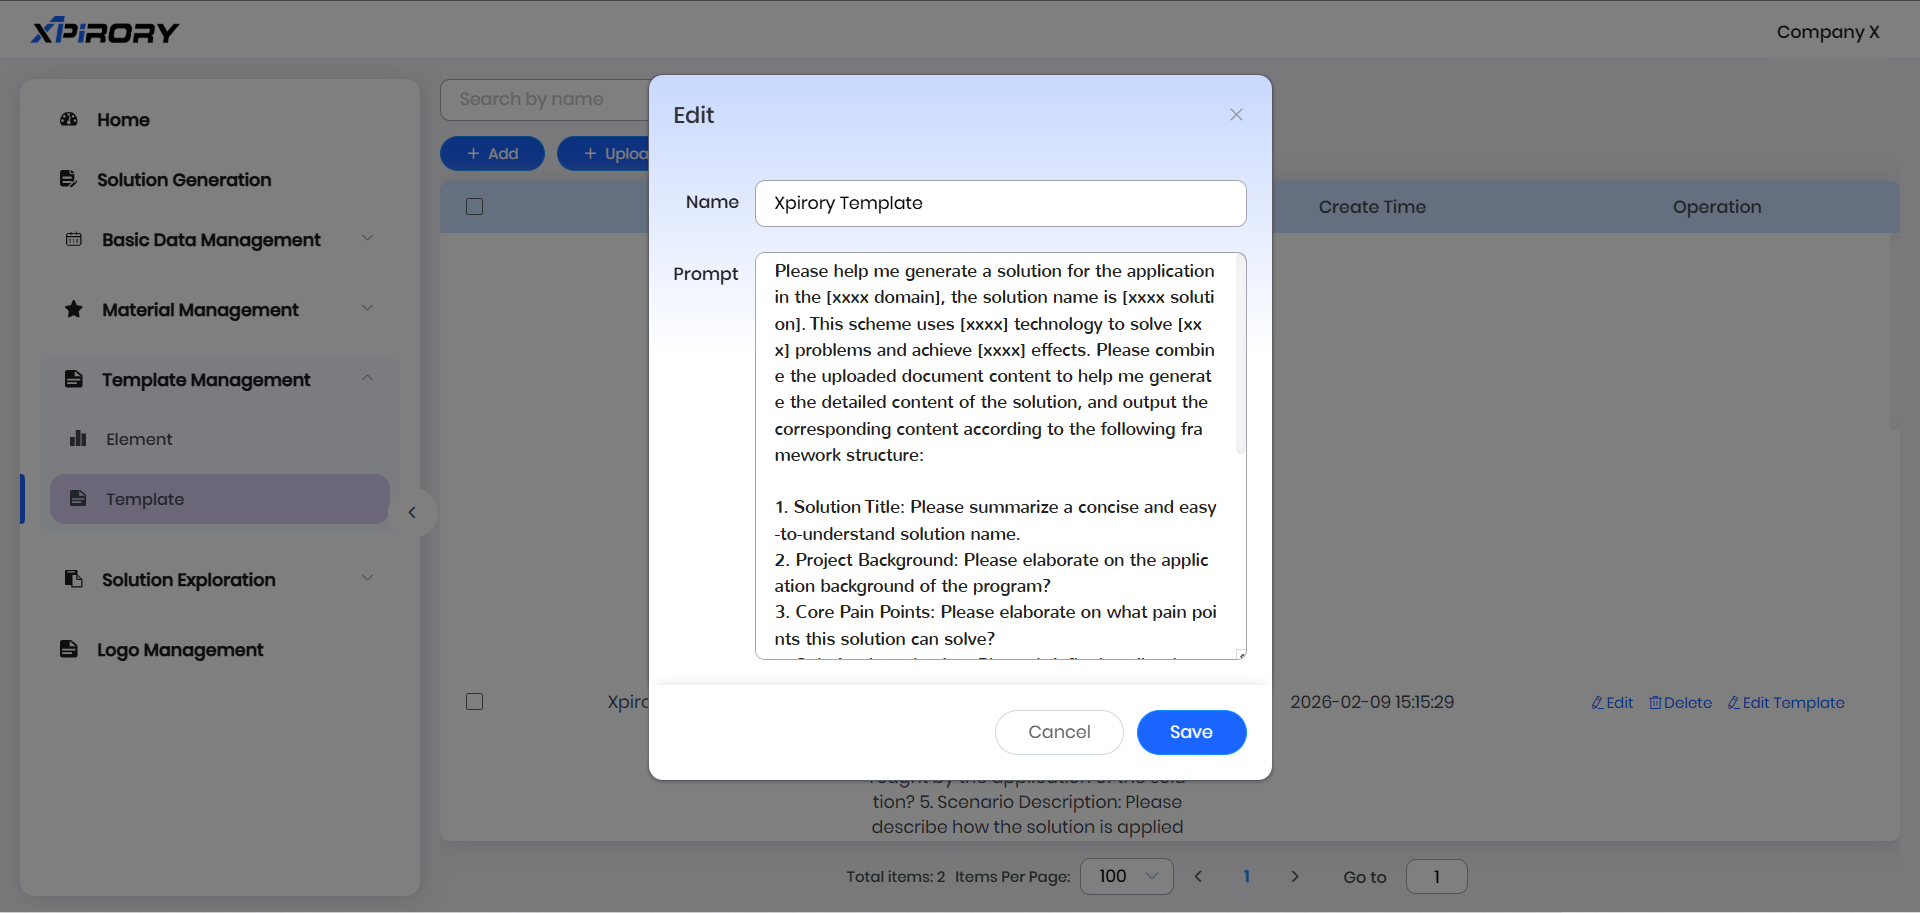
After editing all elements in the template, close the PPT editing page and return to the template management list. Click the "Edit" button in the template's operation area to further edit the PPT template name and prompt words in the pop-up window.
In the pop-up window, we can edit the template name based on its intended use and focus on modifying the prompt content. This completes the template setup. 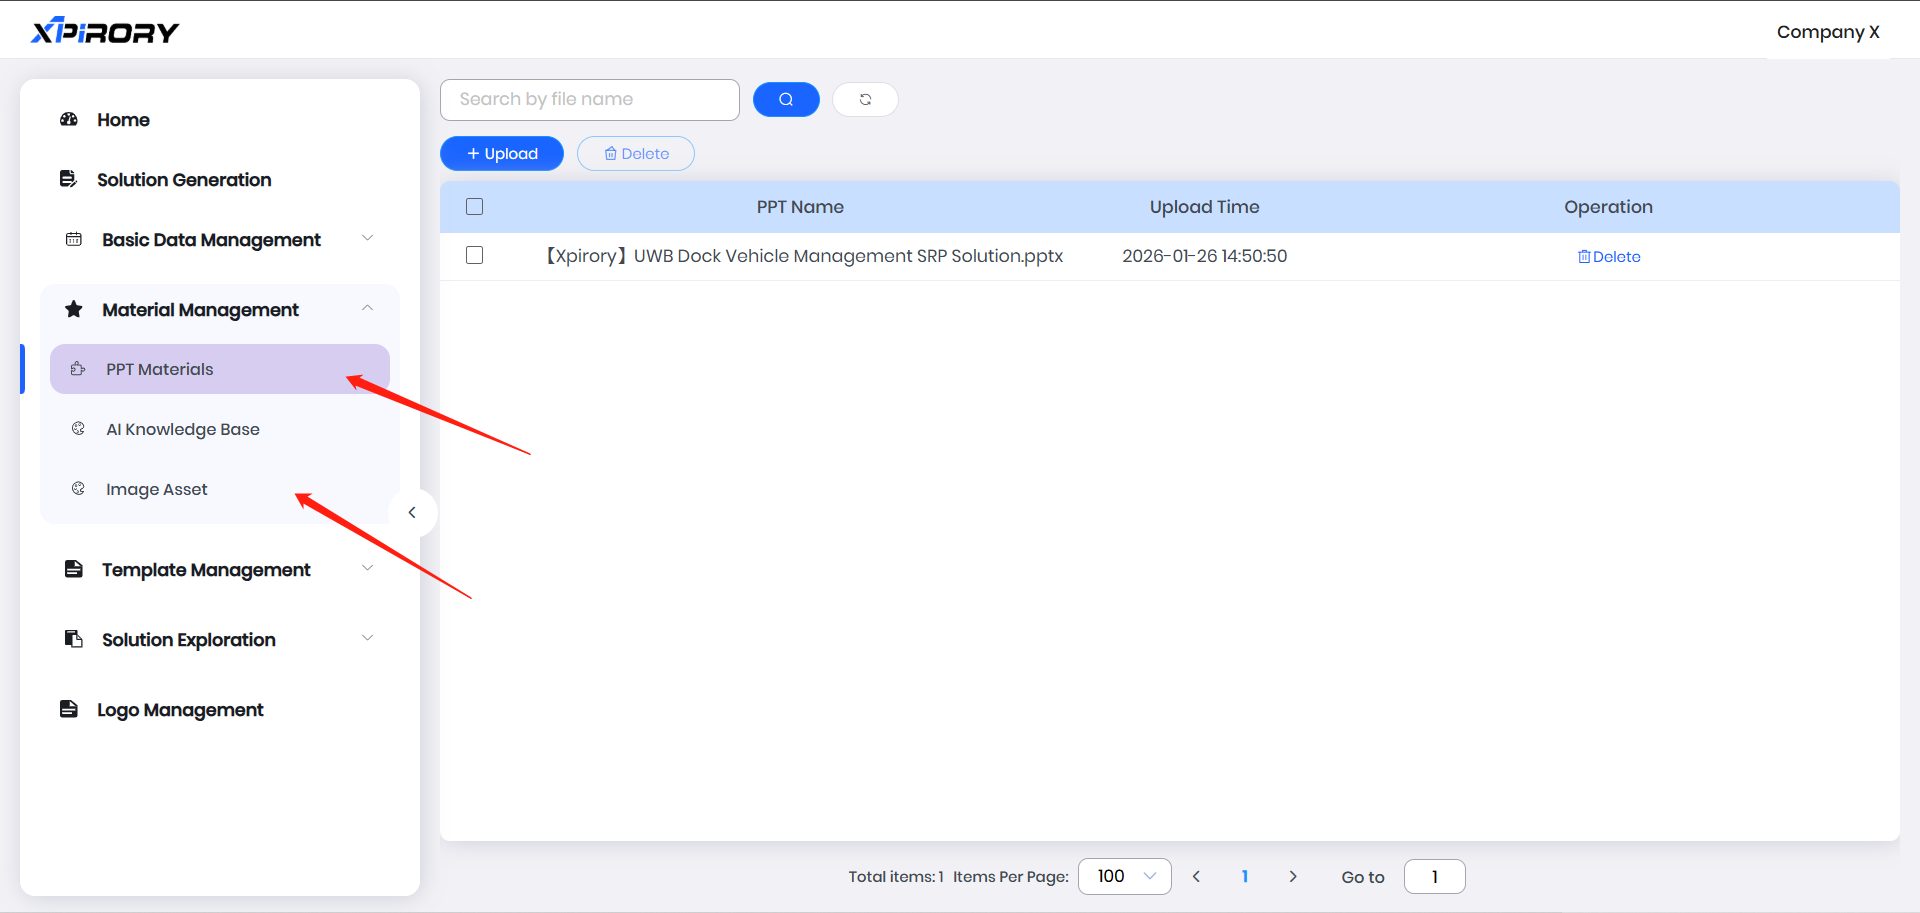
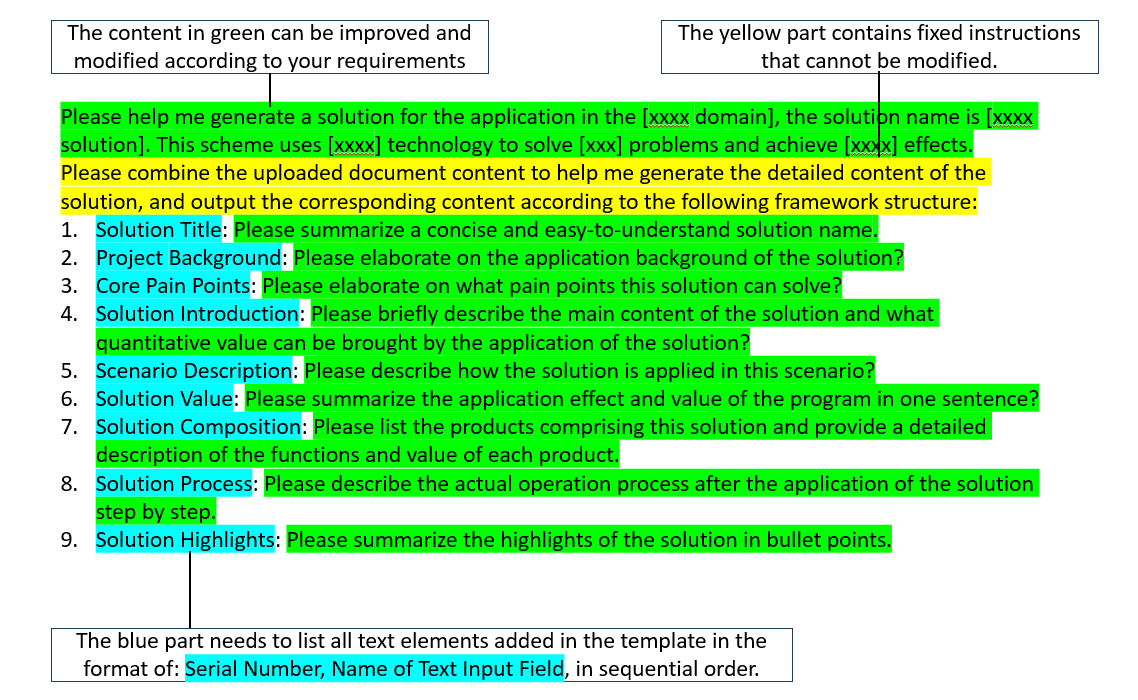
Here, prompt words serve as outline instructions and requirements for the AI. Specific writing rules are as follows:

Example:
"Please help me generate a solution applied in the [xxxx box], named [xxxx Solution]. This solution uses [xxxx] technology to solve [xxx] problems and achieve [xxxx] effects. Please generate detailed content for this solution based on the uploaded documents, and output content according to the following framework:
Solution Title: Summarize a concise and easy-to-understand solution name.
Project Background: Explain the application background of the solution in detail.
Core Pain Points: List and elaborate on the pain points the solution addresses.
Solution Overview: Briefly describe the main content of the solution and the quantifiable value it brings.
Scenario Description: Describe how the solution is applied in this scenario.
Solution Value: Summarize the application effects and value of the solution in one sentence.
Solution Components: List the products comprising the solution and detail the functions and value of each product.
Solution Process: Describe the actual operation process after applying the solution step by step.
Solution Highlights: Summarize the highlights of the solution in bullet points."
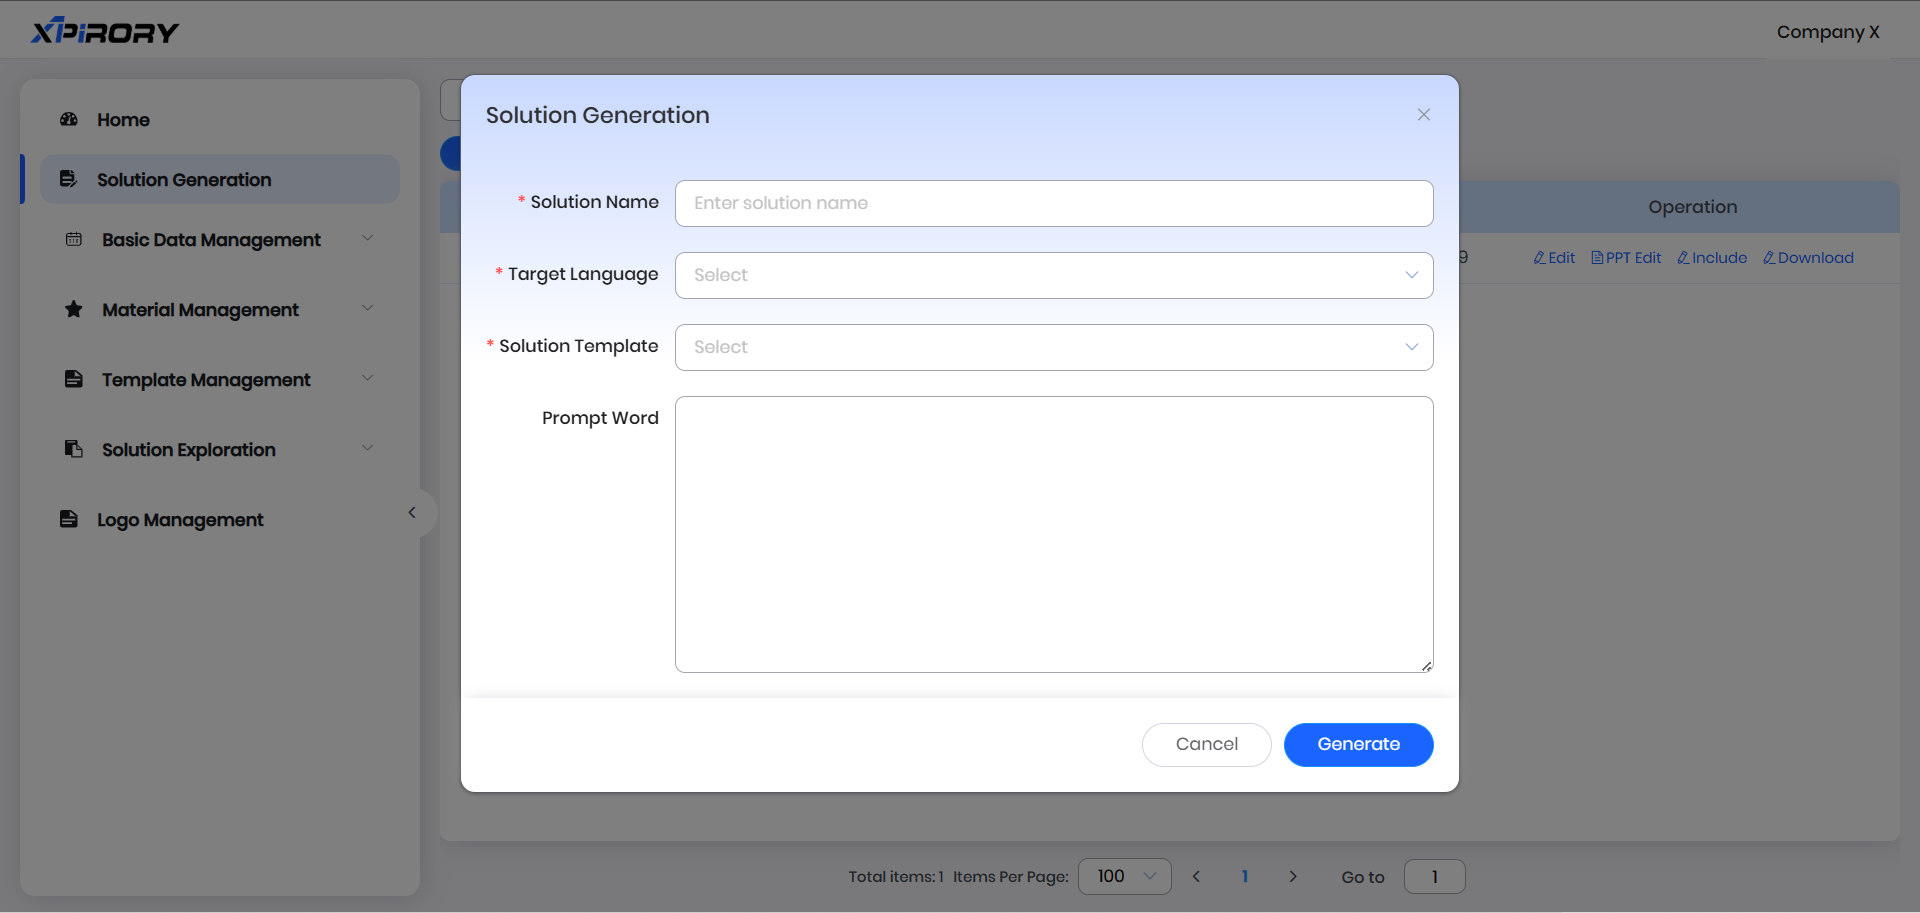
3.8.2 Solution Generation
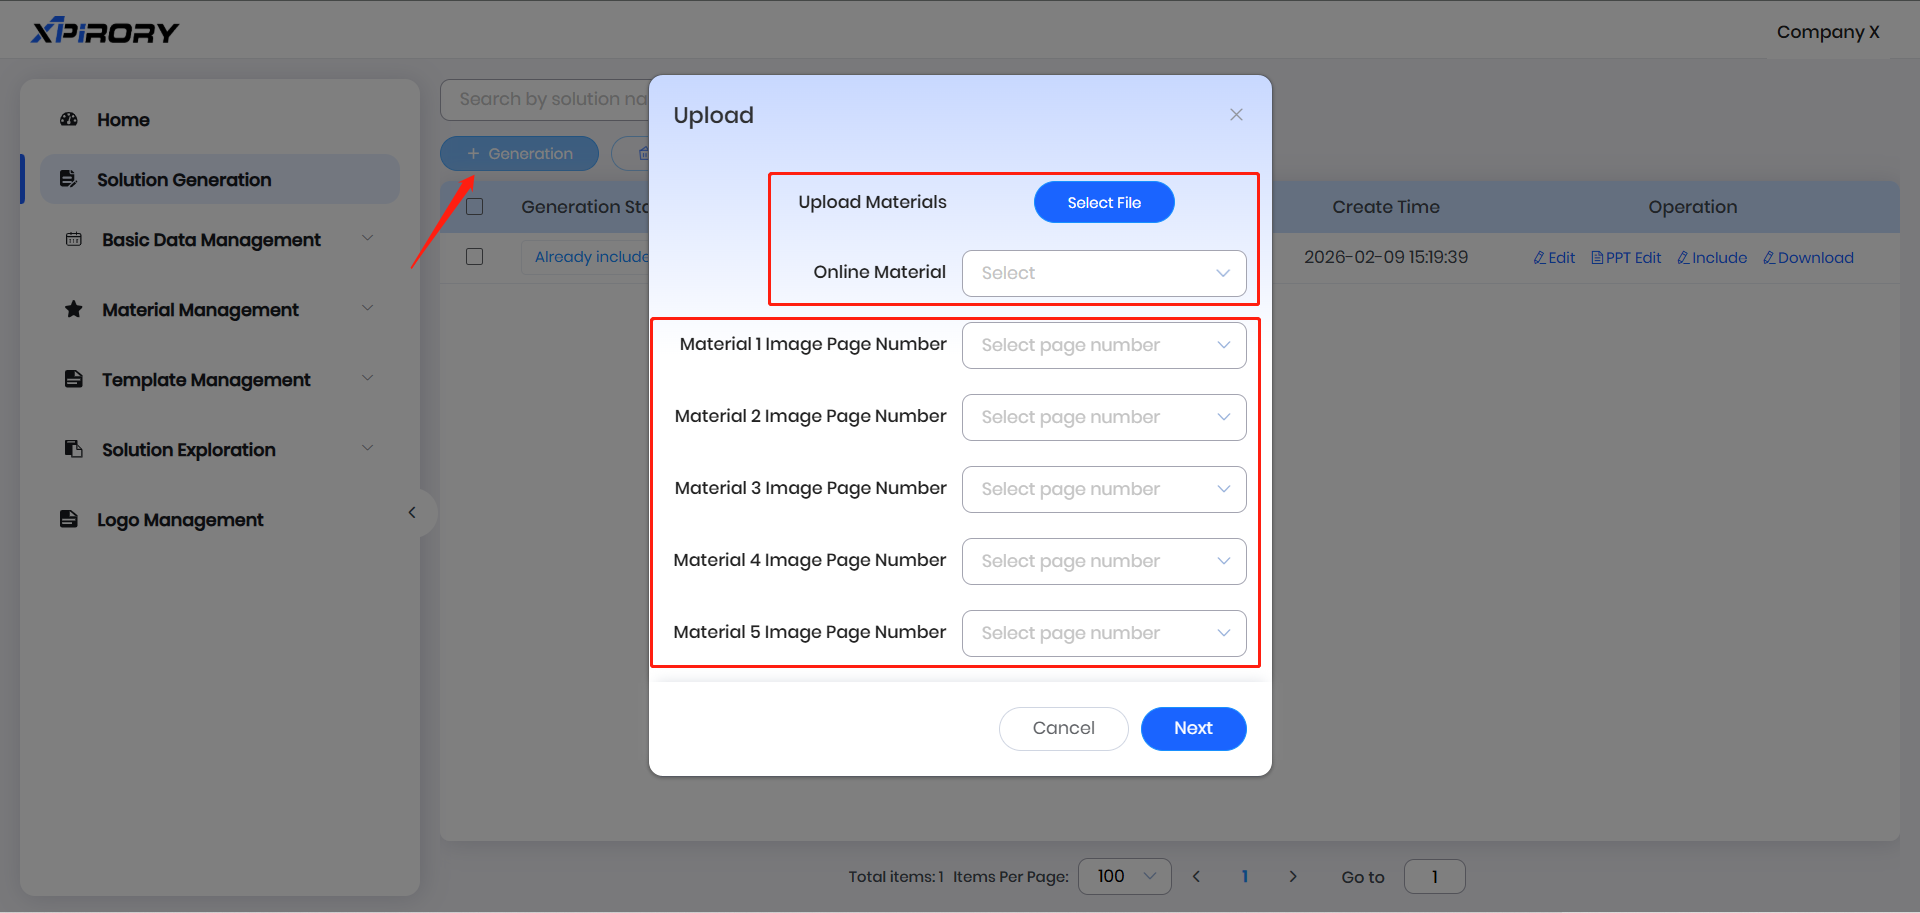
Since solution content required by enterprises is often not directly obtainable from public online knowledge, the solution generation function supports uploading reference documents to ensure generated results better meet enterprise needs.
Click the "Generation" button, then click "Select File" in the pop-up window to upload local documents (supporting up to 10 documents). Users can also click "Online Material" to select previously uploaded and saved documents from the AI knowledge base as reference materials.
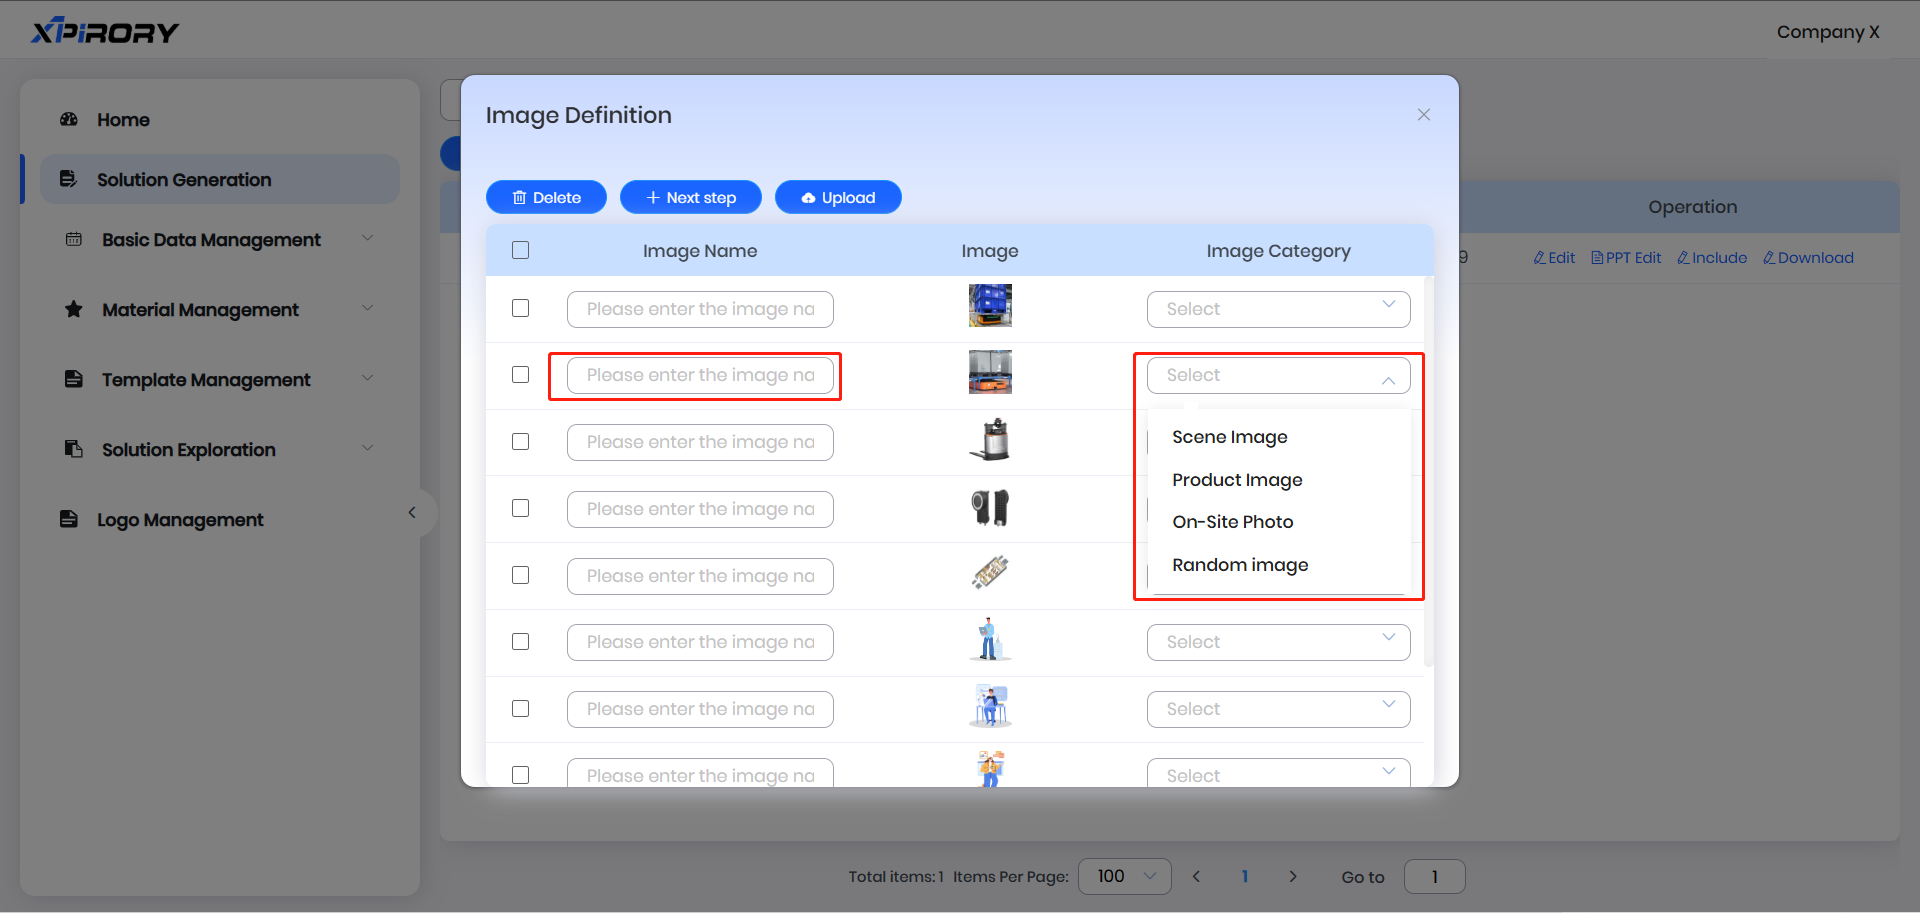
After clicking "Next," the system will parse images from all reference documents. Upon completion, in the image material definition window, select images applicable to the current solution and define their corresponding image categories. This will automatically insert images into corresponding image element frames in the PPT template. Notably, images with defined categories are also automatically saved to the image material library, so naming images facilitates library management. Images without defined categories are not saved to the library.
After defining image categories, click the "Next step" button in the upper left corner. Fill in information as prompted, select the output language and template for generation, and refine prompt word content.

Click "Generate" and after a short wait, enter the solution editing interface to further modify and improve the generated content.

Use the "Insert Element" tool under the "Plugins" tab to select existing materials for solution improvement.

Click the "Insert PPT" button to open uploaded PPT materials. Select desired pages and use "Ctrl+C" and "Ctrl+V" shortcuts to add them to the current solution.


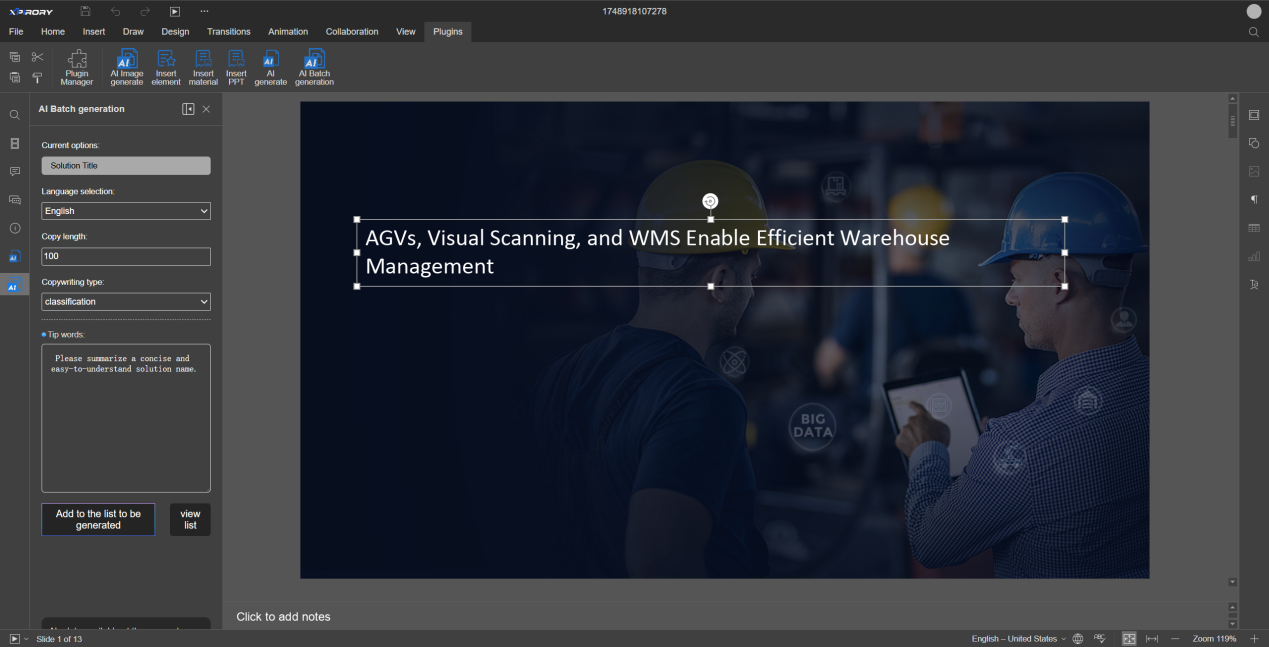
Click the "AI Generate" button to regenerate specific generated results.

For multiple regenerations, use the "AI Batch Generate" button to add multiple generation requests to a list for batch processing.
3.8.3 Basic Data Management
Completed standard solutions can be filed into industry maps via the filing function for knowledge sharing and quick learning by colleagues. Prior to filing, industry maps and pain point-related basic data must be established.
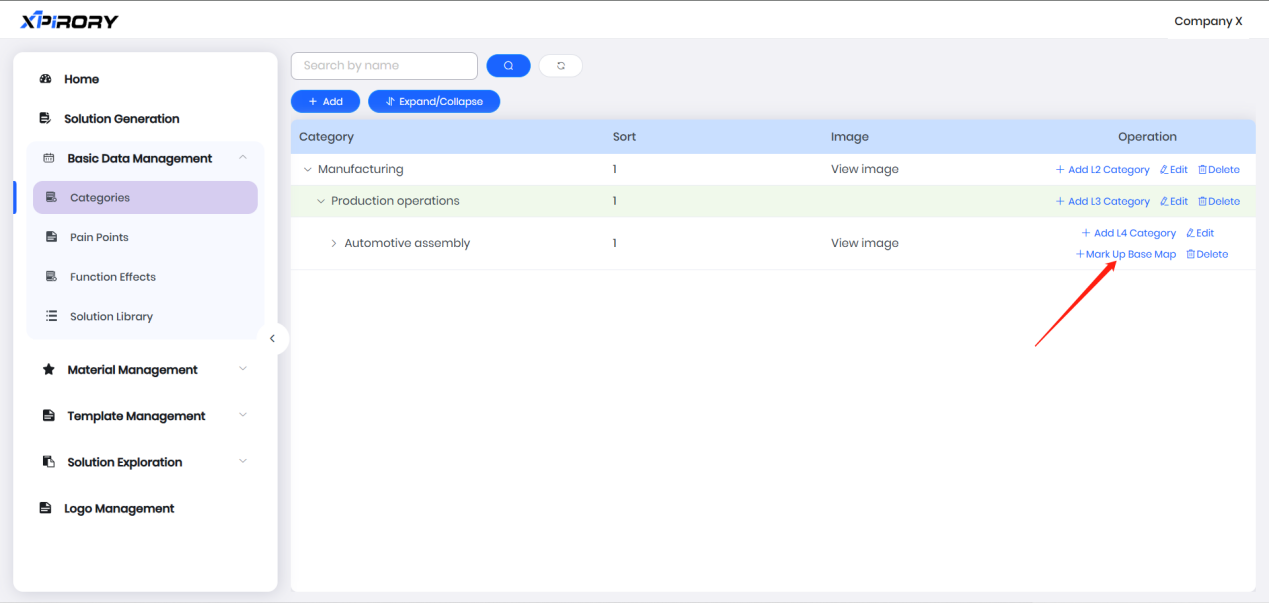
3.8.3.1 Categories
Four-tiered structures can be created in Categories to display pain points and solutions:
(1) Click "Add" to set the name, cover image, and display order of L1 Category via a pop-up window. Smaller sorting values mean higher rankings.

(2) In the operation area behind the L1 Category name, click "Add L2 Category" to set the name and order of L2 Category. Smaller sorting values mean higher rankings.


(3) Click "Add L3 Category" behind a L2 Category to add a L3 Category and upload a corresponding business panoramic image.

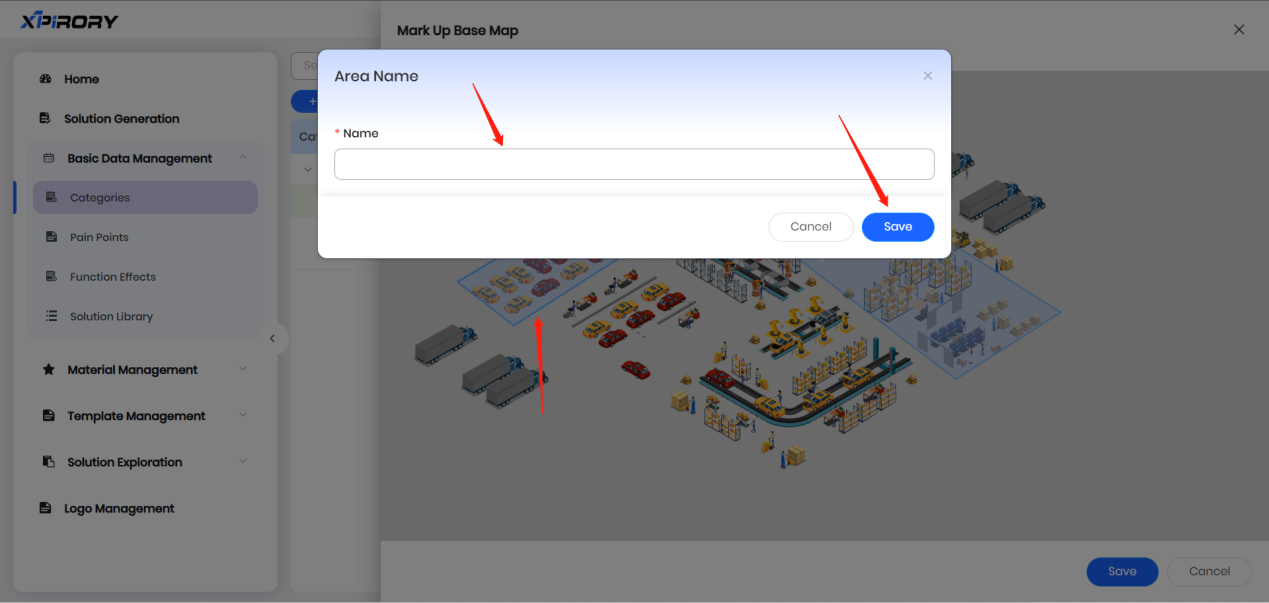
(4) After uploading the panoramic image, click "Mark Up Base Map" in the operation area behind the L3 Category name to divide L4 Categories.
(5) In the popped-up base map interface, form a closed area by continuously clicking multiple points with the mouse, then enter the region name in the pop-up window and click "Save" to complete one scenario region. Other regions are set similarly.

(6) After drawing all categories, close the base map editing window to complete the four-tiered classification.
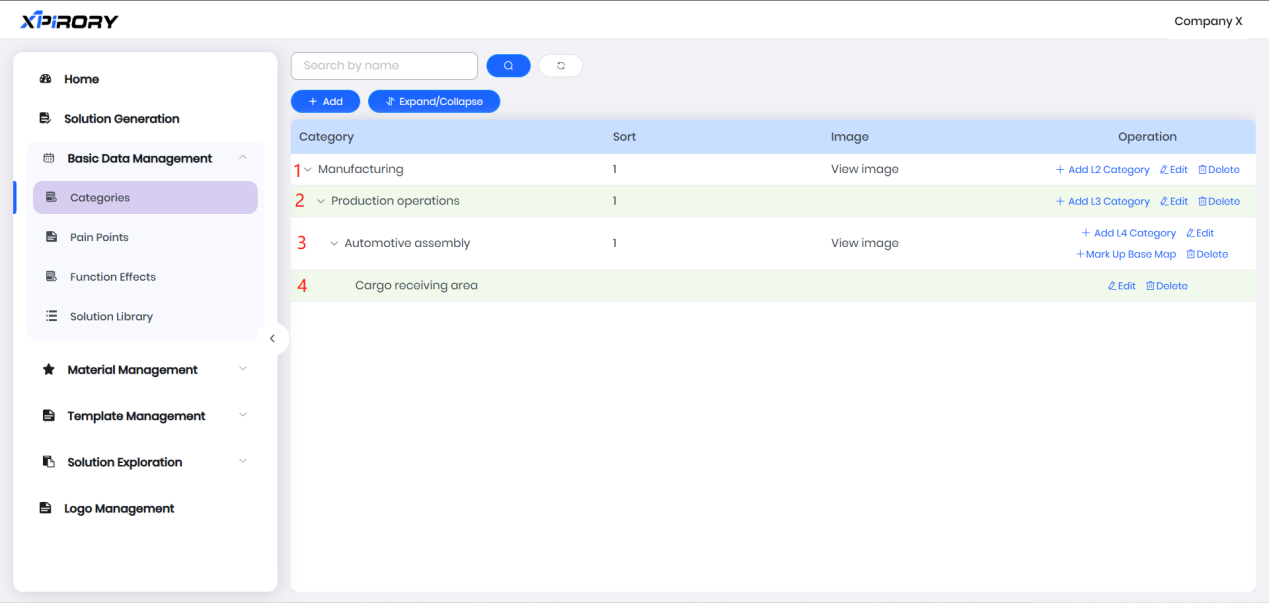
Classification methods are not fixed; users can define content for each tier independently to form a knowledge management structure suitable for their enterprise.
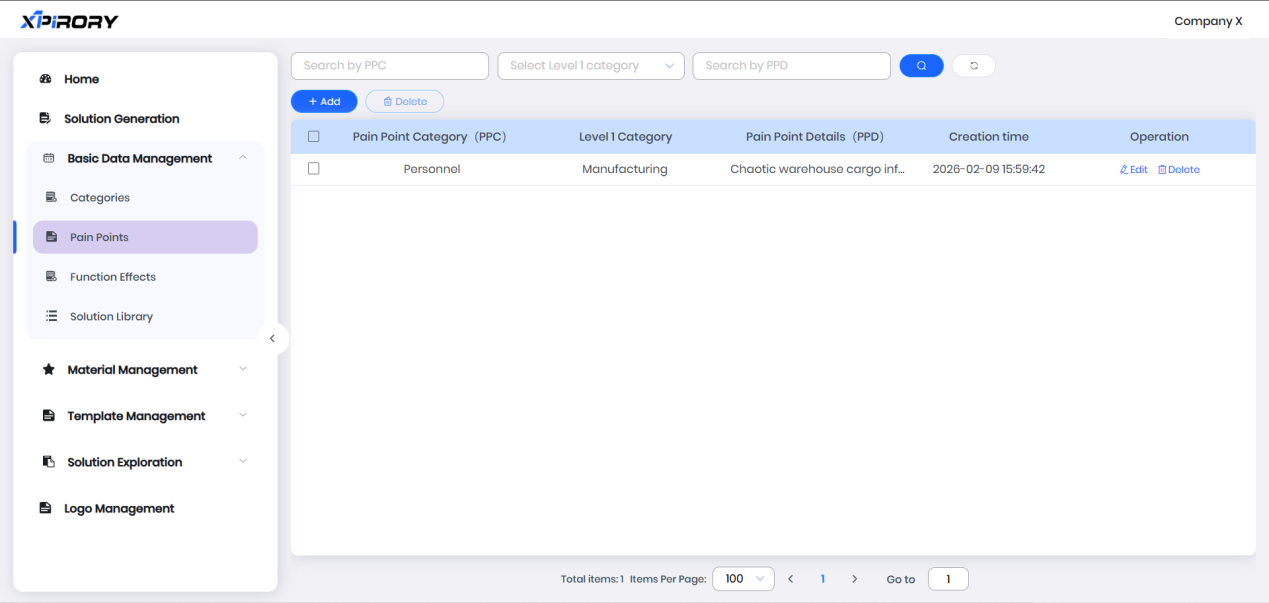
3.8.3.2 Pain Points
Pain points set in Pain Points are mainly used for subsequent binding with solutions and categories:
(1) Click the "Add" button and enter corresponding information according to prompts in the pop-up window to complete pain point setup.

(2) Filling Instructions:
L1 Category: Pain points are classified by L1 Category due to generality across similar categories.
Pain Point Category: Categories can be self-defined (e.g., by resource object categories like personnel, vehicles, equipment, facilities, goods, and venues).
Pain Point Details: Describe an objective fact in one sentence (avoid excessive length for easy display and selection).

(3) Click "Add" to complete pain point setup.
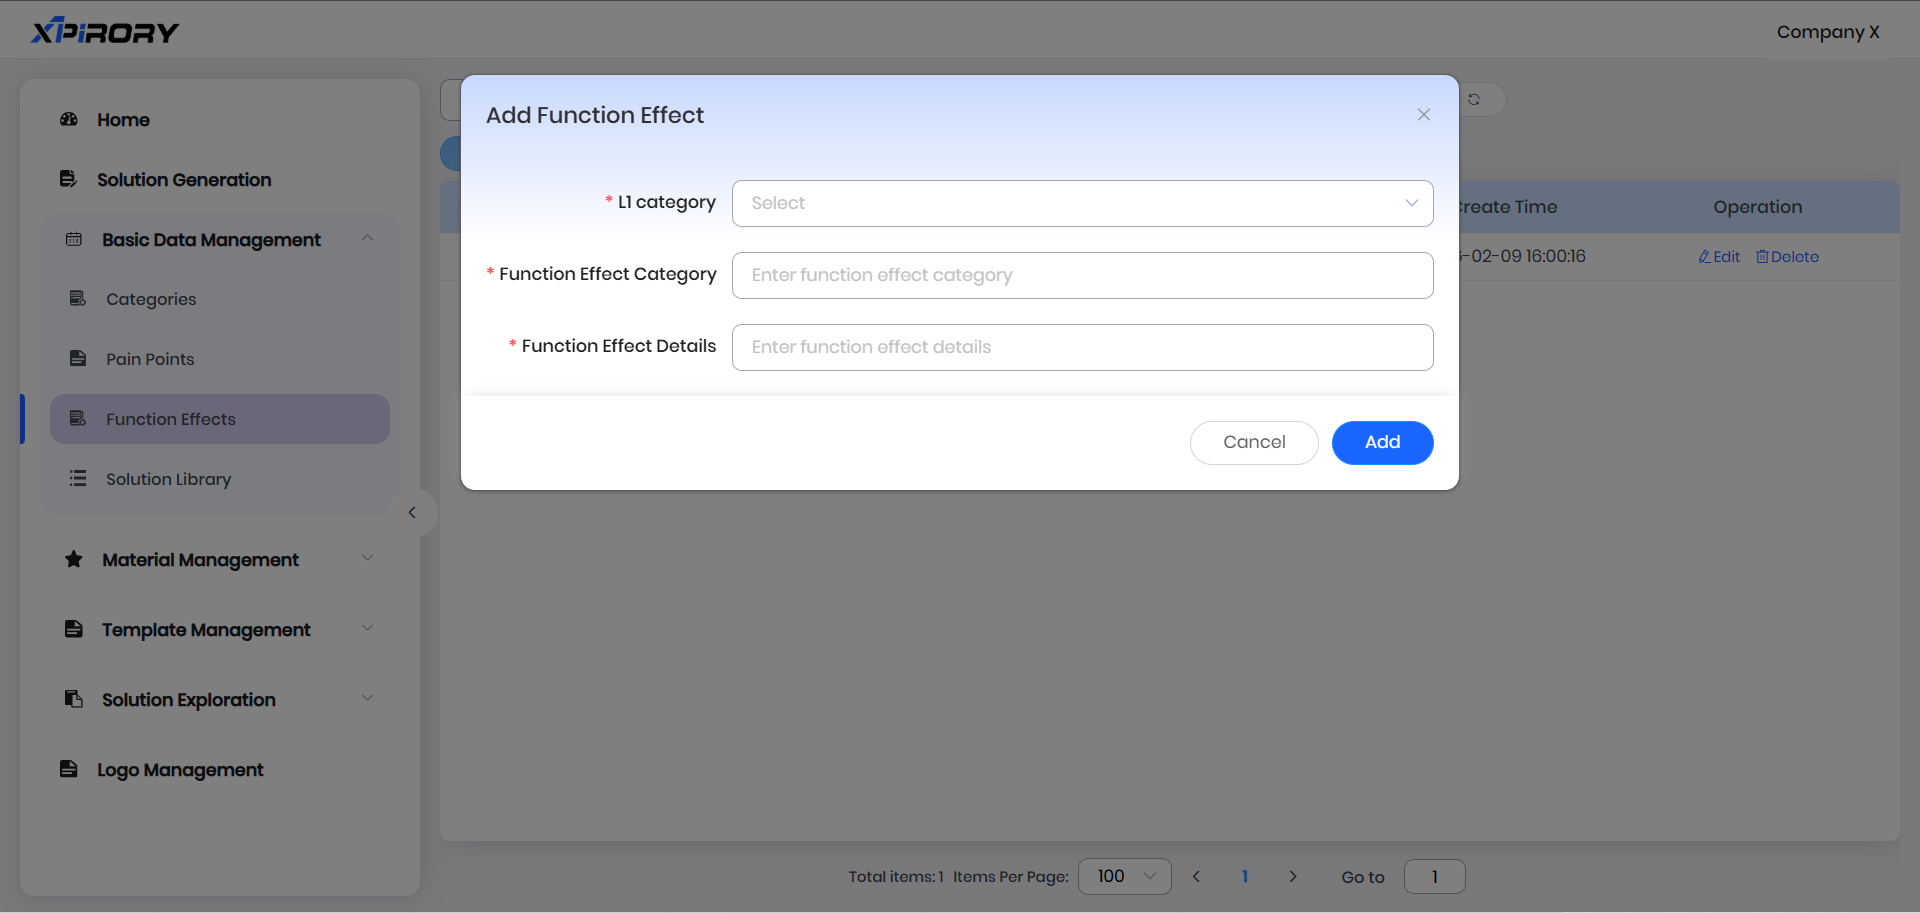
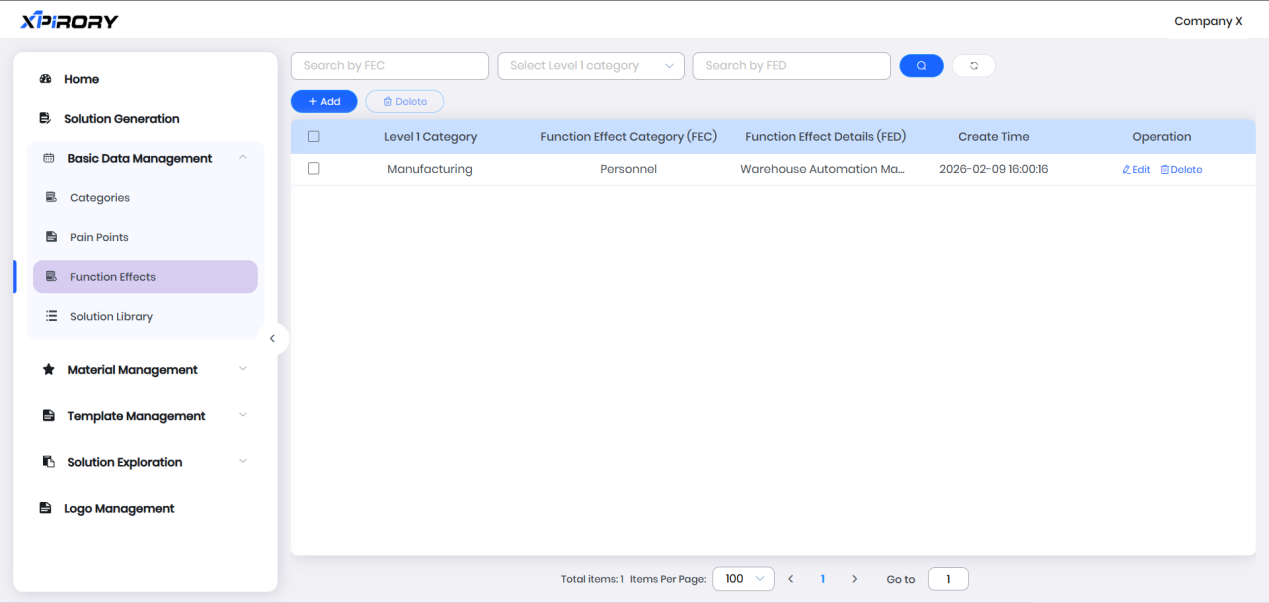
3.8.3.3 Function Effects
Function effects set in Function Effects are used for binding with solutions and categories. Since one pain point may have multiple functional solutions, function effects refer to the functions and desired outcomes for solving a pain point, enabling users to associate multiple solution types with one pain point:
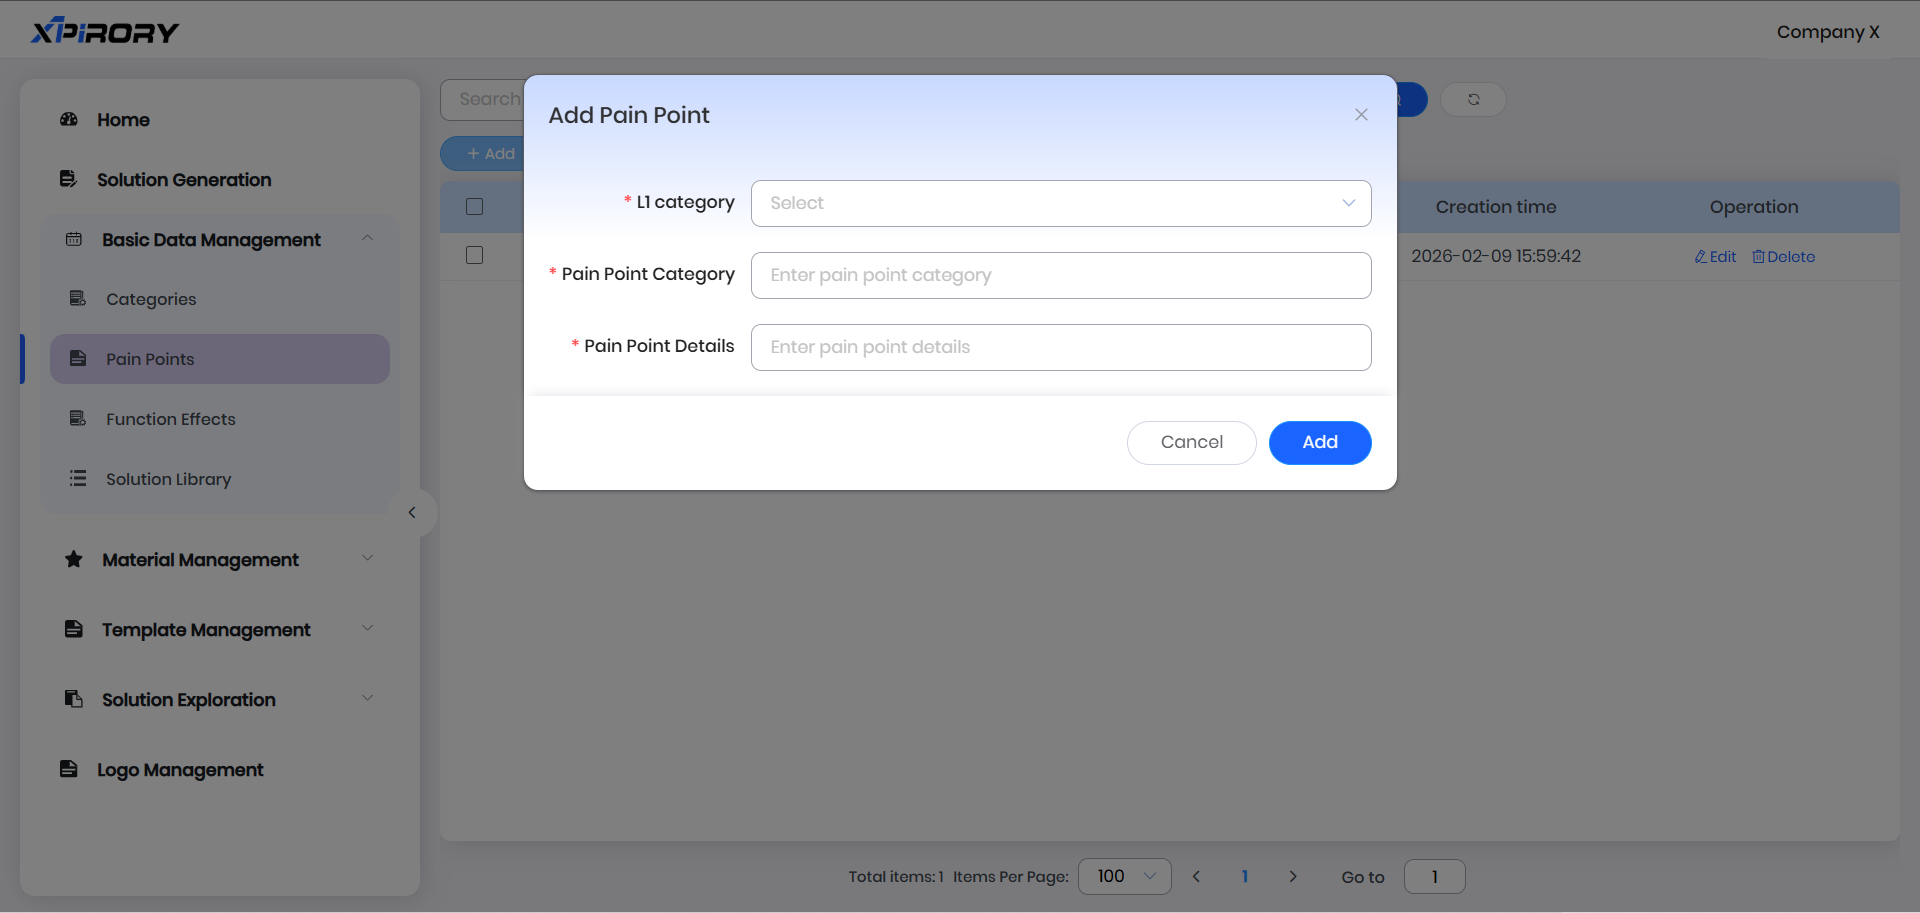
(1) Click the "Add" button and enter corresponding information according to prompts in the pop-up window to complete function effect setup.

(2) Filling Instructions:
L1 Category: Function effects are classified by L1 Category due to generality across similar industries.
Function Effect Category: Categories can be self-defined (e.g., by resource object categories like personnel, vehicles, equipment, facilities, goods, and venues).
Function Effect Details: Describe the functional outcomes of a solution in one sentence (avoid excessive length for easy display and selection).

(3) Click "Add" to complete function effect setup.
3.8.3.4 Solution Library
After setting up categories management, pain point management, and function effect management, solutions can be filed in two ways: through Solution Library or directly from the solution generation interface:
(1) Click "Add" to set solution content via a pop-up window.
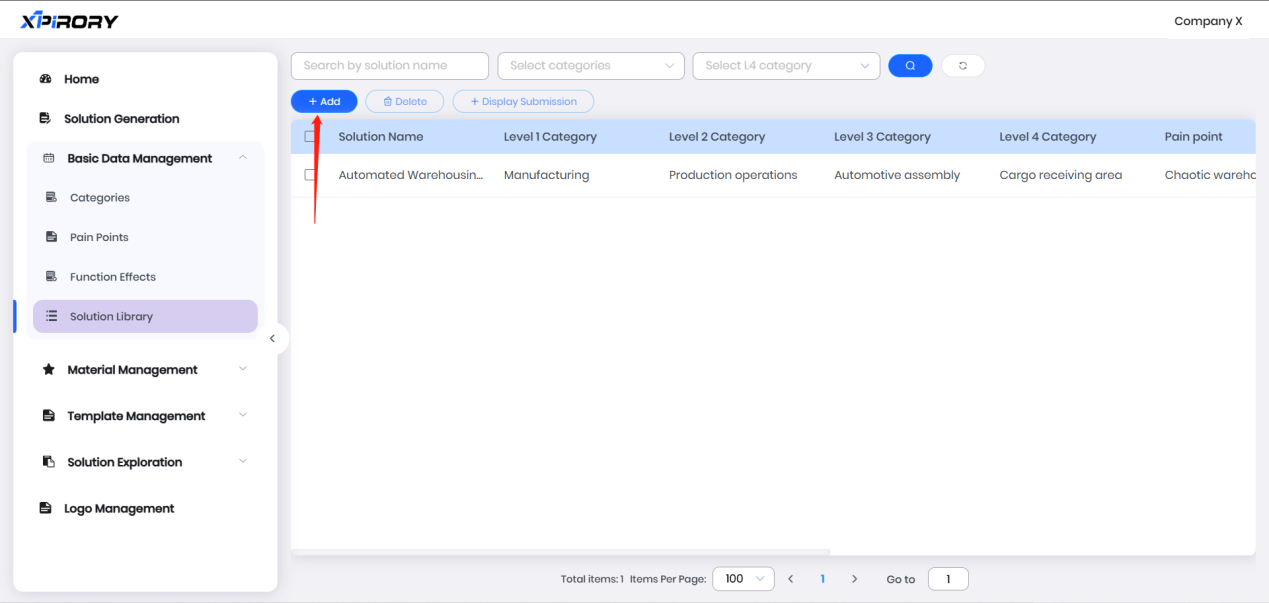
(2) Select the Categories and L4 Category to which the solution belongs as prompted.
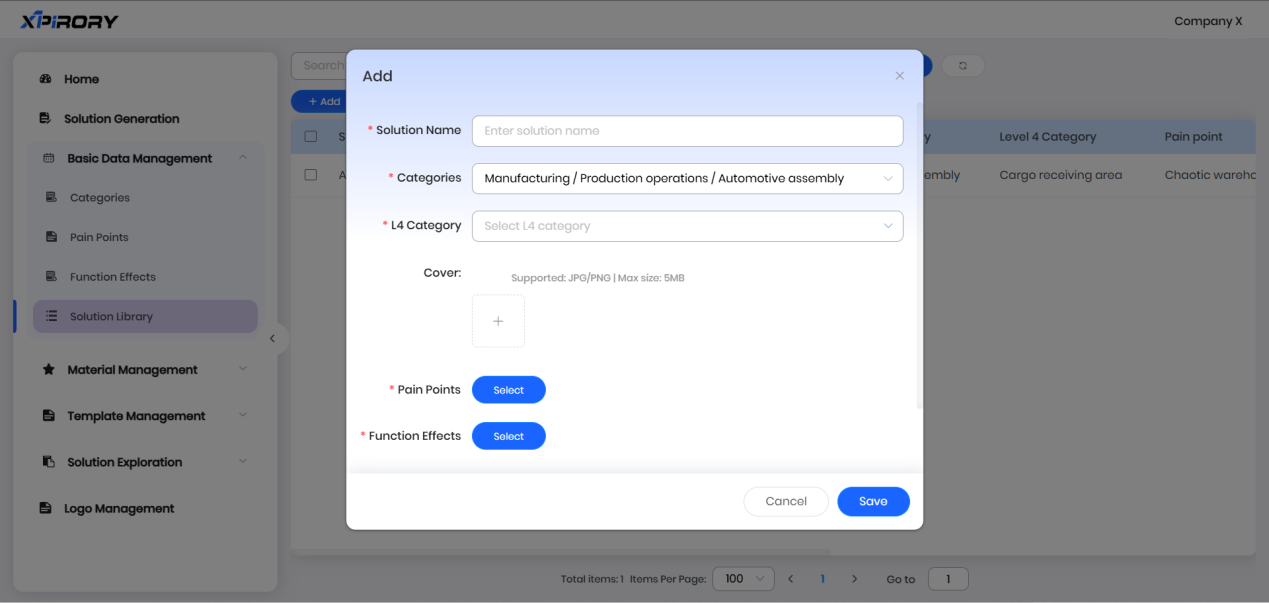
(3) Upload the solution's cover image.
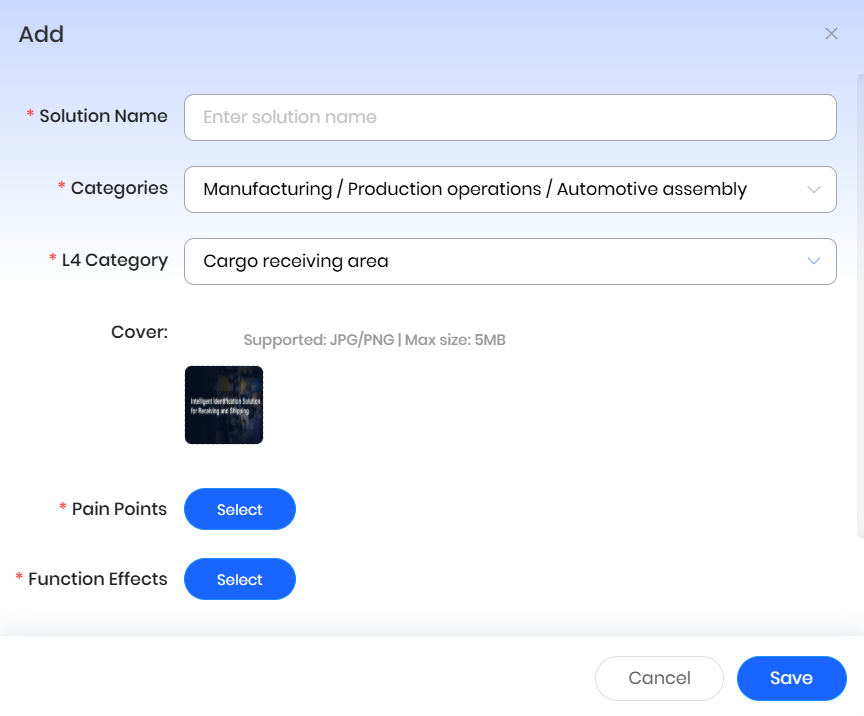
(4) Select Pain Points and Function Effects to bind with the solution, then click "Save" to complete association.
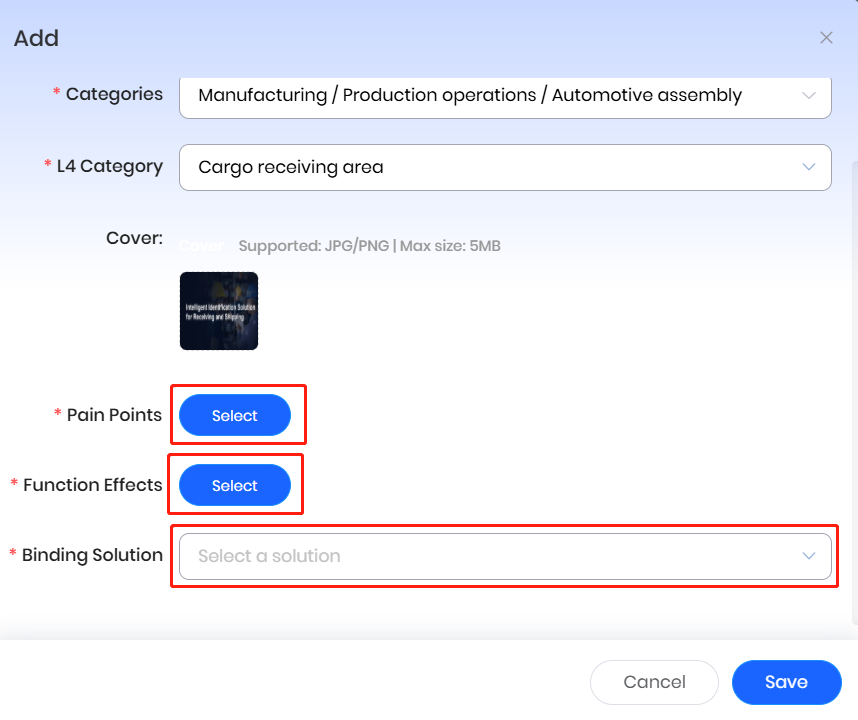
(5) Alternatively, click the "Include" button behind a solution in the generation list, and select/bind items in the pop-up window to achieve the same filing effect.
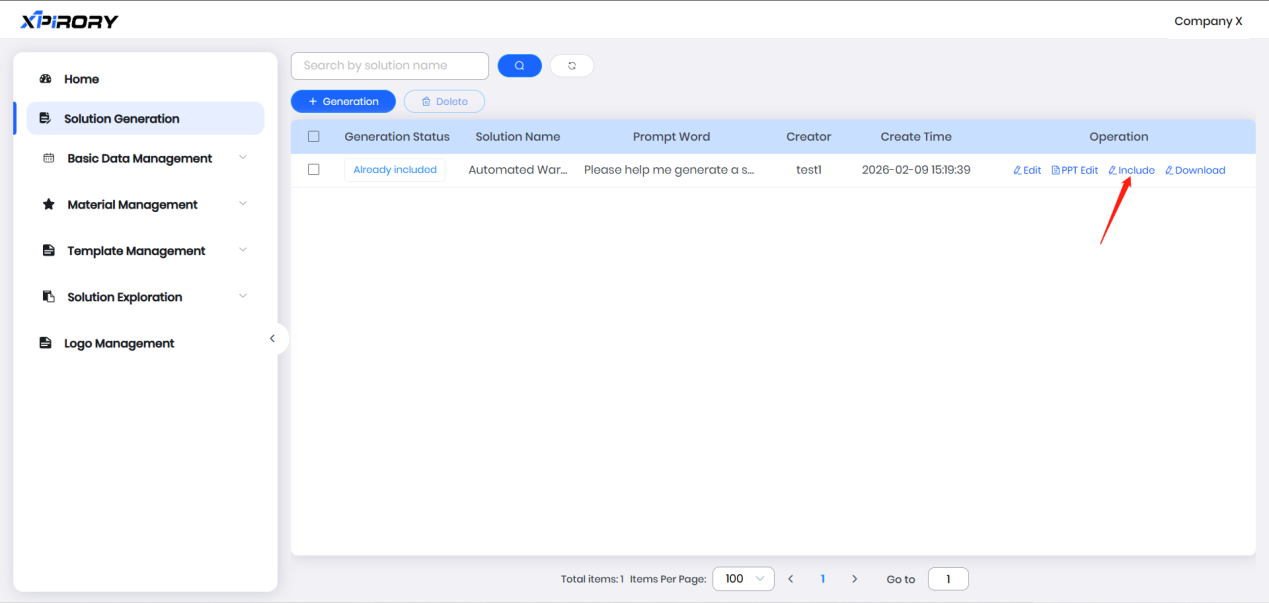

Filed solutions are synchronized to other internal users via solution exploration, enabling knowledge sharing and reducing repetitive work on similar industry solutions.
3.8.4 Solution Exploration
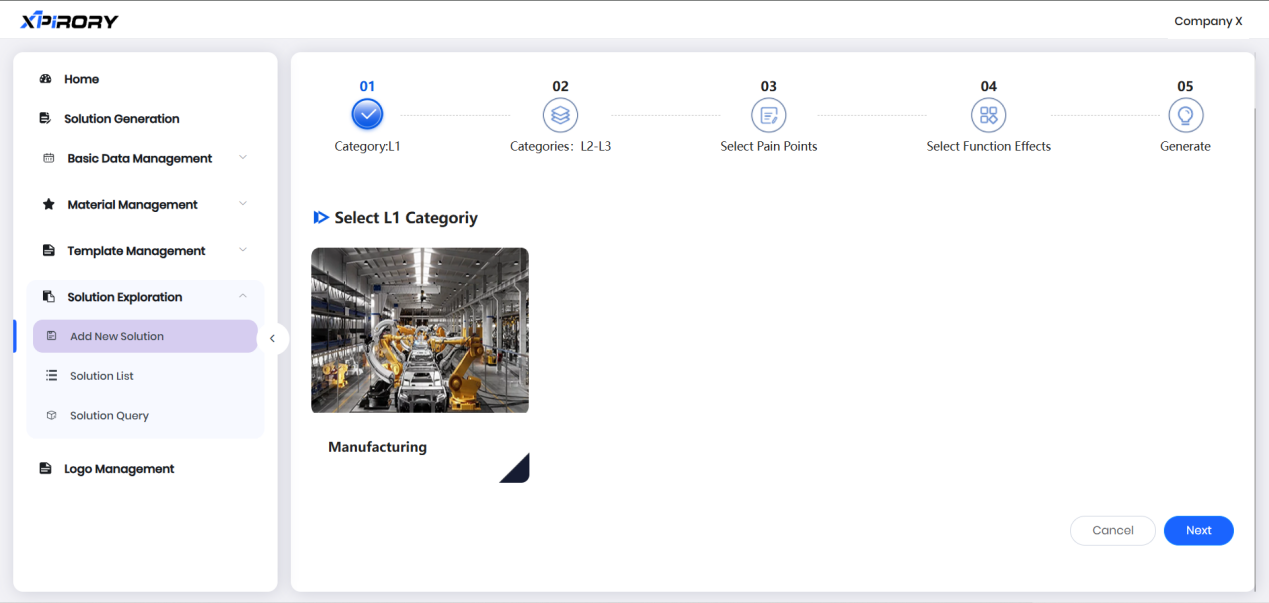
Solution Exploration helps sales personnel quickly understand existing categories, pain points, and corresponding solutions across industries. By making simple modifications, they can output solutions to different customers and accelerate demand confirmation:
(1) In the Solution Exploration interface, progressively select the target customer's categories, pain points, and function effects to view corresponding solutions.

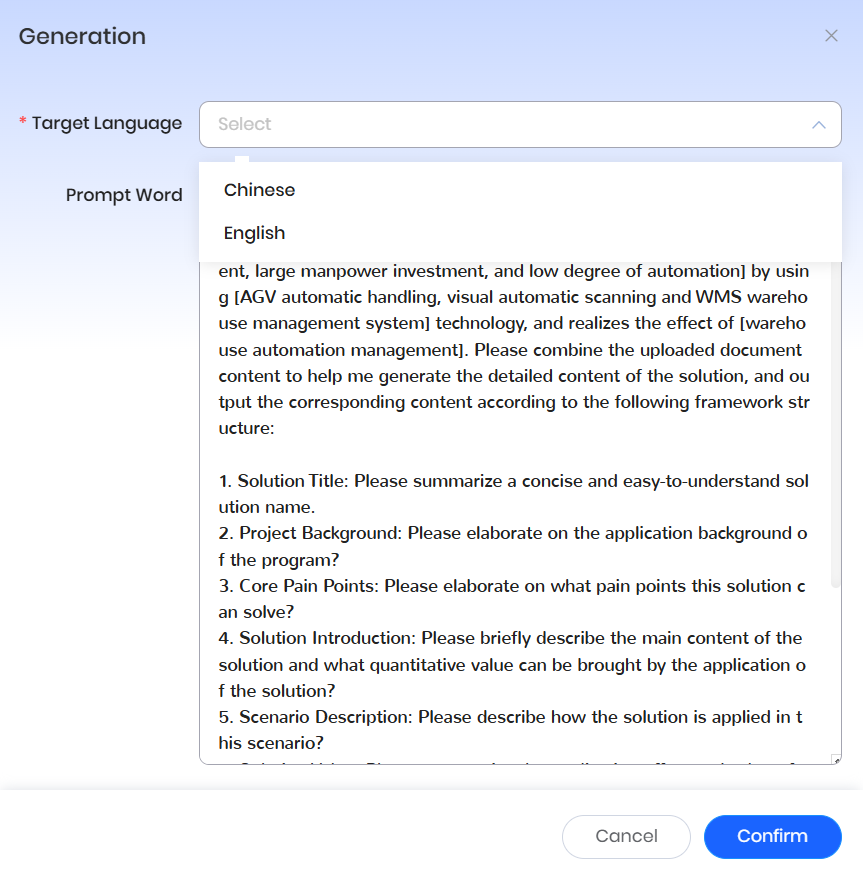
(2) Click "Generation" under the solution cover, select the target language in the pop-up window, modify variable parts of the prompt words, and click "Confirm." The AI will fine-tune the text content according to prompts to generate a new solution. If no modifications are needed, directly click "Confirm" to view the standard solution.
(3) In the new window, manually edit and adjust solution content, and use the "Download As" function under the "File" tab to save the solution locally. Adjusted solutions can be rechecked in the solution list menu.

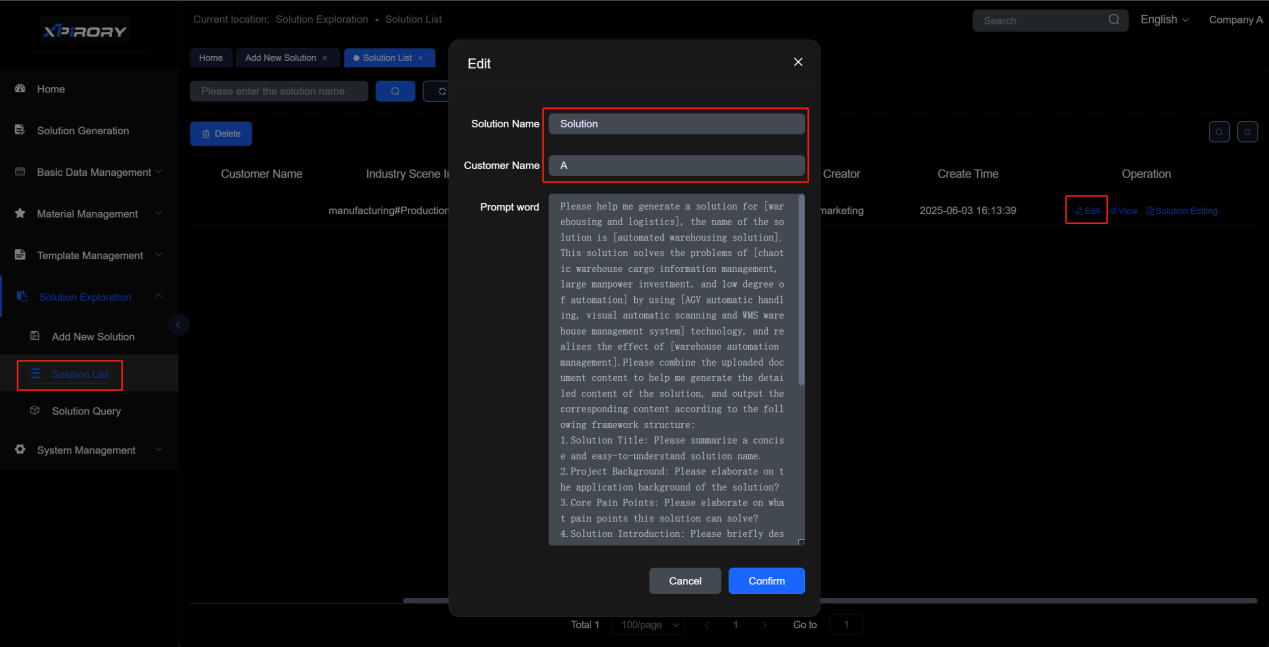
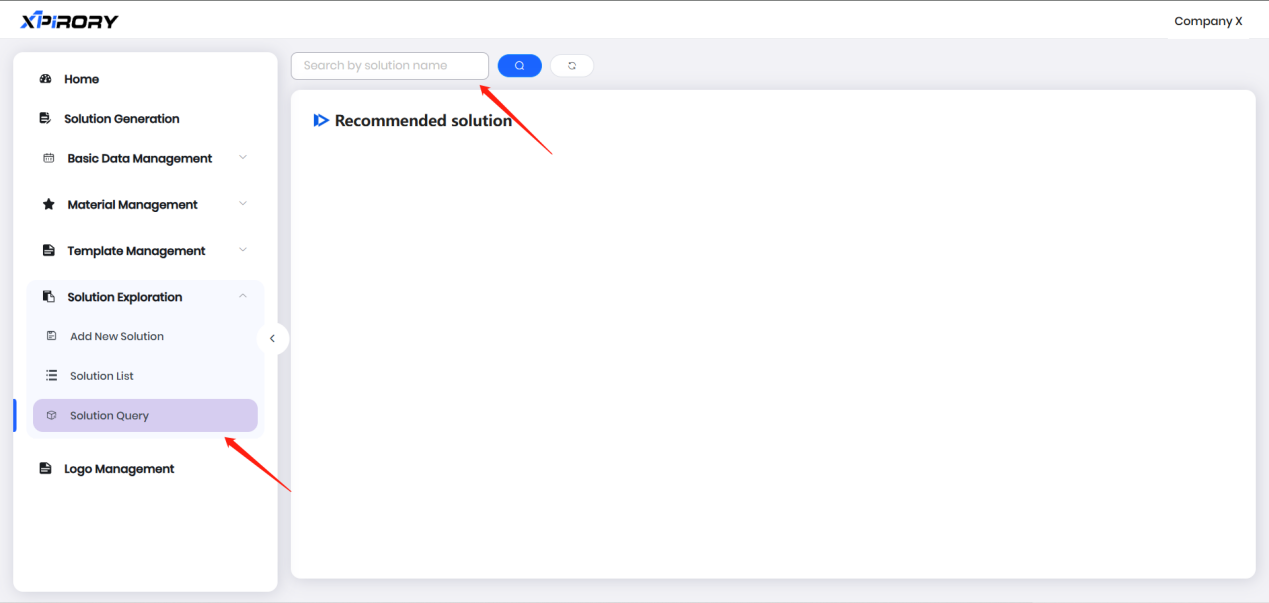
(4) For direct searches by solution name, use the "Solution Query" function to quickly locate filed solutions.
3.8.5 Material Management
Materials for the "Insert Material" and "Insert PPT" tools in the solution editing page are maintained under the Material Management menu.


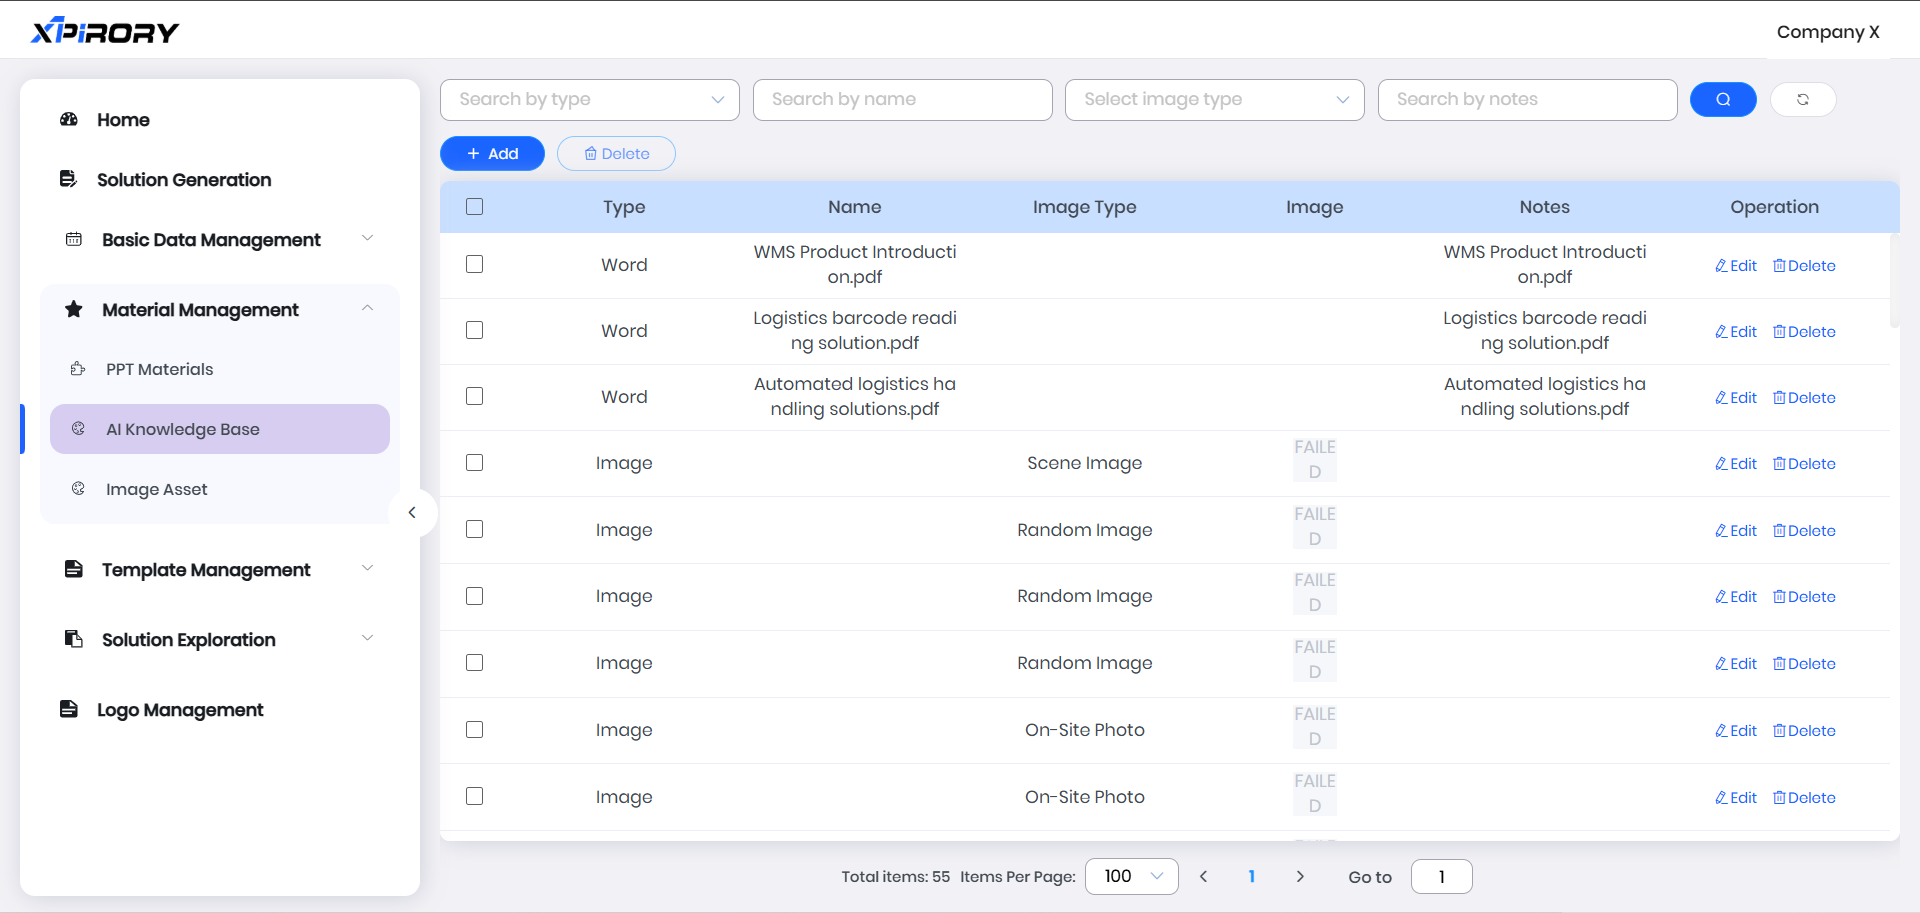
Documents and images maintained in the AI knowledge base are automatically saved from reference documents uploaded during solution generation and images parsed/used from those documents.
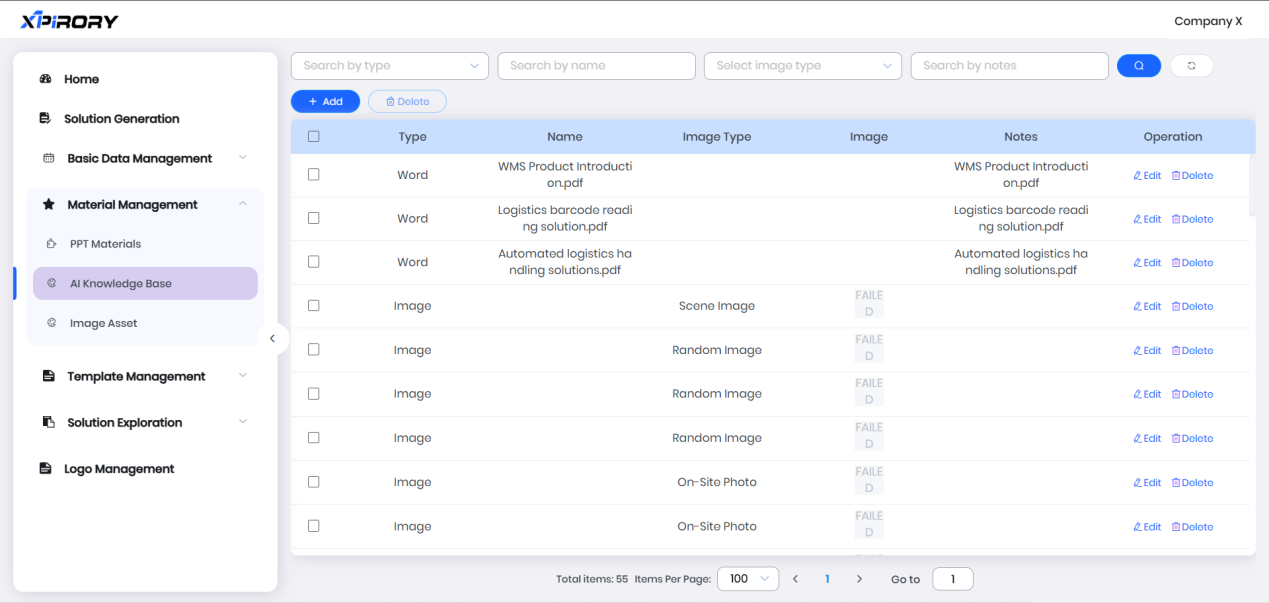
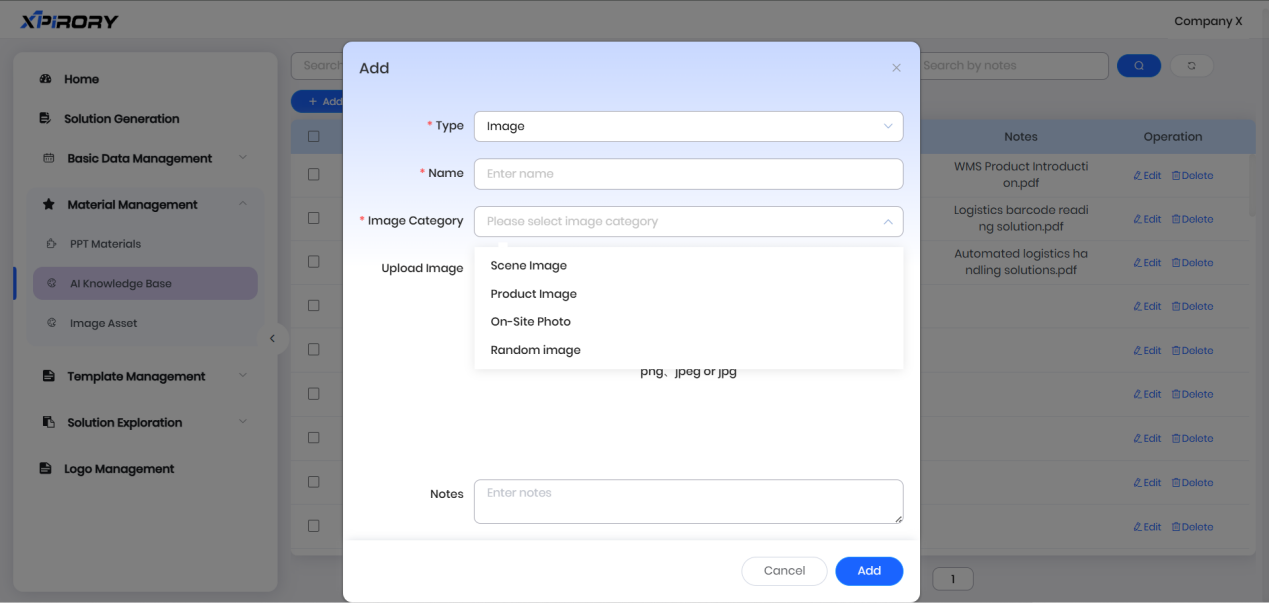
Users can also pre-upload documents via the "Add" button in AI knowledge base management for direct selection via the "Online Solutions" dropdown during solution generation as reference materials.

3.9 Demo & Training
Function Overview:
The Demo & Training is a live Demo practice site with remote real-time control capabilities, covering numerous digital application scenarios for on-site operation management. Users can remotely control multi-angle cameras and physical objects (personnel, vehicles, machines, materials, venues, equipment) in real time, fully experiencing how smart hardware products digitally empower on-site resource elements and improve management processes. This intuitively demonstrates the functional characteristics of IoT and other smart hardware, enabling quick verification and demonstration of solution applications anytime, anywhere, significantly enhancing Demo efficiency and reducing demonstration costs for users.
Operation Steps:
Coming soon, stay tuned.
3.10 Company Profile
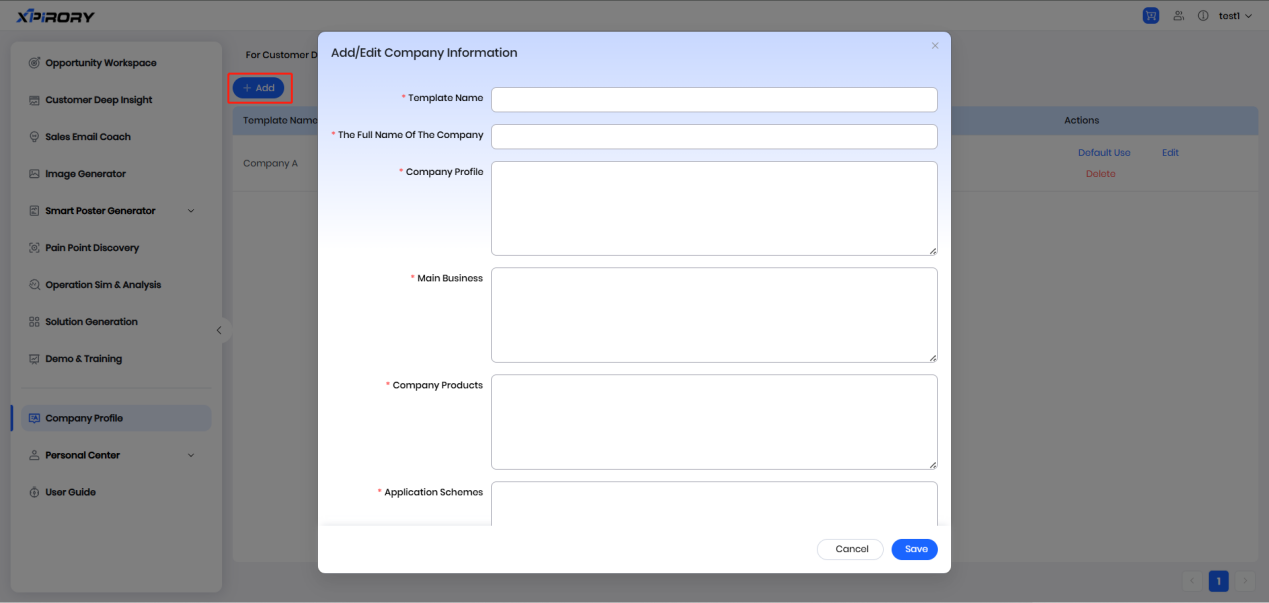
3.10.1 For Customer Deep Insight
Function Overview:
The For Customer Deep Insight mainly assists the Customer Deep Insight functions in maintaining and quickly inserting commonly used enterprise information. Under this function, users can pre-set their own enterprise information and planned promotion business details, and can also edit or delete information at any time. In addition, information saved via the " Save Company Profile " button in the Customer Deep Insight interfaces will also be synchronously saved to the information list under the Company Profile menu.
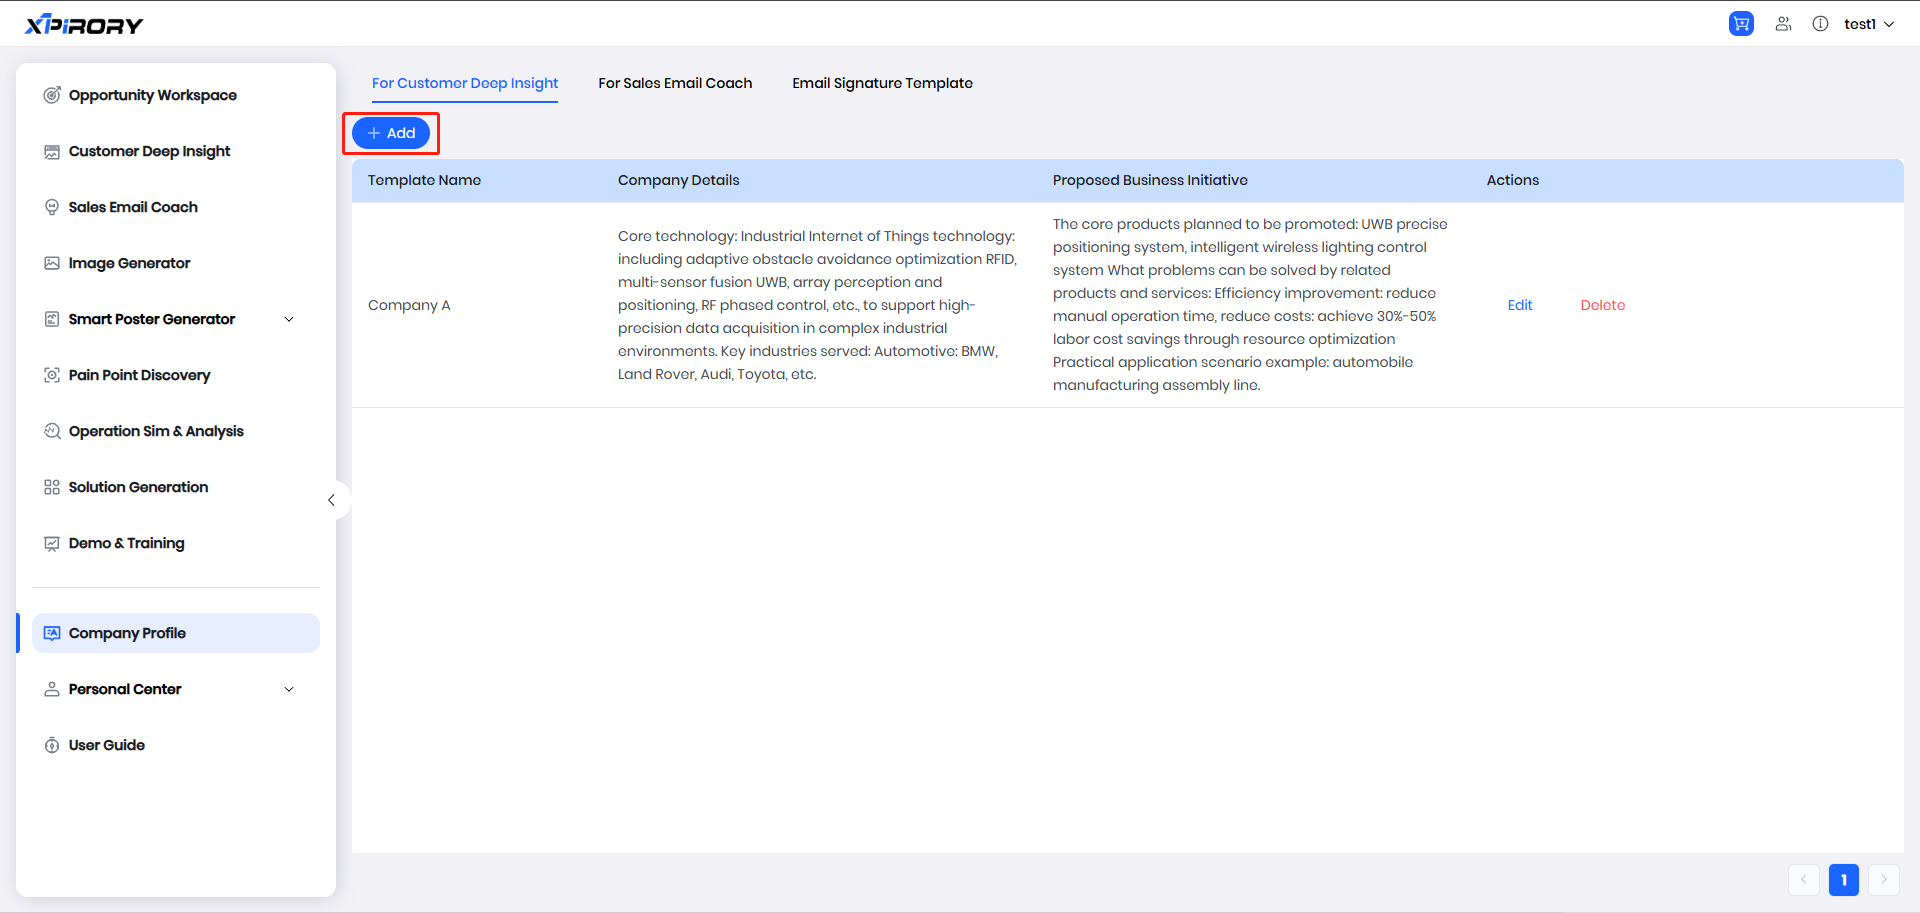
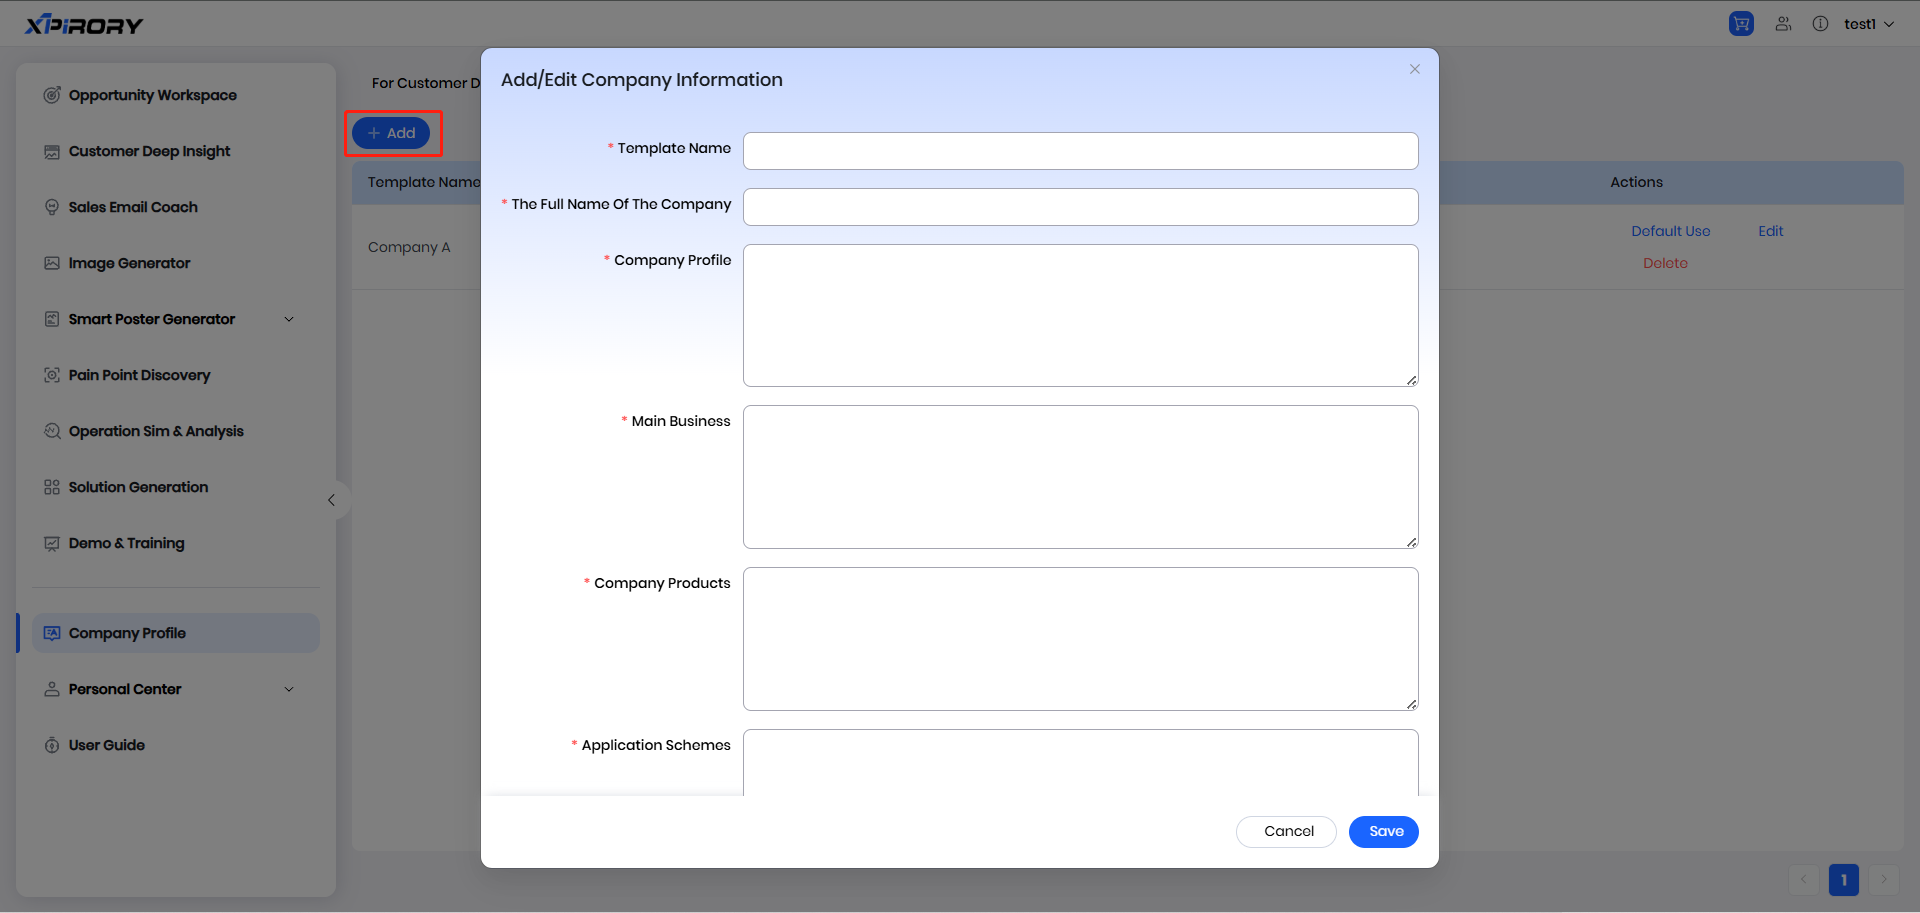
Operation Steps:
(1) Click "Add" to open the enterprise information filling interface.

(2) After filling in relevant information in detail according to the filling prompts, click the "Save" button to complete the saving of this template information.
(3) Click the "Edit" or "Delete" button behind a template information entry to edit or delete the information.

3.10.2 For Sales Email Coach
Operation Steps:
(1) In For Sales Email Coach, add multiple sets of enterprise information and email signatures to facilitate automatic import into input fields when using the Sales Email Coach, reducing repetitive information entry.
(2) Click "Add," fill in relevant content one by one in the pop-up window, and click "Save" to complete the addition of a set of enterprise information.
(3) If there are multiple sets of enterprise background information, click the "Default Use" button behind the group to set it as the default option. The Sales Email Coach will automatically populate the default enterprise background information.

3.10.3 Email Signature Template
Email signature settings and usage are exactly the same as enterprise information and will not be repeated here.
